
PowerShell
Overview
The PowerShell connector enables your AI Colleagues to integrate with your organization's Microsoft 365 and Exchange Online environments, facilitating automated IT administration tasks, script execution, and mailbox management workflows.
PowerShell is a cross-platform task automation solution comprising a command-line shell and a configuration management framework. This connector can configure Microsoft Exchange use cases such as creating Distribution Lists, managing Shared Mailboxes, managing user access permissions, and executing custom automation scripts.
API Details
Leena AI integrates with Microsoft Exchange Online by executing Exchange Online PowerShell cmdlets remotely through the ExchangeOnlineManagement module. The connector authenticates using app-only (certificate-based) authentication (CBA) — Microsoft's recommended method for unattended automation, in which no username or password is ever stored.
| Item | Value |
|---|---|
| Execution mechanism | Exchange Online PowerShell remoting (ExchangeOnlineManagement v3.0.0+) |
| Authentication | App-only / certificate-based authentication (X.509 certificate + Exchange.ManageAsApp) |
| Authorization | Determined by the Microsoft Entra directory role assigned to the application |
| Connect cmdlet | Connect-ExchangeOnline -Certificate <cert> -AppId <clientId> -Organization <tenant>.onmicrosoft.com |
Documentation links:
- App-only authentication in Exchange Online PowerShell
- Install and update the Exchange Online PowerShell module
Certificate, not client secret
Connect-ExchangeOnlinedoes not support client secrets for app-only authentication. Only certificate-based authentication (and Azure managed identities) are supported. If your tenant was previously configured with a client secret and Microsoft Graph permissions, that credential cannot run any of the actions on this page and must be replaced by the certificate setup below.
Setup
Setup is performed once by a Microsoft 365 administrator and consists of five steps in Microsoft Entra ID, followed by adding the connection in Leena AI.
- Step 1 – Register an application in Microsoft Entra ID
- Step 2 – Assign the
Exchange.ManageAsAppAPI permission and grant admin consent - Step 3 – Generate a certificate
- Step 4 – Attach the certificate to the application
- Step 5 – Assign a directory role to the application
Prerequisites
Before setting up the PowerShell connector, ensure you have:
- A Microsoft 365 administrator account that can register applications and assign roles (for example, Global Administrator or equivalent delegated permissions)
- Administrator access to the Microsoft Entra admin center (formerly Azure Active Directory)
- Access to create App Registrations in Microsoft Entra ID
- Permission to grant admin consent for API permissions
- The Exchange Online PowerShell module (
ExchangeOnlineManagement) version 3.0.0 or later on the machine used for testing - Your tenant's primary
.onmicrosoft.comdomain (for example,contoso.onmicrosoft.com). Find it in the Microsoft 365 admin center under Settings > Domains - A Windows machine with an elevated PowerShell session for generating the certificate
- Access to your Leena AI workspace with connector management permissions
Get credentials
Step 1 – Register the application in Microsoft Entra ID
-
Open the Azure portal at https://portal.azure.com and sign in as an administrator. (The Microsoft Entra admin center at https://entra.microsoft.com reaches the same blades via Identity > Applications > App registrations; the screenshots below are from the Azure portal.)
-
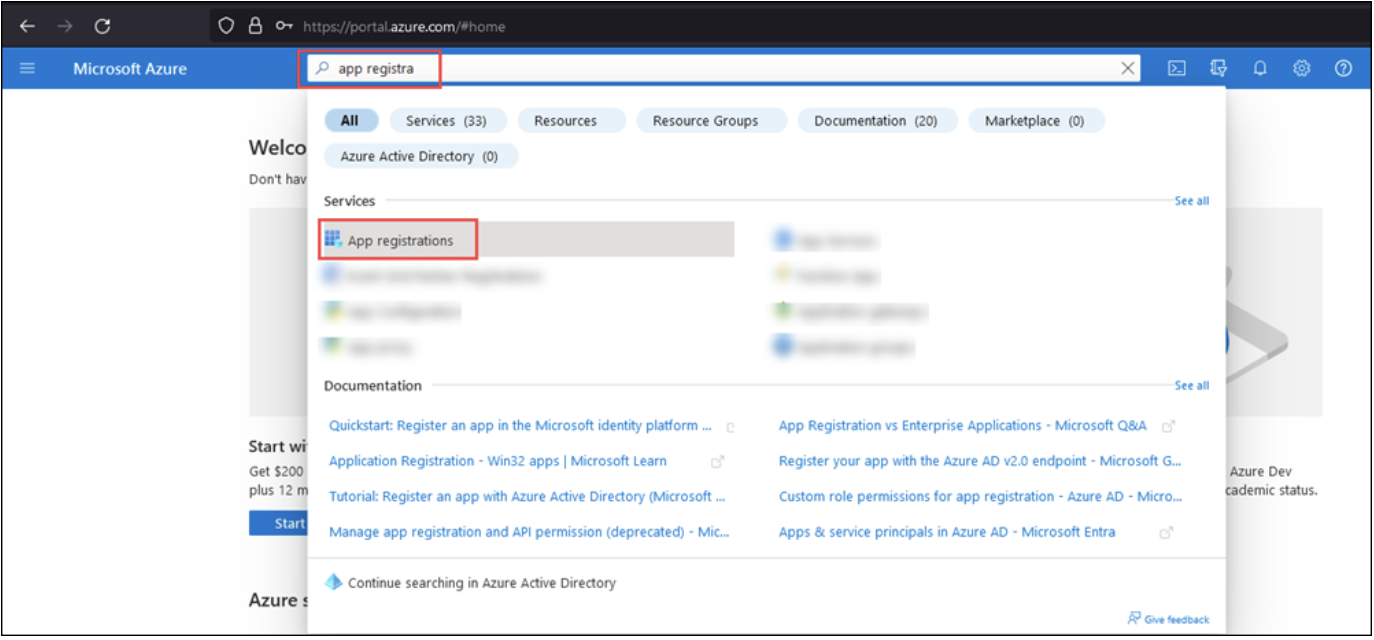
In the Search box at the top of the page, type App registrations and select it from the results.
-
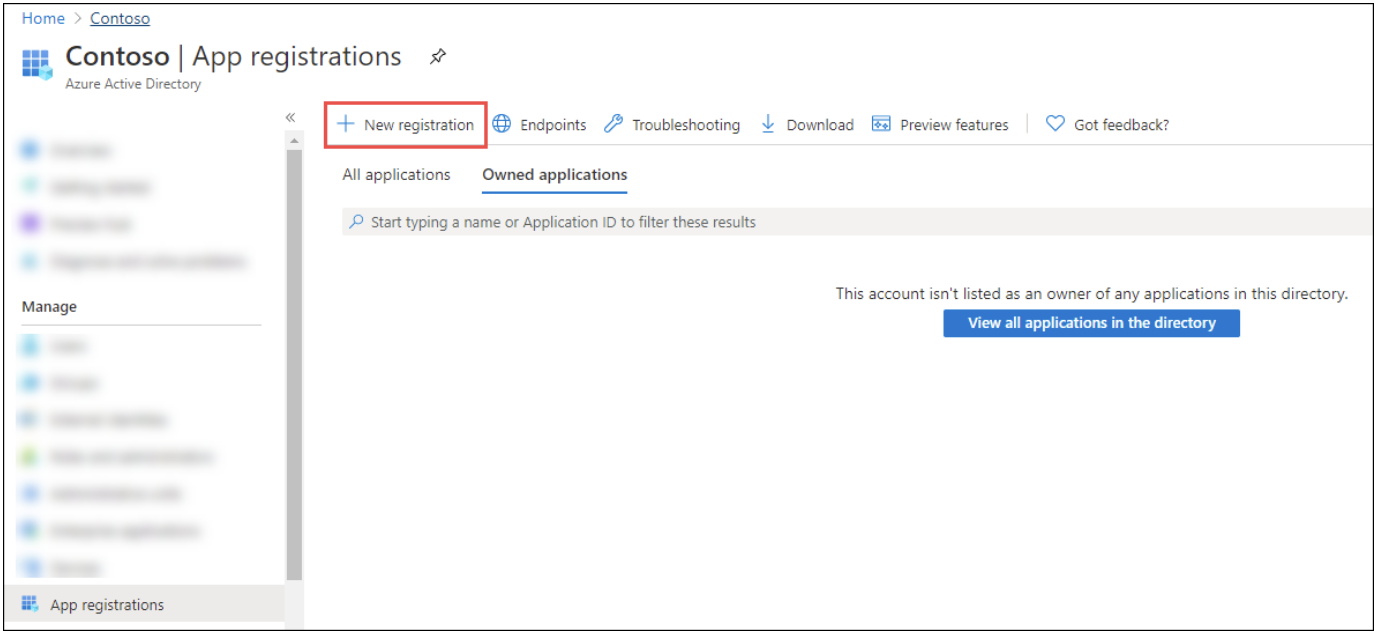
On the App registrations page, select New registration.
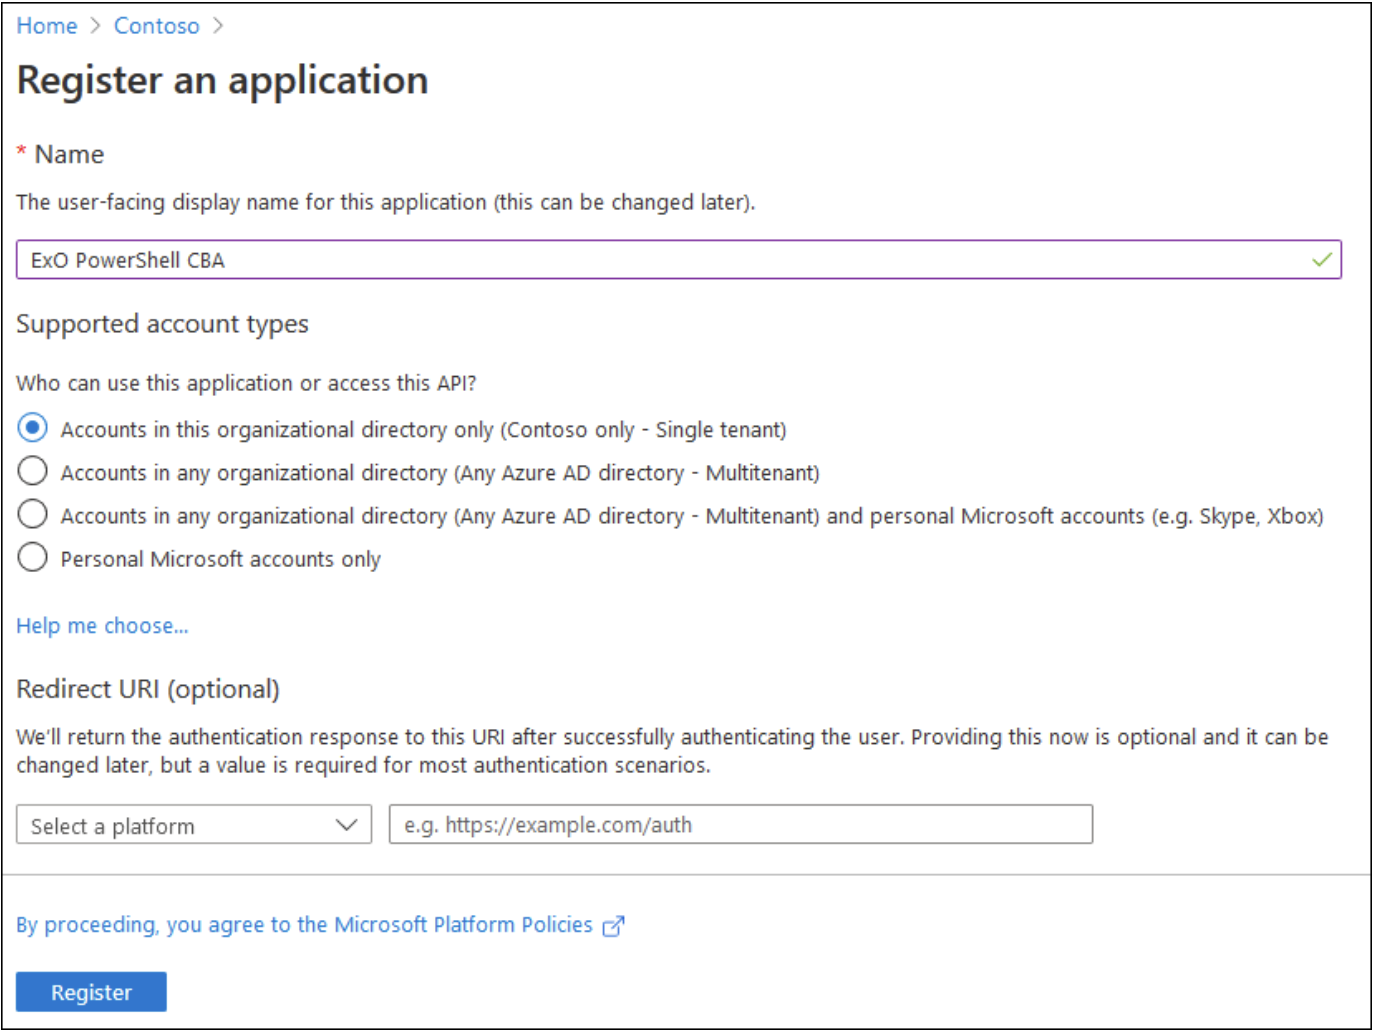
- Configure the registration:
- Name – enter something descriptive (for example, "Leena AI PowerShell Connector")
- Supported account types – keep Accounts in this organizational directory only (Single tenant)
- Redirect URI – leave empty
- Select Register
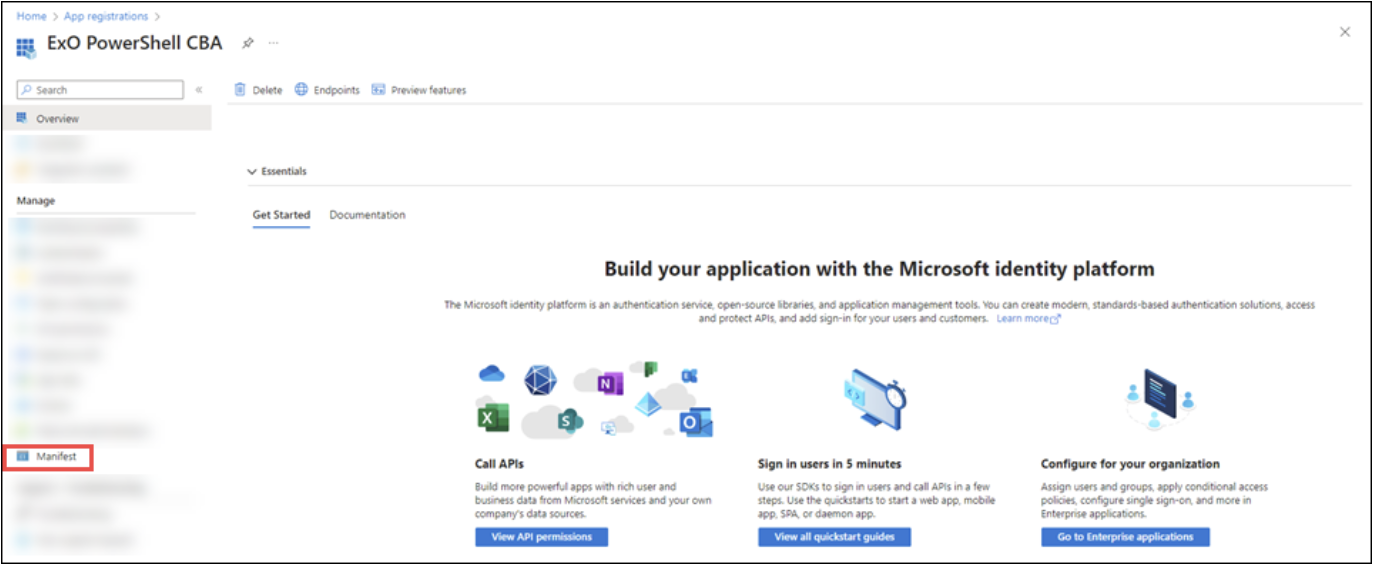
- You are taken to the app's Overview page. Record the Application (client) ID and the Directory (tenant) ID — both are needed later.
Step 2 – Assign API permissions
-
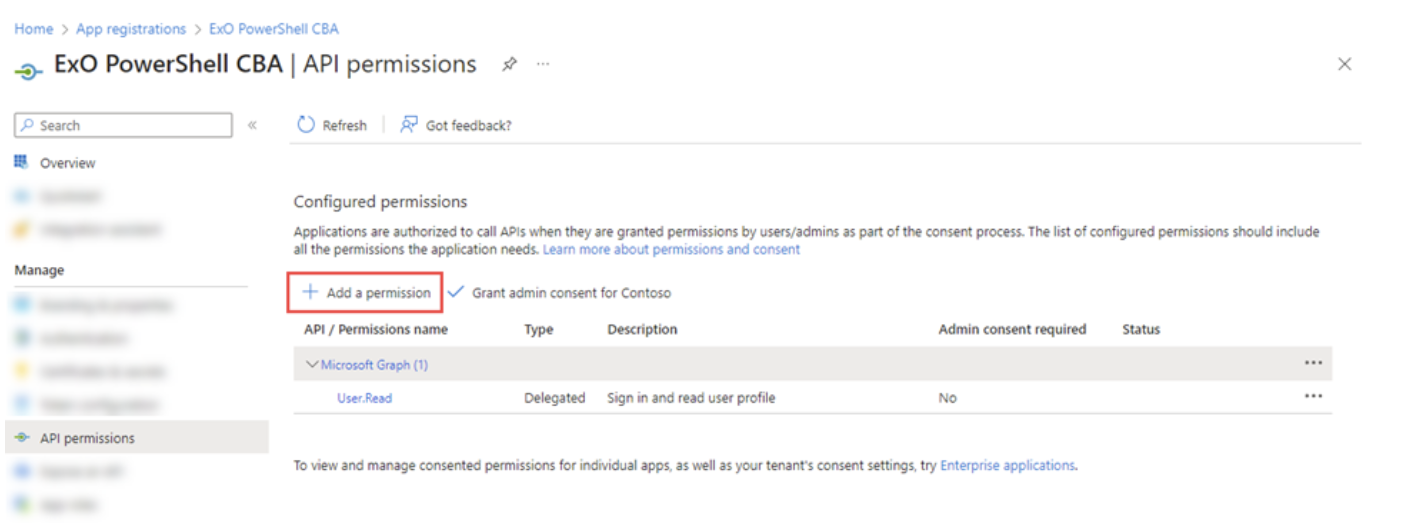
On the app's Overview page, select API permissions from the Manage section.
-
Select Add a permission.
-
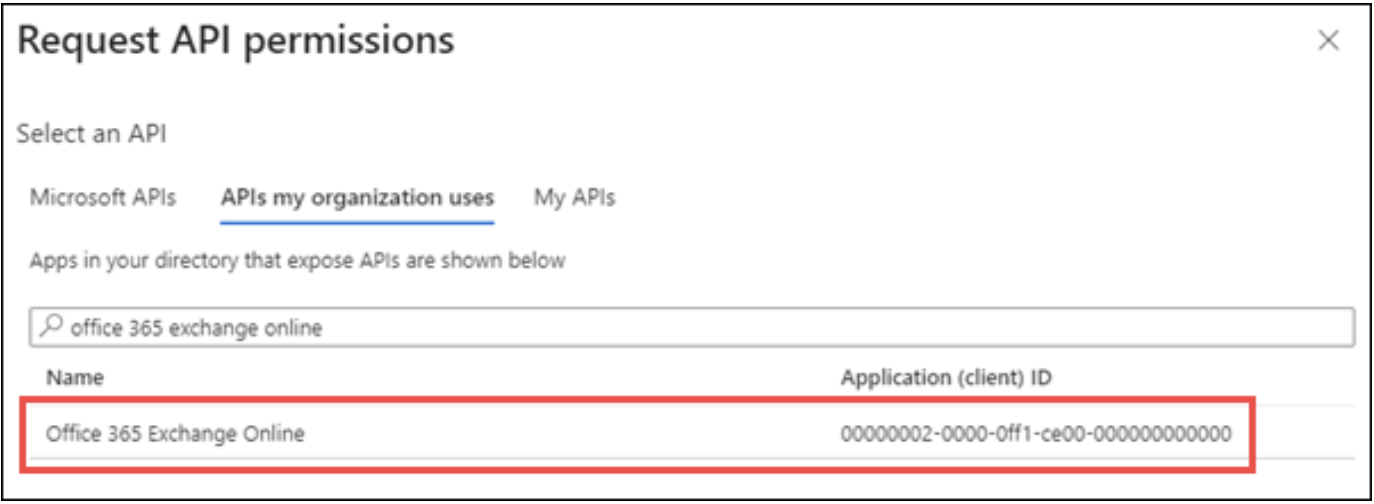
In the flyout, open the APIs my organization uses tab, search for Office 365 Exchange Online, and select it.
-
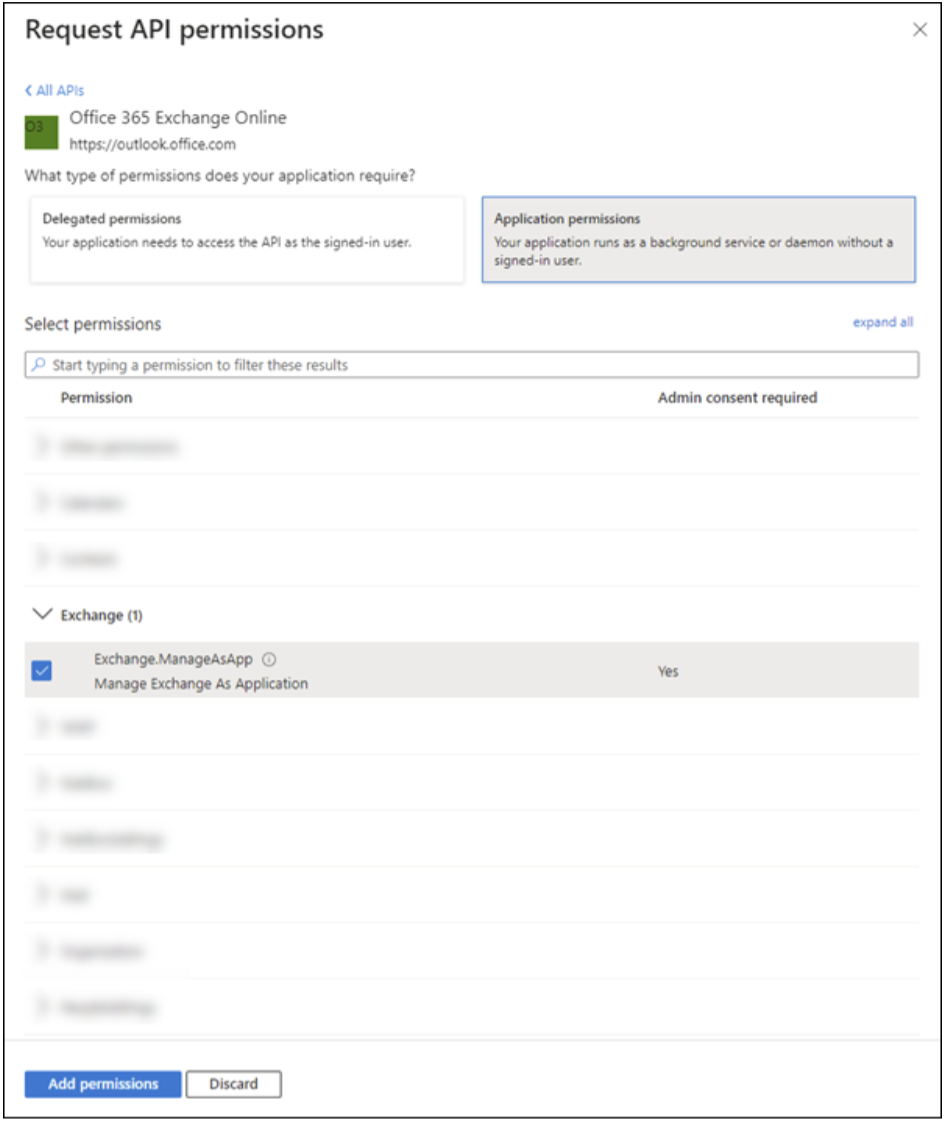
Choose Application permissions, expand Exchange, select Exchange.ManageAsApp, and then select Add permissions.
-
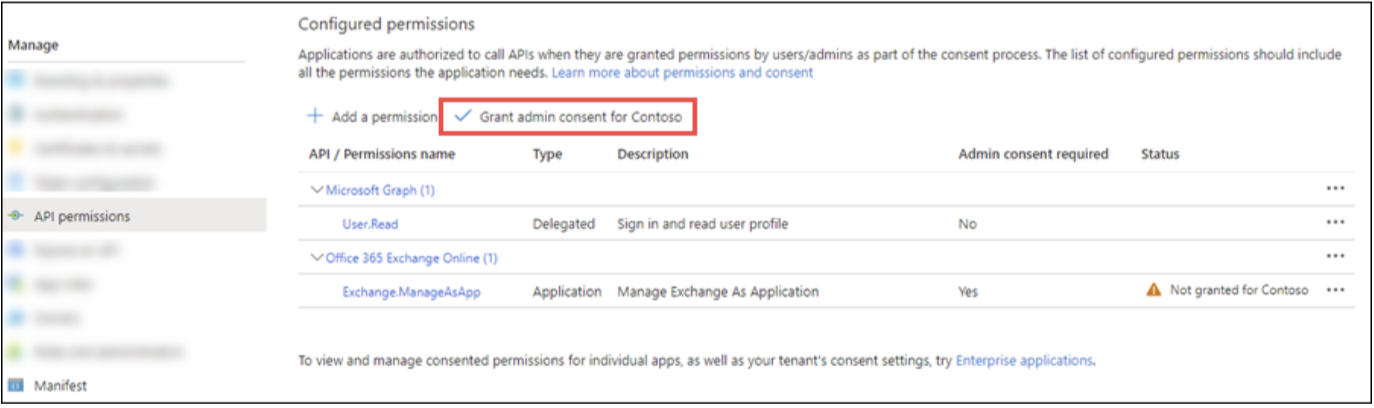
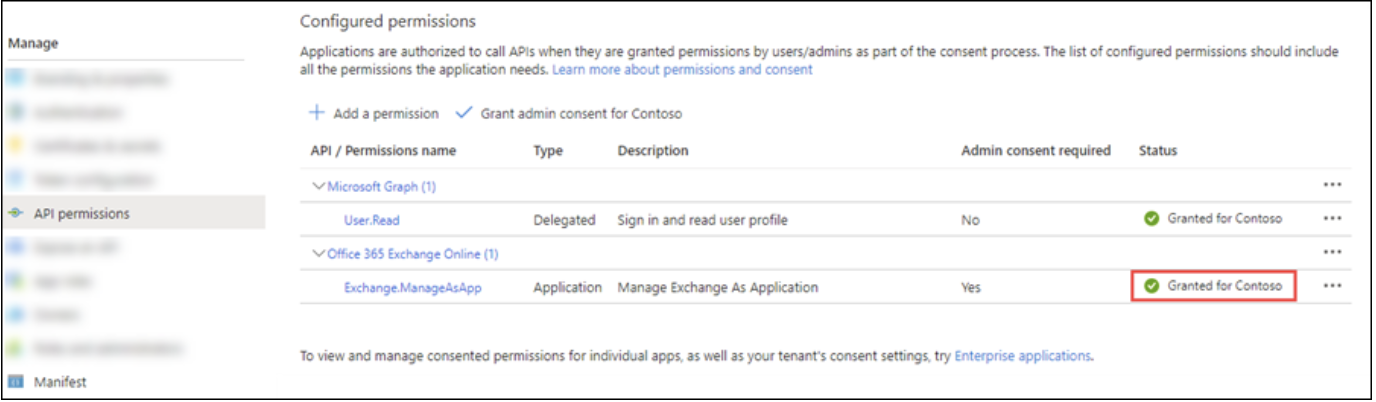
Back on the API permissions page, the status shows Not granted. Select Grant admin consent for [Your Tenant Name] and confirm with Yes.
-
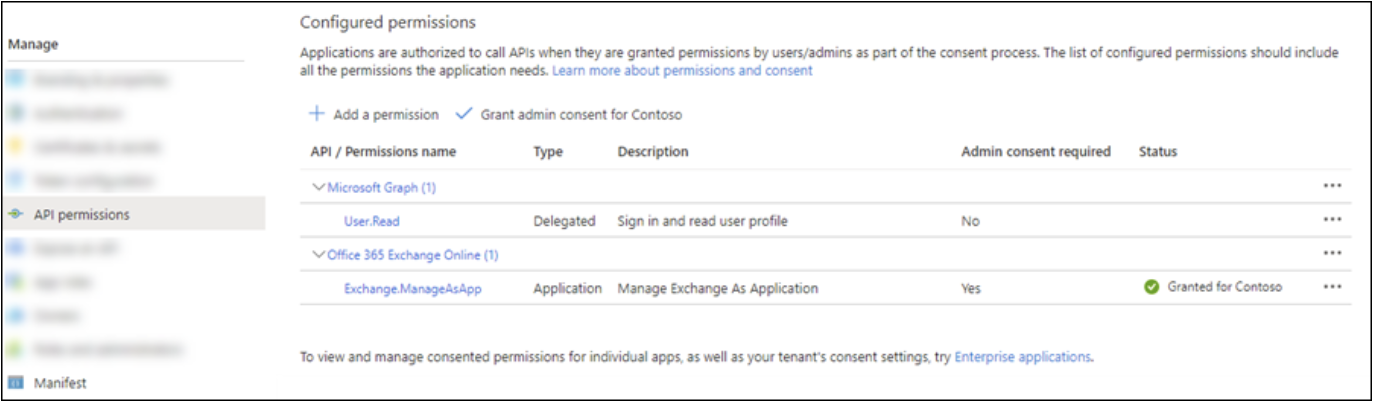
Optional (recommended): for the default Microsoft Graph > User.Read entry, select … > Revoke admin consent to return its status to blank — it is not needed for this integration.
Step 3 – Generate the certificate
A self-signed certificate is sufficient and is Microsoft's recommended approach for this scenario. The certificate authenticates the application against Microsoft Entra ID; anyone holding the certificate and its private key can use the app, so store the files securely.
CNG certificates are not supportedCryptography Next Generation (CNG) certificates do not work with app-only authentication for Exchange. The
-KeySpec KeyExchangeparameter below ensures a supported CSP certificate is created.
Run the following in an elevated PowerShell session (right-click PowerShell > Run as administrator):
# 1. Create a self-signed certificate (valid for 1 year)
$mycert = New-SelfSignedCertificate -DnsName "contoso.com" `
  -CertStoreLocation "cert:\CurrentUser\My" `
  -NotAfter (Get-Date).AddYears(1) -KeySpec KeyExchange

# 2. Export the public certificate (.cer) - uploaded to the Entra app in Step 4
$mycert | Export-Certificate -FilePath "C:\Certs\ExO-PowerShell-CBA.cer"

# 3. Export the certificate with private key (.pfx), protected by a password
$mycert | Export-PfxCertificate -FilePath "C:\Certs\ExO-PowerShell-CBA.pfx" `
  -Password (Get-Credential).Password

# 4. Note the certificate thumbprint for later use
$mycert.Thumbprint
Replace contoso.com with your organization's domain. When prompted by Get-Credential, enter any user name (it is ignored) and the password that will protect the .pfx file.
Output files:
| File | Contains | Use |
|---|---|---|
.cer | Public key only | Uploaded to the Entra application (Step 4). Safe to share. |
.pfx | Public + private key, password-protected | Used by the Leena AI connector. Share only over a secure channel, and send the password separately. |
Certificate validityValidity is set to 1 year in the example. Track the expiry date — a new certificate must be generated and uploaded before it expires to avoid an interruption. A certificate from an internal PKI or a commercial CA can be used instead of a self-signed one; the only requirements are an exportable private key (
.pfx) and public certificate (.cer).
Step 4 – Attach the certificate to the application
-
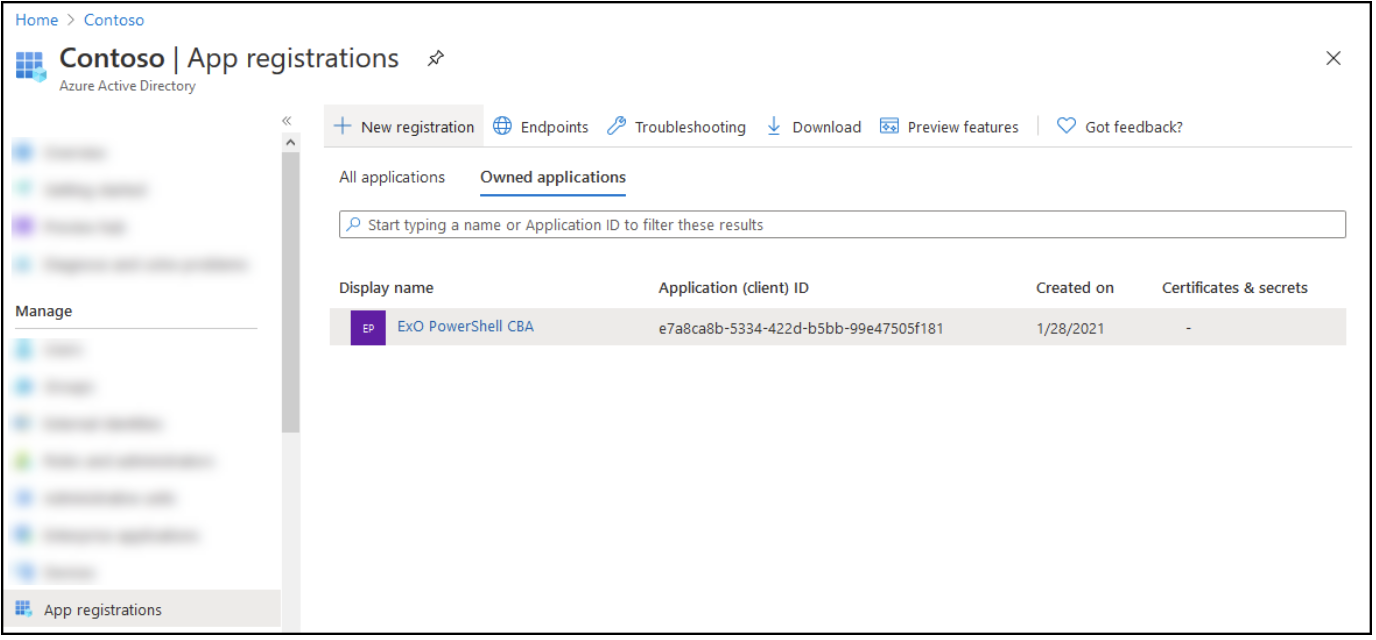
Return to App registrations in the Azure portal, open the Owned applications tab, and select the app created in Step 1.
-
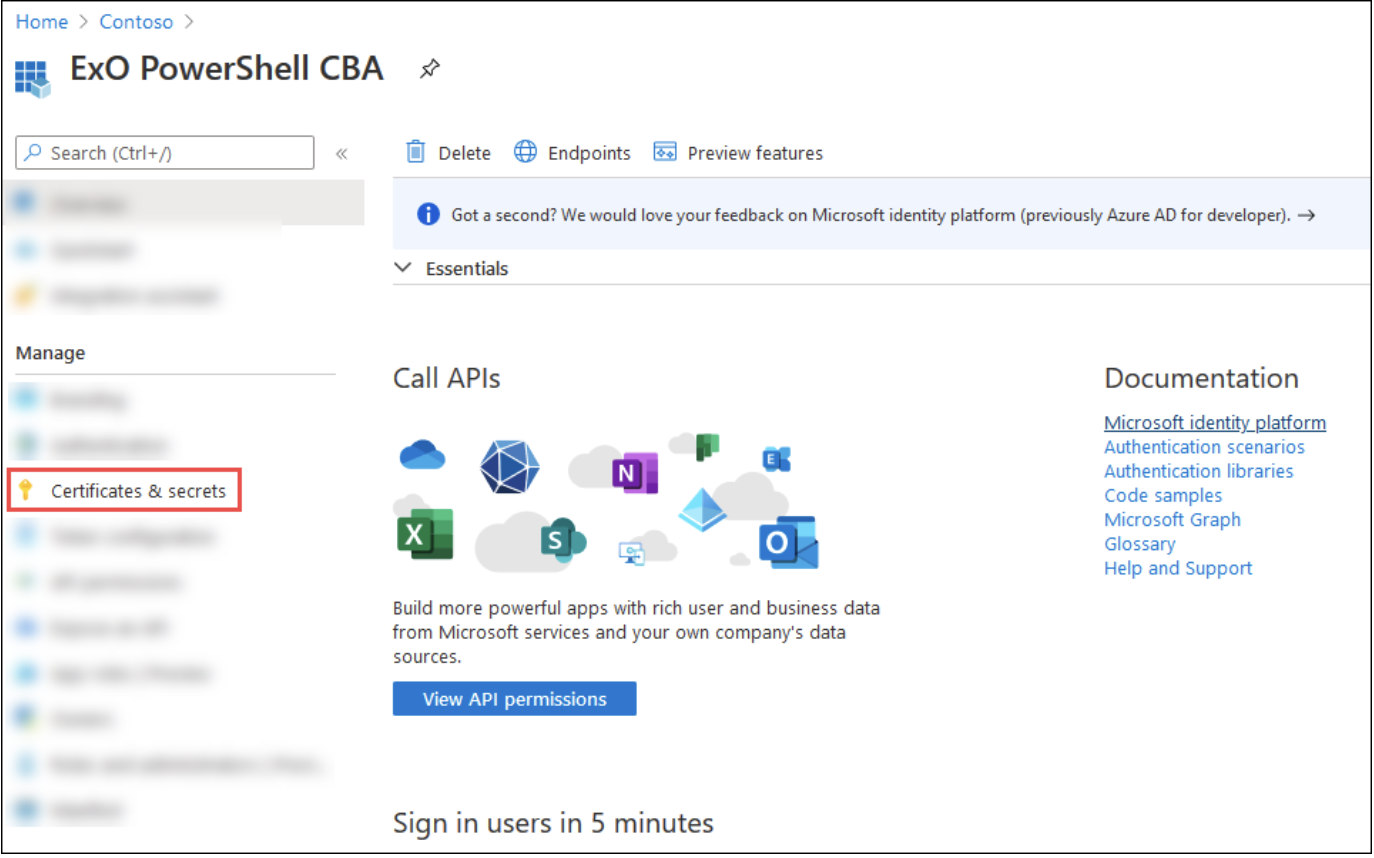
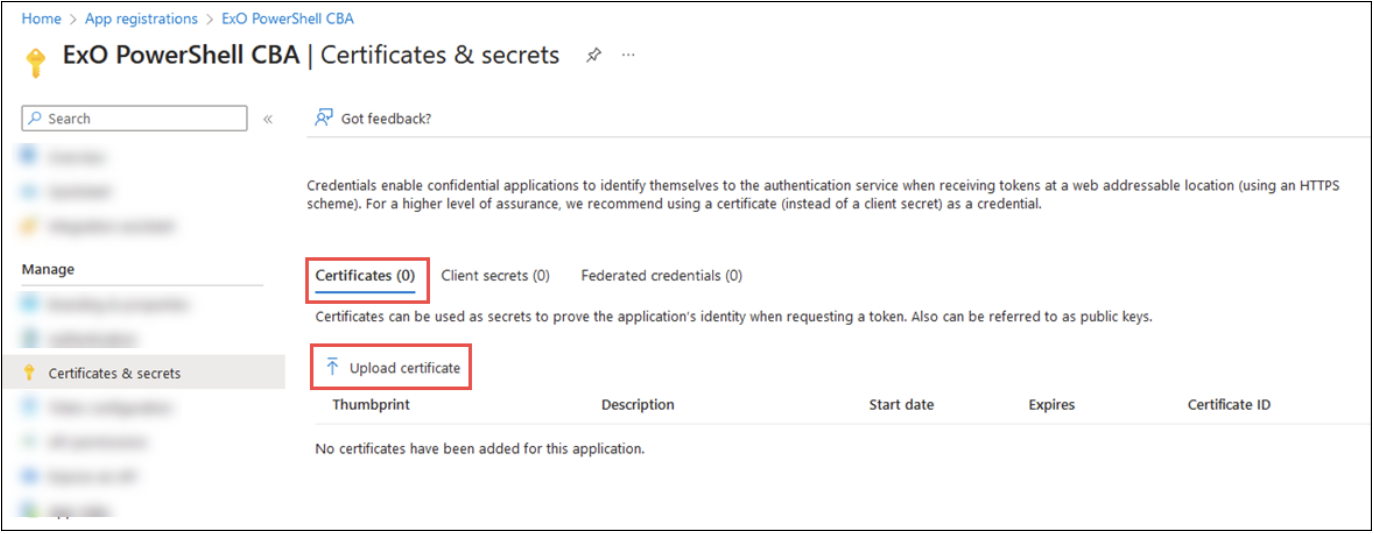
Select Certificates & secrets from the Manage section.
-
On the Certificates tab, select Upload certificate.
-
Browse to the
.cerfile exported in Step 3 and select Add.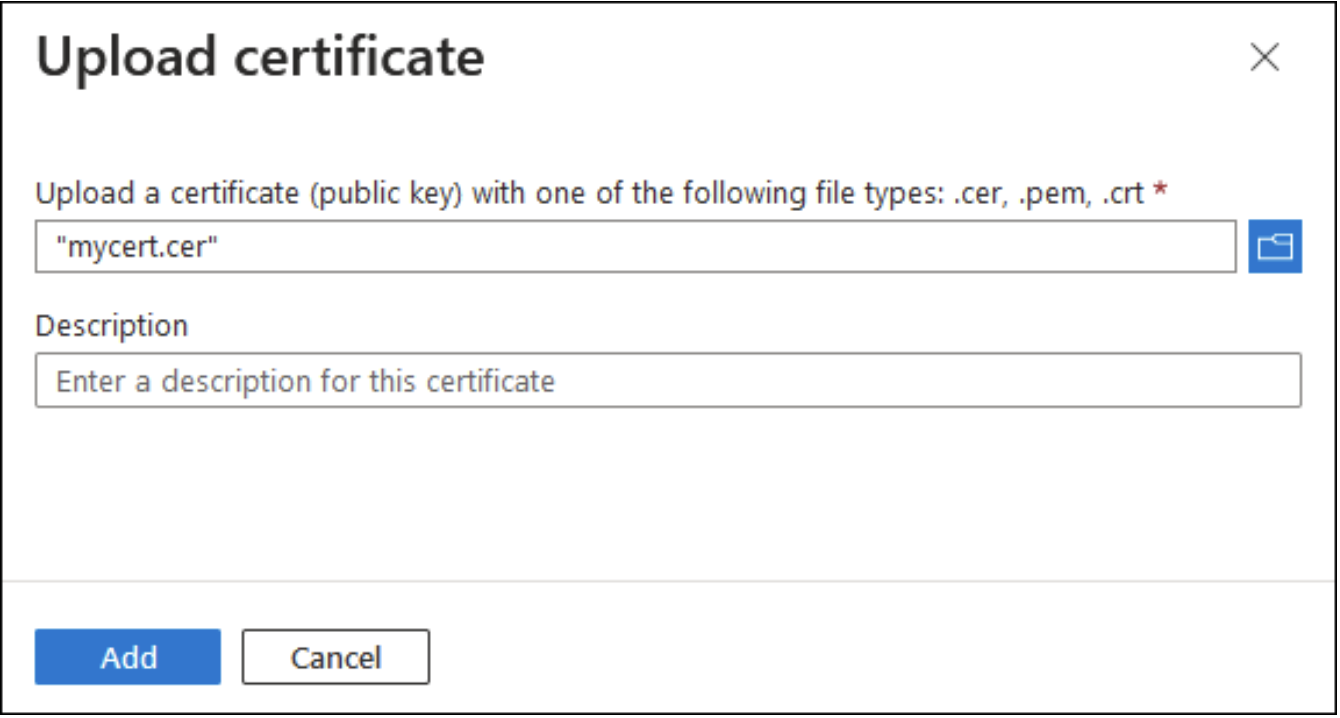
-
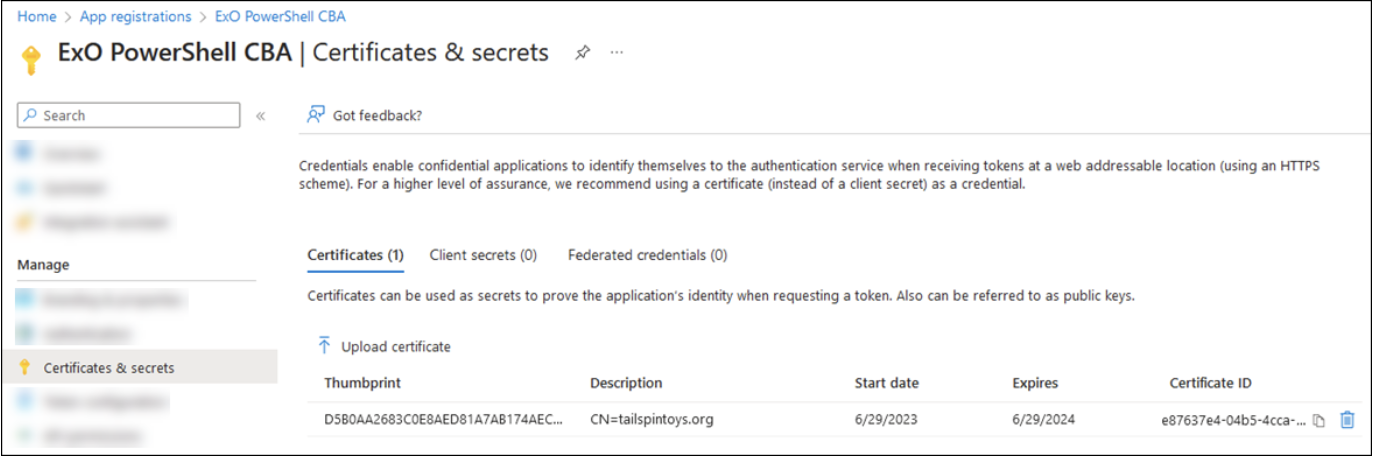
The certificate now appears in the Certificates list with its thumbprint and expiry date.
Step 5 – Assign a directory role to the application
The application needs a supported Microsoft Entra role to determine what it is allowed to do in Exchange Online. Choose the least-privileged role that covers the actions you intend to run — see Permissions and roles for the role-to-action mapping.
| Role | Typical use |
|---|---|
| Exchange Administrator | Full Exchange Online management (recipients, protection settings). Recommended for most integrations that modify data. |
| Exchange Recipient Administrator | Recipient management only (mailboxes, groups, contacts). |
| Global Reader | Read-only access. Recommended for reporting and audit integrations. |
| Global Administrator | Works, but over-privileged. Microsoft advises against it (principle of least privilege). |
-
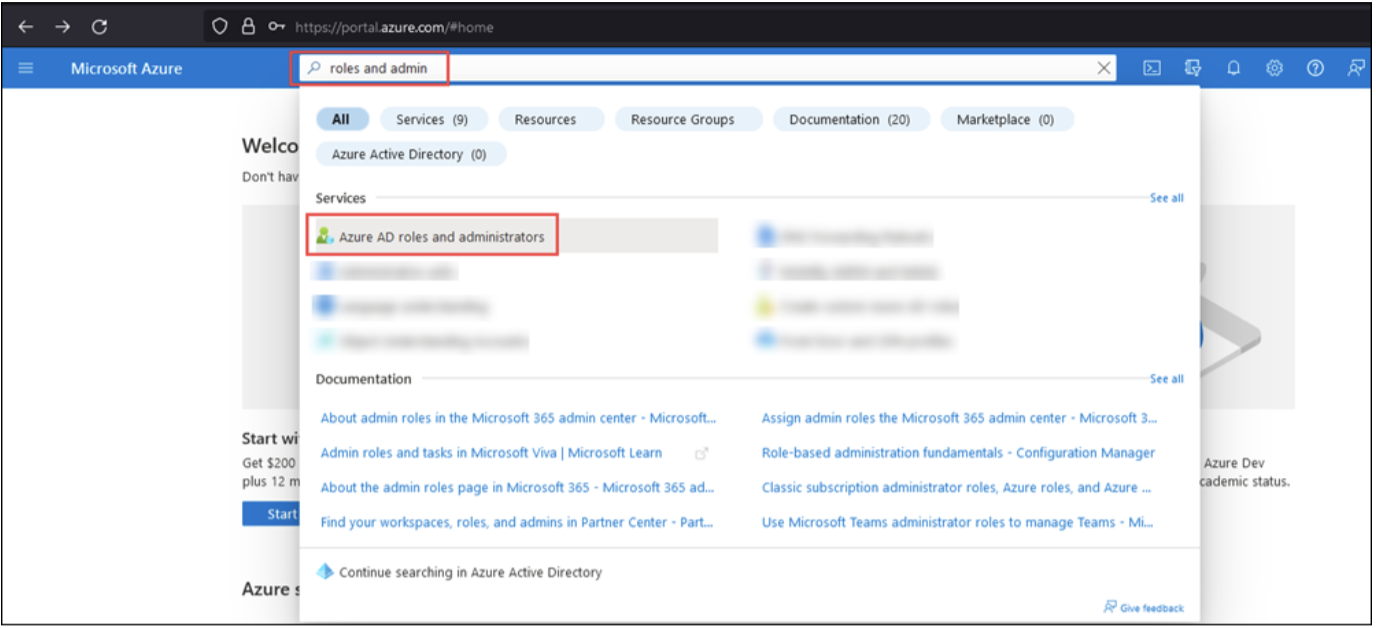
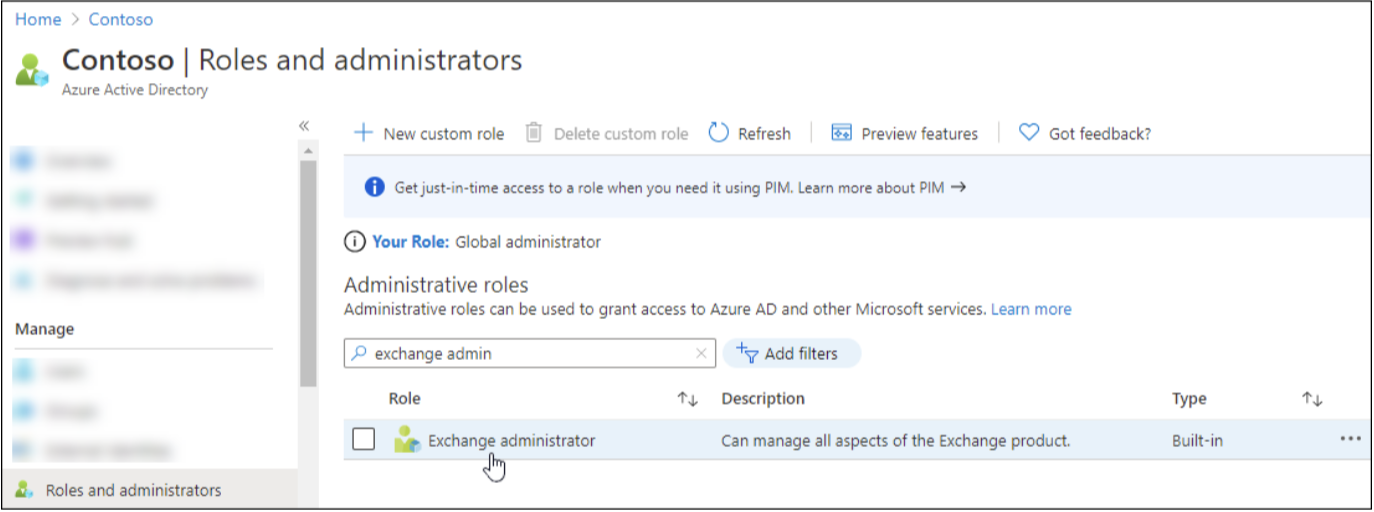
In the Azure portal, search for roles and administrators and select Microsoft Entra roles and administrators.
-
Find the chosen role (for example, Exchange administrator) and click its name (not the check box).
-
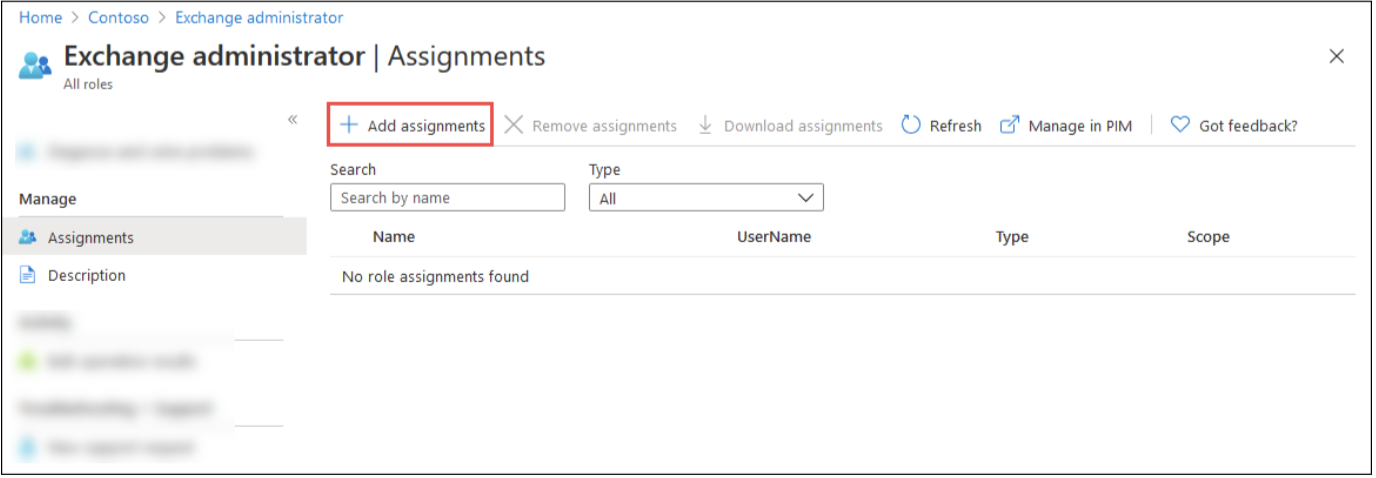
On the Assignments page, select Add assignments.
-
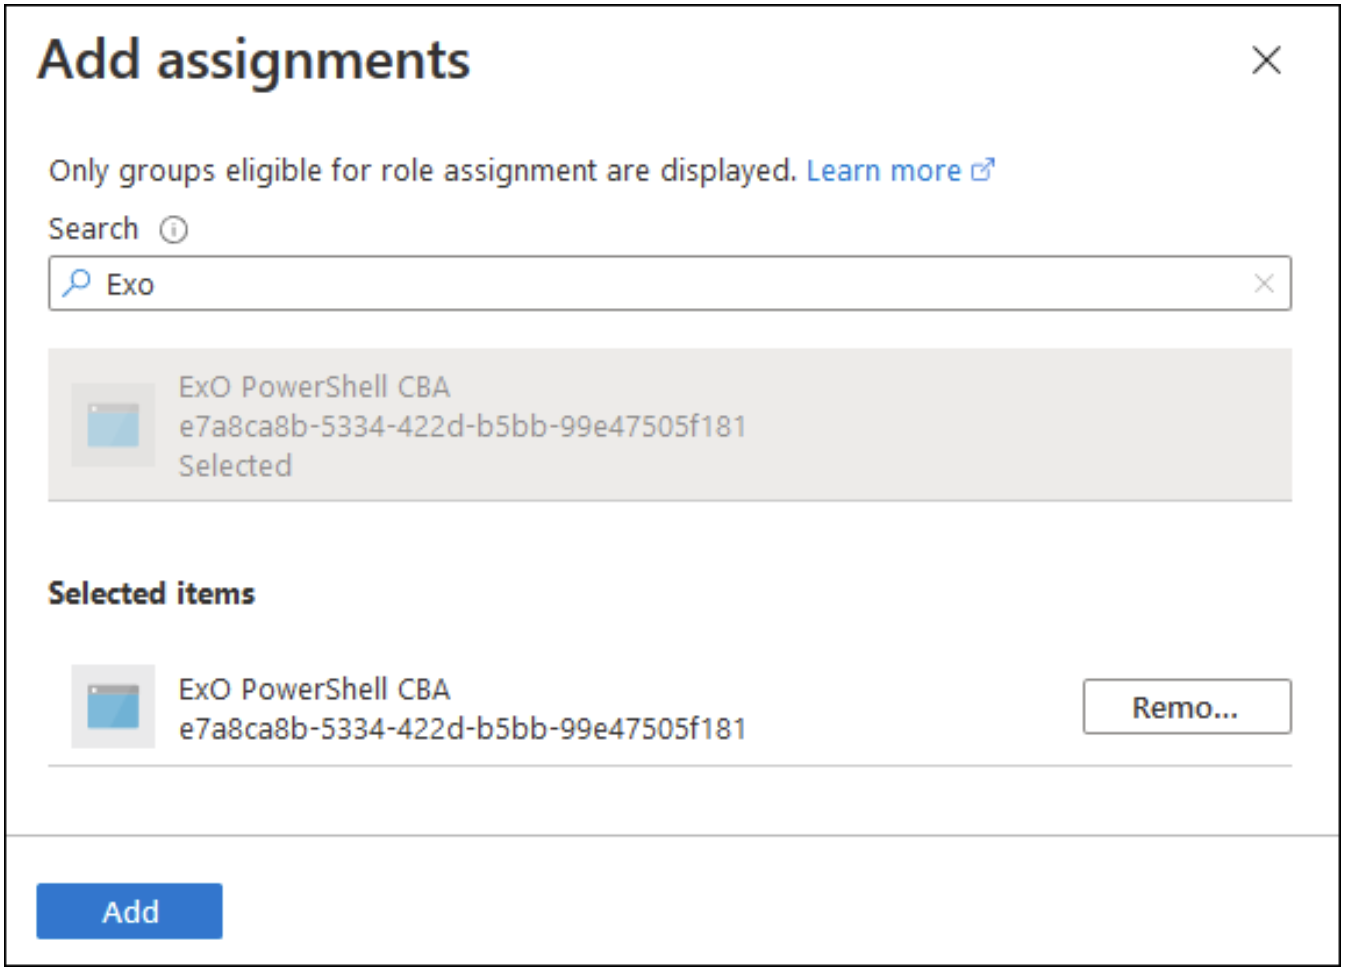
In the flyout, search for the application by name, select it, and click Add.
-
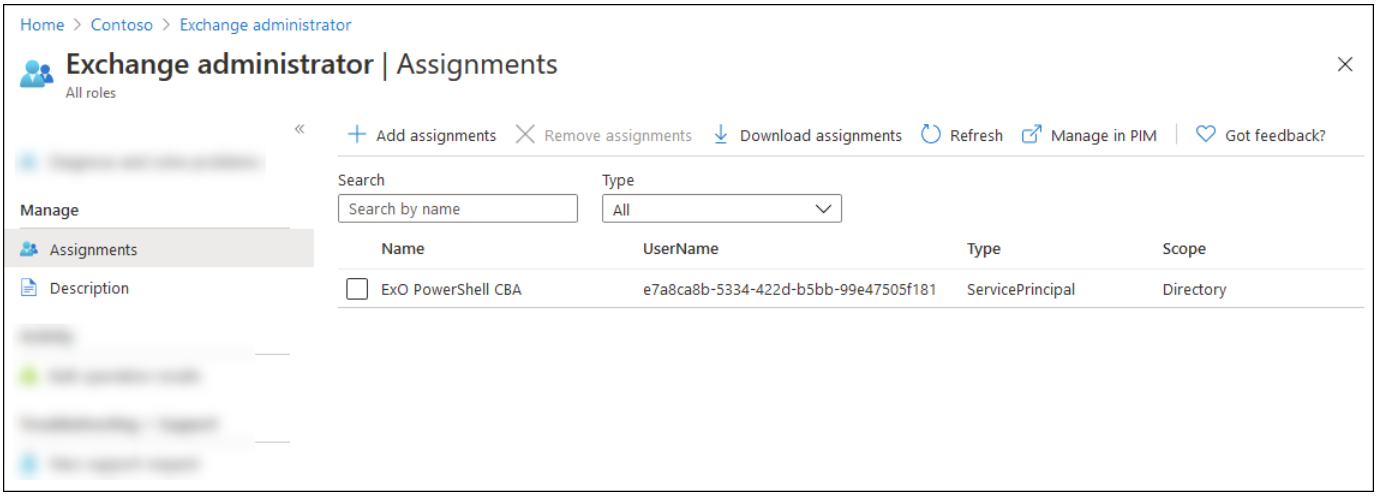
Verify the application now appears in the role's assignment list.
Tighter scopingFor more granular control, Exchange Online also supports assigning custom role groups to the application via service principals, which lets you restrict the available cmdlets and scope which recipients can be modified. See the Microsoft reference in References.
Credentials checklist
Once Steps 1–5 are complete, collect the following before adding the connection in Leena AI:
| Item | Notes |
|---|---|
| Application (client) ID | From the app's Overview page in Entra ID. |
| Directory (tenant) ID | From the app's Overview page in Entra ID. |
Primary .onmicrosoft.com domain | Used as the -Organization value, for example contoso.onmicrosoft.com. |
Certificate (.pfx file) | Contains the private key. Transfer only via a secure channel (encrypted file share or password vault). |
.pfx password | Send separately from the .pfx file, over a different channel. |
| Certificate expiry date | So renewal can be planned before the certificate expires. |
Add connection
Here is how to add a connection on Leena AI:
- Log in to your Leena AI workspace.
- Navigate to Settings > Integrations.
- Search for "PowerShell" and select it from the list to add its new connector.
- Start configuring the connector:
- Auth Type: Select "Powershell" from the dropdown.
- Settings: Add the following key-value pairs:
- clientId: Your Application (client) ID from Entra ID
- tenantId: Your Directory (tenant) ID
- organization: Your primary
.onmicrosoft.comdomain (for example,contoso.onmicrosoft.com) - certificate: The
.pfxfile exported in Step 3 - certificatePassword: The password protecting the
.pfxfile
- Save the connection configuration.
- Test the connection to verify credentials are working correctly.
Verify the connection
You can validate the setup independently of Leena AI from any machine that has the .pfx file. This works on Windows, Linux, and macOS:
# One-time: install the Exchange Online PowerShell module
Install-Module -Name ExchangeOnlineManagement -MinimumVersion 3.0.0

# Load the certificate from the .pfx file as an X509Certificate2 object
$pfxPassword = (Get-Credential -UserName "pfx" -Message "PFX password").Password
$cert = New-Object System.Security.Cryptography.X509Certificates.X509Certificate2( `
  "C:\Certs\ExO-PowerShell-CBA.pfx", $pfxPassword)

# Connect using the certificate object
Connect-ExchangeOnline -Certificate $cert `
  -AppId "<Application (client) ID>" `
  -Organization "<tenant>.onmicrosoft.com"

# Verify the connection
Get-AcceptedDomain

# Disconnect when finished
Disconnect-ExchangeOnline -Confirm:$false
Alternative (Windows only) — if the certificate is installed in the local certificate store, connect by thumbprint instead of loading the .pfx:
Connect-ExchangeOnline -CertificateThumbprint "<Thumbprint>" `
  -AppId "<Application (client) ID>" -Organization "<tenant>.onmicrosoft.com"
If Get-AcceptedDomain returns your domains, app-only authentication is working.
Permissions and roles
The directory role assigned in Step 5 determines which actions will succeed. Assigning a read-only role will cause every write action to fail at run time, not at connection time.
| Action | Exchange Administrator | Exchange Recipient Administrator | Global Reader |
|---|---|---|---|
| List Mailbox | ✅ | ✅ | ✅ |
| List Shared Mailbox Members | ✅ | ✅ | ✅ |
| Create Shared Mailbox | ✅ | ✅ | ❌ |
| Delete Shared Mailbox | ✅ | ✅ | ❌ |
| Add User to Shared Mailbox | ✅ | ✅ | ❌ |
| Remove User from Shared Mailbox | ✅ | ✅ | ❌ |
| Add User to Distribution Group | ✅ | ✅ | ❌ |
| Remove User from Distribution Group | ✅ | ✅ | ❌ |
| Custom write scripts (protection/transport settings) | ✅ | ❌ | ❌ |
Rule of thumb: choose Exchange Recipient Administrator if the connector only manages mailboxes, groups, and contacts; Exchange Administrator if custom scripts also touch protection or transport settings; Global Reader only for reporting-only deployments.
Actions
The following actions are supported for the PowerShell connector:
Execute PowerShell Script
Executes a predefined PowerShell script from the template library. The Agent can leverage the tool (workflow), which has been designed to run automation scripts for various Microsoft 365 and Exchange management tasks.
Note: This action uses a dynamic form system. When you select a PowerShell Script, the form fields change dynamically based on the selected script's configuration. Each script type has its own set of required and optional parameters.
Input Parameters
Here are the input parameters required to set up this action:
Step 1: Select Script (Mandatory)
| Name | Description |
|---|---|
| Powershell Script | Select the PowerShell script template to execute from the dropdown |
Step 2: Script-Specific Fields (Dynamic)
Once a script is selected, additional fields appear based on the script's configuration. Below are common script types and their respective fields:
Add User to Shared Mailbox
Grants a user access to a shared mailbox with specified permissions.
| Name | Type | Required | Description |
|---|---|---|---|
| Shared Mailbox | Select | Yes | The shared mailbox to grant access to |
| Users | Multi-Select | Yes | Users to add to the shared mailbox |
| Access Rights | Select | Yes | Permission level (FullAccess, SendAs, SendOnBehalf) |
{
  "scriptType": "add_user_to_shared_mailbox",
  "sharedMailboxEmail": "[email protected]",
  "users": ["[email protected]", "[email protected]"],
  "accessRights": "FullAccess"
}
Remove User from Shared Mailbox
Revokes a user's access from a shared mailbox.
| Name | Type | Required | Description |
|---|---|---|---|
| Shared Mailbox | Select | Yes | The shared mailbox to revoke access from |
| Users | Multi-Select | Yes | Users to remove from the shared mailbox |
| Access Rights | Select | Yes | Permission level to revoke |
{
  "scriptType": "remove_user_from_shared_mailbox",
  "sharedMailboxEmail": "[email protected]",
  "users": ["[email protected]"],
  "accessRights": "FullAccess"
}
List Shared Mailbox Members
Retrieves all members of a shared mailbox with their access levels.
| Name | Type | Required | Description |
|---|---|---|---|
| Shared Mailbox | Select | Yes | The shared mailbox to list members from |
| Access Type | Select | No | Filter by permission type (FullAccess, SendAs, etc.) |
{
  "scriptType": "list_shared_mailbox_members",
  "sharedMailboxEmail": "[email protected]",
  "accessRights": "FullAccess"
}
Create Shared Mailbox
Creates a new shared mailbox in the tenant.
| Name | Type | Required | Description |
|---|---|---|---|
| Shared Mailbox Name | Input | Yes | Display name for the new shared mailbox |
| Shared Mailbox Alias | Input | Yes | Email alias for the shared mailbox |
{
  "scriptType": "create_shared_mailbox",
  "sharedMailboxName": "Customer Support",
  "sharedMailboxAlias": "support"
}
Delete Shared Mailbox
Removes an existing shared mailbox from the tenant.
| Name | Type | Required | Description |
|---|---|---|---|
| Shared Mailbox | Select | Yes | The shared mailbox to delete |
{
  "scriptType": "delete_shared_mailbox",
  "sharedMailboxEmail": "[email protected]"
}
Add User to Distribution Group
Adds users as members to a distribution group.
| Name | Type | Required | Description |
|---|---|---|---|
| Group | Select | Yes | The distribution group to add members to |
| Users | Multi-Select | Yes | Users to add to the group |
{
  "scriptType": "add_user_to_group",
  "groupId": "[email protected]",
  "users": ["[email protected]"]
}
Remove User from Distribution Group
Removes users from a distribution group.
| Name | Type | Required | Description |
|---|---|---|---|
| Group | Select | Yes | The distribution group to remove members from |
| Users | Multi-Select | Yes | Users to remove from the group |
{
  "scriptType": "remove_user_from_group",
  "groupId": "[email protected]",
  "users": ["[email protected]"]
}
List Mailbox
Retrieves all shared mailboxes in the tenant.
| Name | Type | Required | Description |
|---|---|---|---|
| Search String | Input | No | Filter mailboxes by name or email |
{
  "scriptType": "list_mailbox",
  "searchString": "support"
}
Response
Upon successful execution, the action returns:
- Execution status (success or failure)
- Script output data (formatted as JSON if post-processing is configured)
- Error details (if execution failed)
Dynamic Data Sources (Async Hooks)
The PowerShell connector provides dynamic dropdowns that fetch real-time data from your Microsoft 365 tenant:
| Data Source | Description |
|---|---|
| Domains | Lists all registered domains in the tenant |
| Groups | Lists all distribution groups |
| Shared Mailbox | Lists all shared mailboxes |
| Users | Lists all users in the tenant |
| Users not guest | Lists internal users only (excludes guest accounts) |
| Users in group | Lists members of a specific group |
| Users not in group | Lists users who are not members of a specific group |
| Users in shared mailbox | Lists users with access to a specific shared mailbox |
| Users not in shared mailbox | Lists users without access to a specific shared mailbox |
| Users in shared mailbox basis access | Lists users with specific access rights to a shared mailbox |
| Users not in shared mailbox basis access | Lists users without specific access rights to a shared mailbox |
| Users in shared mailbox not guest basis access | Lists non-guest users with specific access to a shared mailbox |
These dropdowns run read cmdlets against Exchange Online using the same app-only connection, so they require the application to hold at least a read-capable directory role (Step 5). If dropdowns come back empty, check the role assignment before investigating the connector.
Script Template Configuration
Administrators can create and manage custom PowerShell script templates through the Template Scripts platform. Each template defines its own form fields, making the connector highly extensible.
Template Schema
| Field | Type | Required | Description |
|---|---|---|---|
| Name | String | Yes | A human-readable display name for the script |
| Type | String | Yes | A unique string identifier for the script |
| Script | String | Yes | The PowerShell script body with Lodash template variables |
| Form | IFormConfig[] | No | An array defining the UI form components to collect input variables |
| Post Execution Script | String | No | JavaScript code to transform the script output into structured JSON |
| Bot ID | String | No | If specified, script is available only to this bot; otherwise global |
Sample Script Template
{
  "name": "Add User to Shared Mailbox",
  "type": "add_user_to_shared_mailbox",
  "script": "Add-MailboxPermission -Identity '<%= sharedMailboxEmail %>' -User '<%= users[0] %>' -AccessRights '<%= accessRights %>'",
  "form": [
    {
      "name": "sharedMailboxEmail",
      "type": "SELECT",
      "label": "Shared Mailbox",
      "required": true,
      "asyncHook": "shared-mailbox-all"
    },
    {
      "name": "users",
      "type": "MULTI_SELECT",
      "label": "Users to Add",
      "required": true,
      "asyncHook": "users-not-in-shared-mailbox-basis-access"
    },
    {
      "name": "accessRights",
      "type": "SELECT",
      "label": "Access Rights",
      "required": true,
      "props": {
        "options": [
          {"label": "Full Access", "value": "FullAccess"},
          {"label": "Send As", "value": "SendAs"},
          {"label": "Send on Behalf", "value": "SendOnBehalf"}
        ]
      }
    }
  ],
  "postExecutionScript": "commandOutput = JSON.parse(commandOutput); commandOutput;"
}
Template Variables
Script templates support Lodash template syntax for dynamic value injection:
| Syntax | Description |
|---|---|
<%= variableName %> | Inserts the value of the variable |
<%= users[0] %> | Accesses array elements |
<%= _.join(users, ',') %> | Uses Lodash functions for complex transformations |
Form Field Types
| Type | Description |
|---|---|
| INPUT | Single-line text input |
| SELECT | Dropdown selection (single value) |
| MULTI_SELECT | Dropdown selection (multiple values) |
| TEXTAREA | Multi-line text input |
| FIELD_ARRAY | Dynamic list of key-value pairs |
Troubleshooting
| Symptom | Cause and fix |
|---|---|
| 401 / UnAuthorized on connect | Usually a missing role assignment (Step 5) or admin consent not granted (Step 2). Changes can take 5–10 minutes to propagate. |
| CNG certificate error | The certificate must come from a CSP key provider. Recreate it with -KeySpec KeyExchange as shown in Step 3. |
| "Organization" not recognised | The -Organization value must be the primary .onmicrosoft.com domain, not a custom vanity domain. |
CertificateThumbprint fails on Linux/macOS | -CertificateThumbprint is Windows-only. Use the certificate object or -CertificateFilePath method instead. |
| Module errors on connect | App-only authentication requires ExchangeOnlineManagement v2.0.4 or later; v3.x is recommended. |
| Connection worked, but a write action fails | The assigned directory role is too restrictive. See Permissions and roles — Global Reader cannot perform write actions. |
| Dropdowns return no options | The application has no read-capable role assigned, or admin consent has not propagated. |
| Connection stops working suddenly | The certificate has most likely expired. See Certificate renewal below. |
Certificate renewal
The certificate is the credential — when it expires, every action stops working.
- Generate a new certificate before the current one expires (repeat Step 3).
- Upload the new
.certo the application (repeat Step 4). Multiple certificates can be attached to the app at once, allowing zero-downtime rotation. - Replace the
.pfxand password in the Leena AI connection configuration. - Once the new certificate is confirmed working, remove the old certificate from the app registration.
Track the expiry date recorded in the credentials checklist and set a reminder at least 30 days ahead.
References
Updated about 1 month ago