
Browser Run
Overview
Browser Run is a native capability within AI Colleagues that enables automated web-based actions through a headless browser running on a virtual machine. This powerful feature allows organizations to automate complex web interactions that would typically require manual intervention by administrators or IT personnel.
Key Capabilities
- Headless Browser Automation: Executes web actions without requiring a visible browser interface
- Admin-Level Access: Performs actions using administrative credentials on behalf of employees
- Cross-Platform Compatibility: Works with any web-based application or system
- Multiple Parallel Task Executions: Executes multiple tasks in parallel
How It Works
Let's walk through a complete example of applying for leave in SAP SuccessFactors to understand how Browser Run operates:
Task Input
Apply for a leave request on behalf of user John Smith:
- Leave Type: PTO
- Start Date: 2025-12-22
- End Date: 2025-12-23
- SAP URL: https://company.successfactors.com
- Login: [email protected] / AdminPass123
Step 1: Task Interpretation and Planning
The AI agent receives the natural language instruction and:
- Parses the objective: Apply vacation leave for John Smith
- Identifies required data: Leave type, dates, credentials, target system.
- Creates execution plan: Login → Navigate → Fill form → Submit → Verify
- Validates inputs: Ensures date format, leave type validity
Step 2: Browser Initialization and Navigation
- Launches headless browser on secure VM with isolated session
- Navigates to SAP URL: https://company.successfactors.com
- Takes initial screenshot for audit trail
- Waits for page load and dynamic content rendering
Step 3: Authentication Process
- Computer vision scans page to identify login elements
- Locates username field (even if ID/class names change)
- Enters credentials: [email protected] in username field
- Finds password field and enters AdminPass123
- Identifies and clicks "Login" or "Sign In" or "Continue" button
- Waits for authentication and verifies successful login
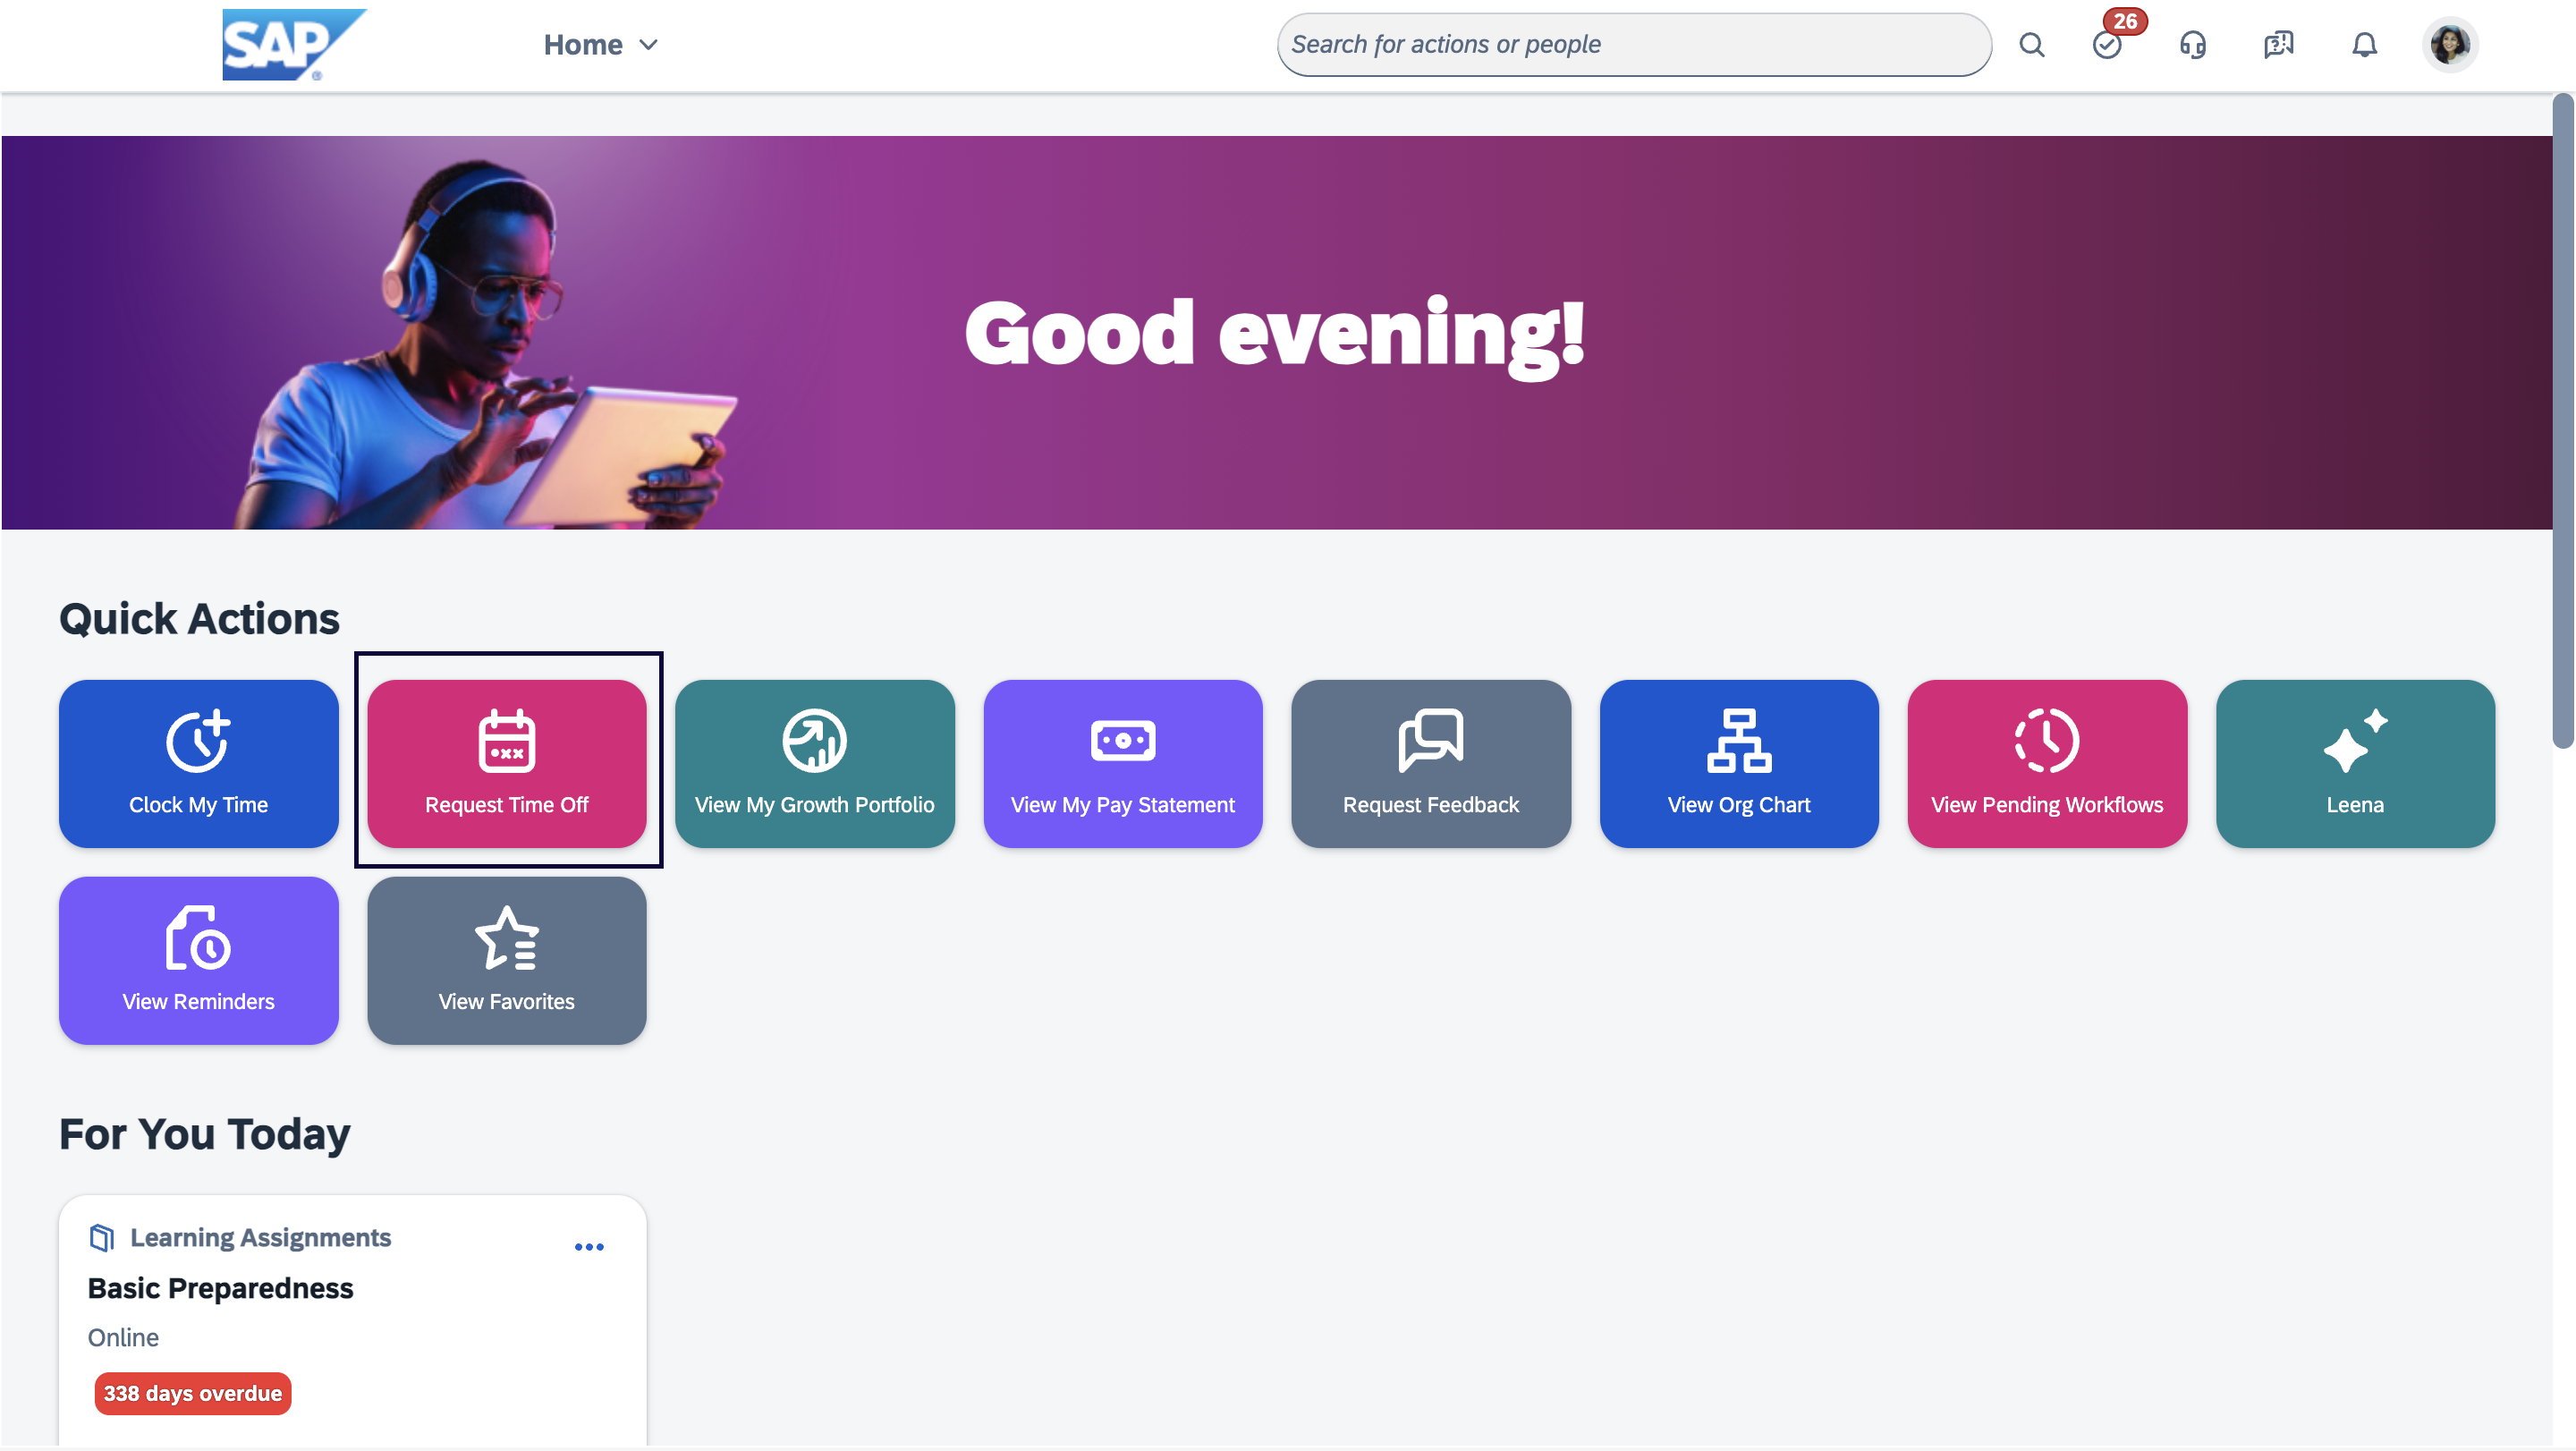
Step 4: Homepage Navigation and Menu Discovery
- Analyses loaded homepage using computer vision
- Scans for navigation elements: menus, buttons, links
- Identifies leave-related options: "Request Time Off", "My Leave", "Employee Services"
- Clicks on "Request Time Off" button (adapts to button text variations)
- Handles any intermediate pages or redirections automatically
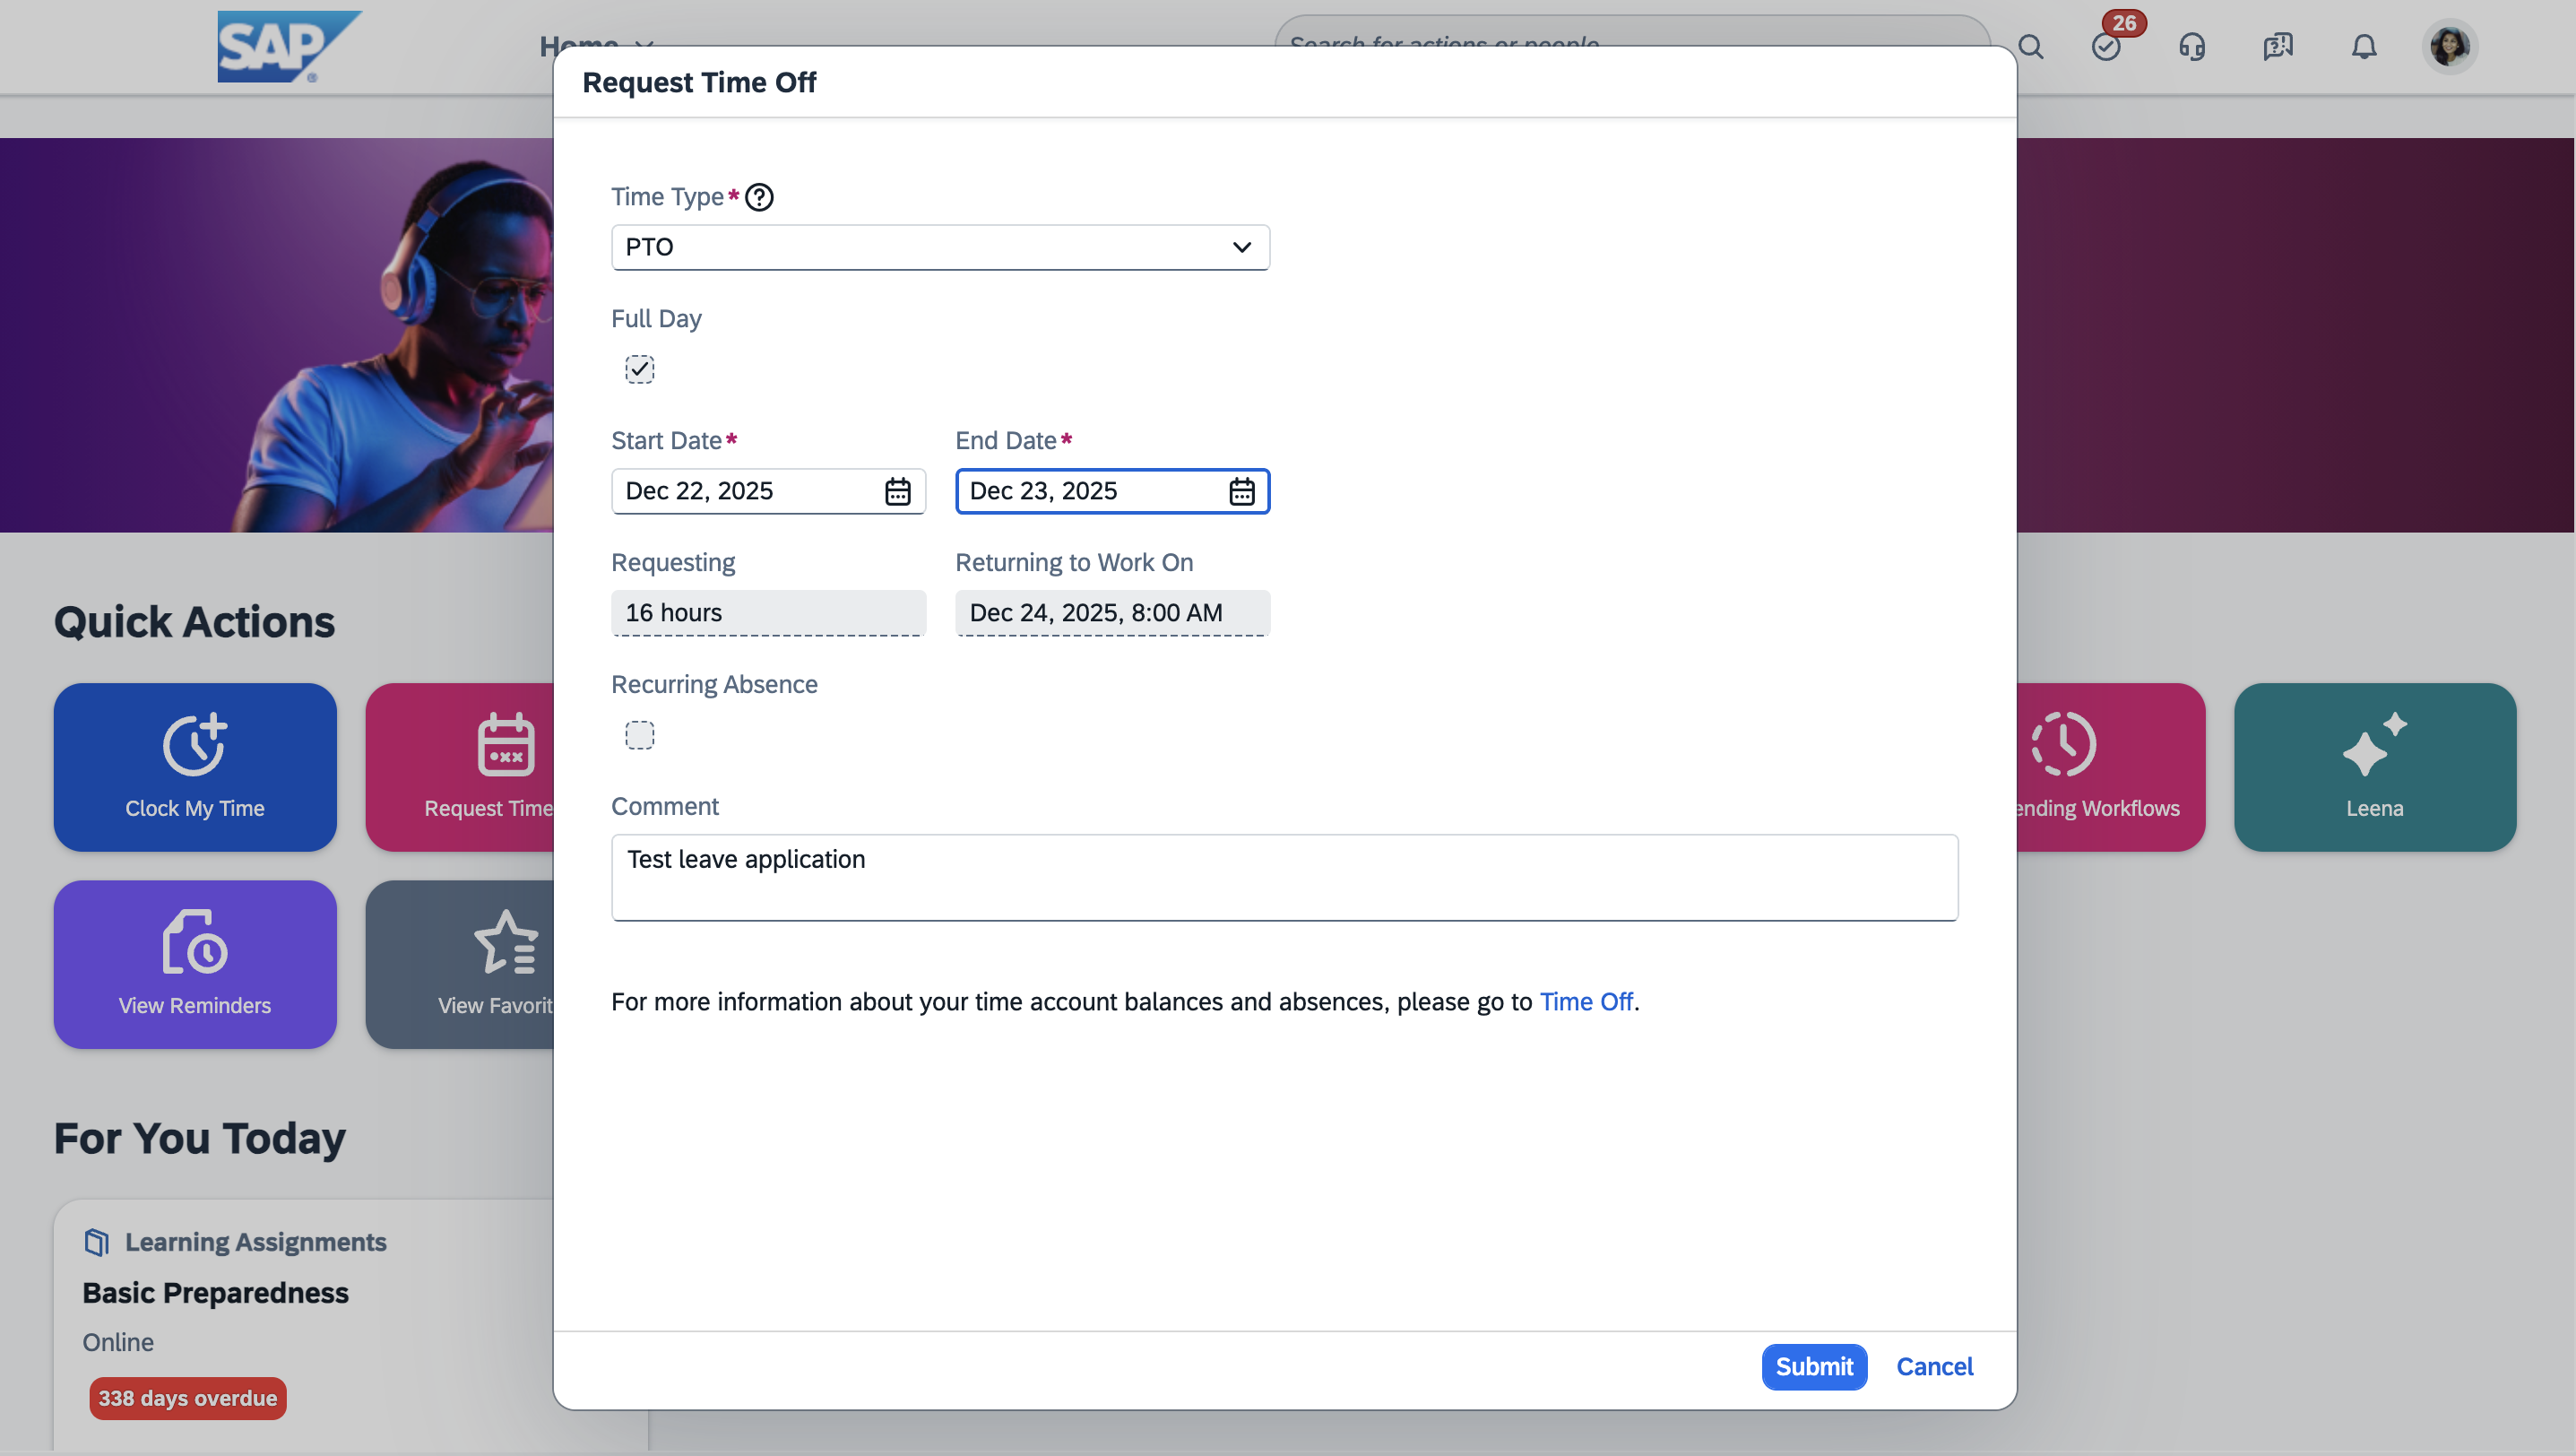
Step 5: Form Interaction and Data Entry
- Analyses leave request form structure and fields
- Locates leave type dropdown:
- Computer vision identifies dropdown element
- Clicks to expand options
- Searches for "PTO" or similar terms
- Selects appropriate option
- Handles start date field:
- Identifies date picker or input field
- Enters 2024-12-22 in correct format
- Handles calendar popup if present
- Handles end date field:
- Enters 2024-12-23 using the same logic
- Validates date range logic
Step 6: Form Submission and Validation
- Reviews form completion: Ensures all required fields filled
- Locates submit button: "Submit", "Apply", "Send Request"
- Clicks submit button with human-like timing
- Waits for processing: Handles loading screens and delays
- Monitors for validation errors: Checks for error messages or field highlighting
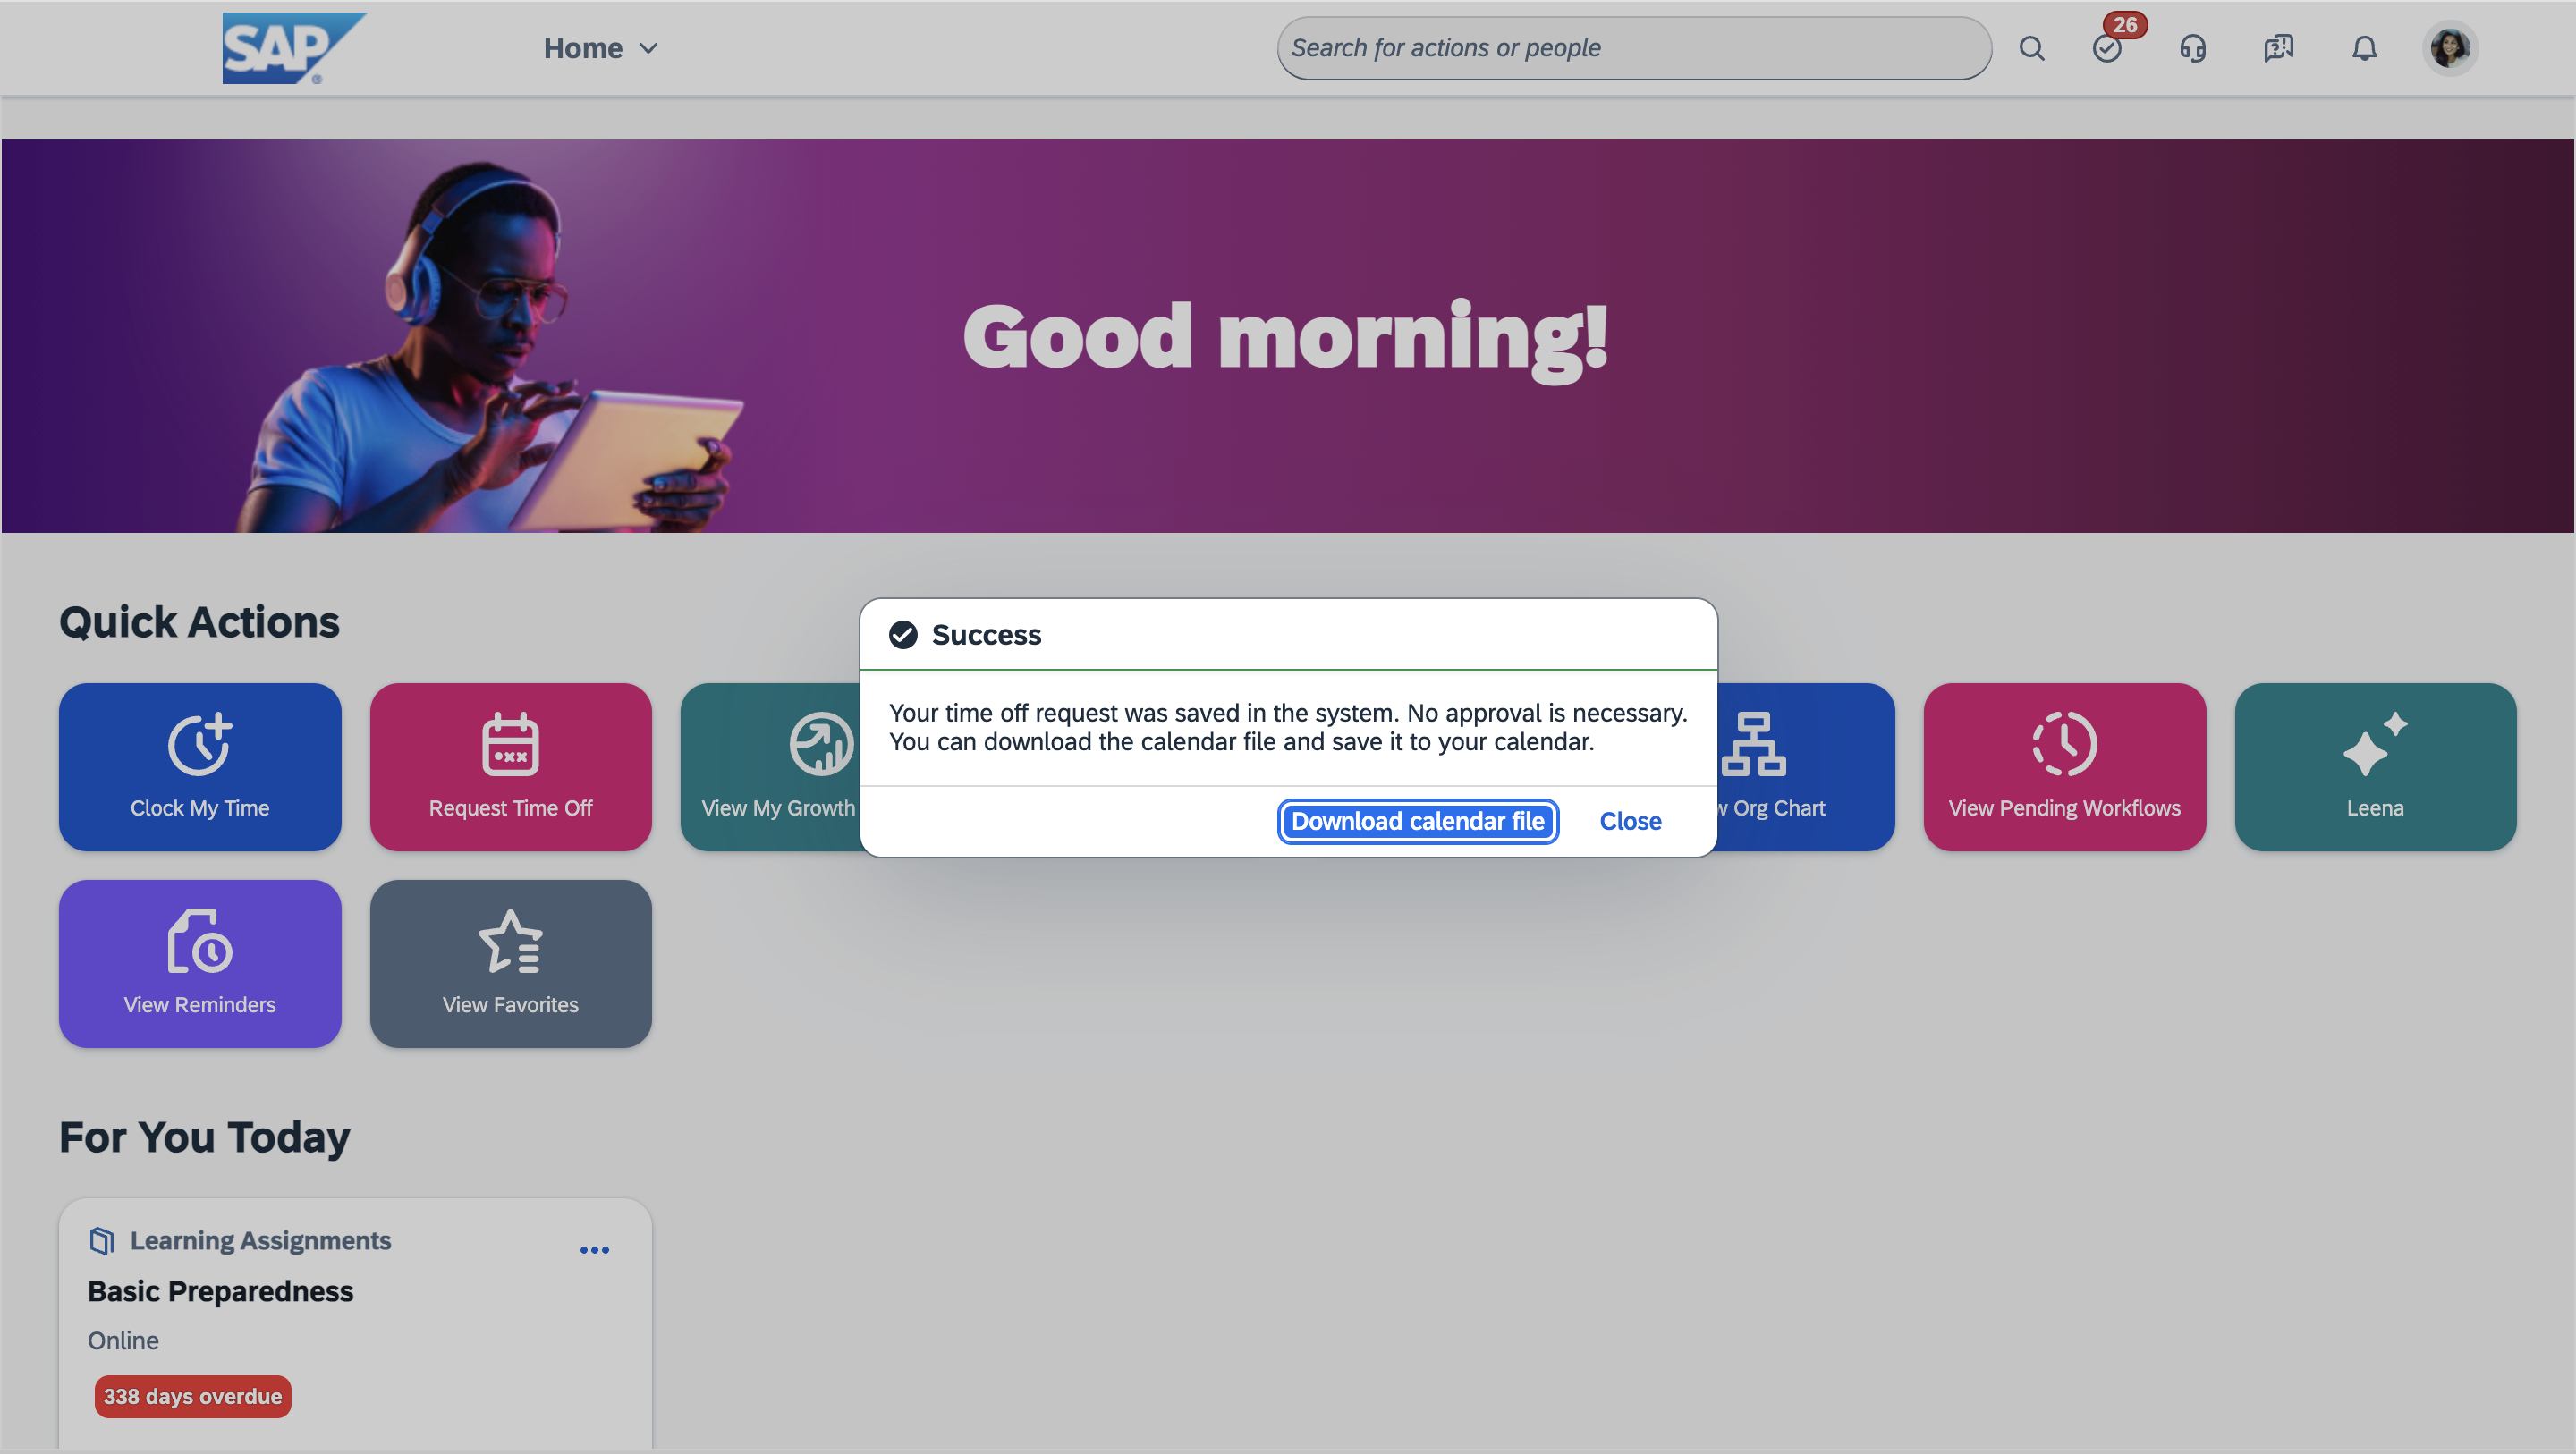
Step 7: Confirmation and Result Capture
- Identifies success indicators:
- Success message: "Leave request submitted successfully"
- Reference number: "Request ID: LR-2024-001234"
- Confirmation page elements
- Takes confirmation screenshot for audit purposes
- Extracts key information: Request ID, status, next steps
- Prepares result summary with execution details
Step 8: Result Reporting
Browser Run returns structured results:
json
"status": "SUCCESS",
"requestId": "LR-2024-001234",
"message": "Leave request submitted successfully",
"details":
"employee": "John Smith",
"leaveType": "PTO",
"startDate": "2025-12-22",
"endDate": "2025-12-23",
"duration": "2 days"
,
"screenshots": ["login.png", "form.png", "confirmation.png"],
"executionTime": "2m 34s"
Setup Connector
There is no requirement of setting up a connector for 'Browser Run' as this is a native Leena AI's Workflow Studio capability.
Configuration
This guide provides step-by-step instructions for setting up and configuring Browser Run functionality within Leena AI's Workflows Studio. 'Browser Run' allows you to automate web-based tasks through a headless browser, such as applying for leave requests in SAP SuccessFactors on behalf of users.
Prerequisites
Before configuring Browser Run, ensure you have:
- Access to Leena AI Workflows Studio
- Valid credentials for the target web application
- Understanding of the target web application's interface and workflow
Step-by-Step Setup Process
Step 1: Create a New Workflow
- Navigate to Workflows Studio in your Leena AI platform
- Go to Apps and create or select your application
- Click on the Workflows tab
- Create a new workflow or edit an existing one
Step 2: Add an Action Node
- In the workflow canvas, locate the Add nodes panel on the left side
- Click on the Action node type from the available options
- Drag and drop the Action node into your workflow at the desired position
- Connect the Action node to your workflow sequence using the connection points
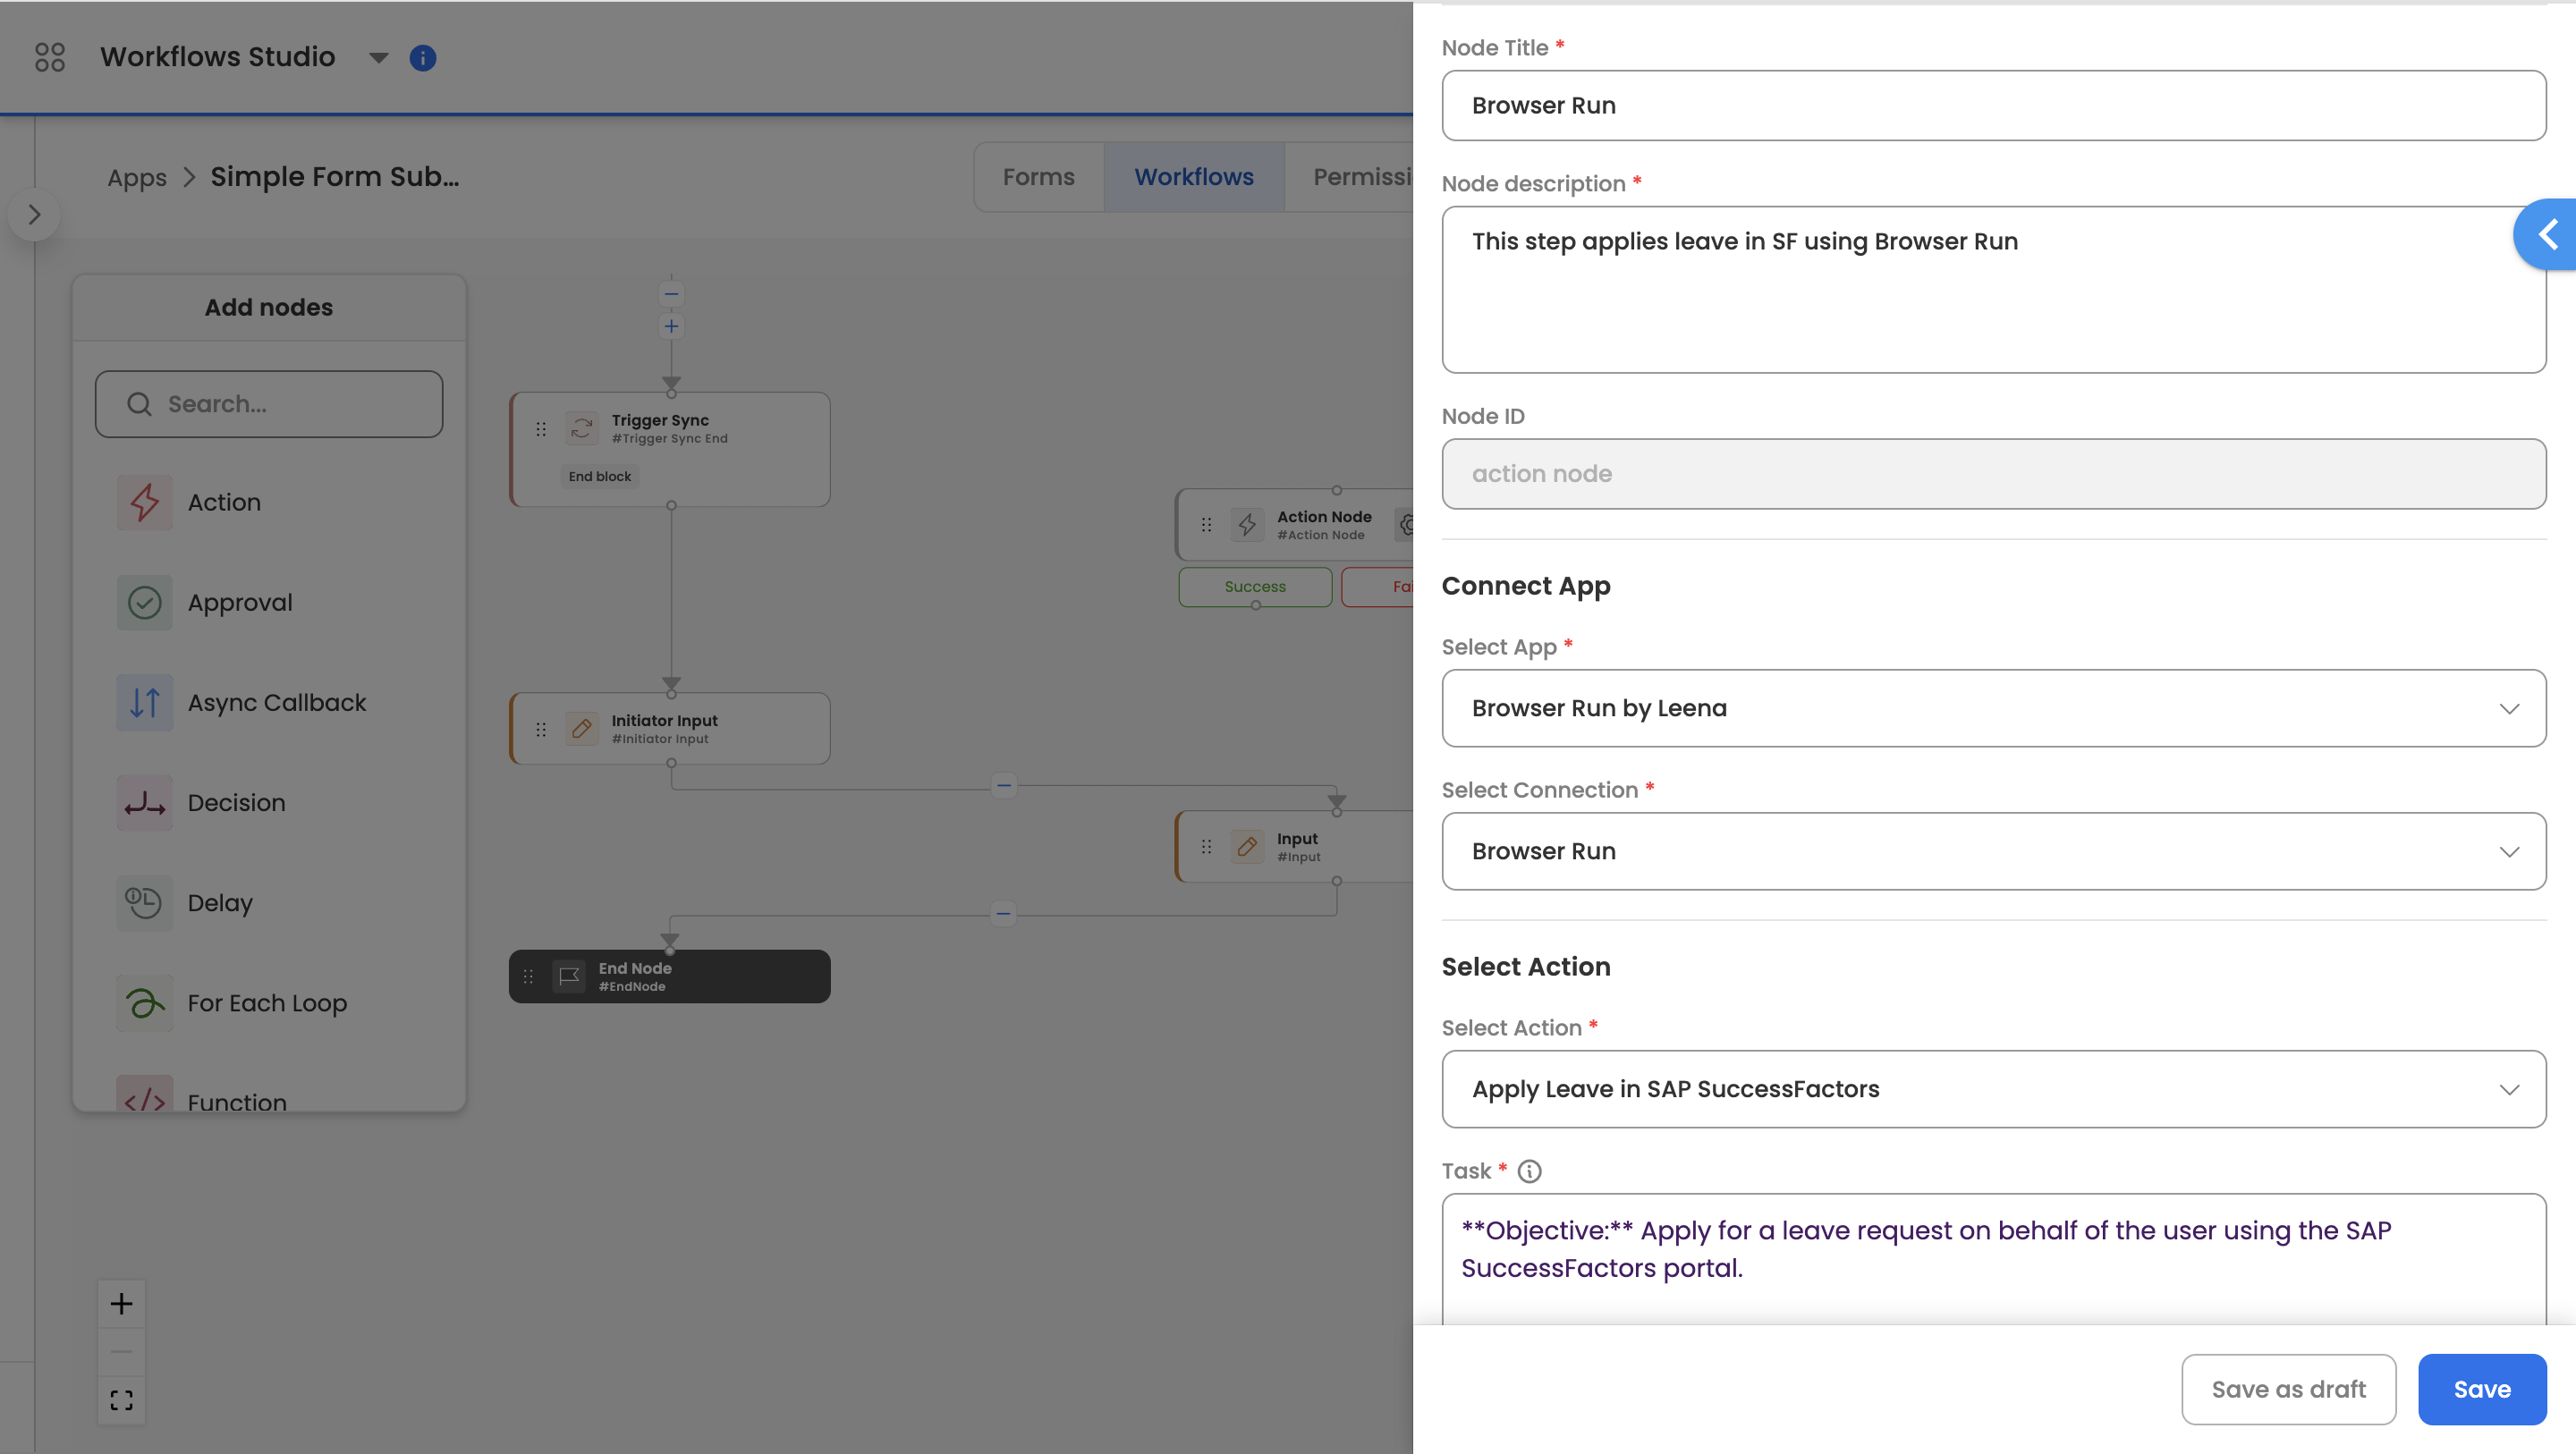
Step 3: Configure Action Node Properties
- Click on the Action node to open the Action Node Properties panel
- Fill in the basic node information:
- Node Title: Enter a descriptive title (e.g., "Apply Leave via Browser Run")
- Node Description: Provide a detailed description of what the action will do
- Node ID: Auto-generated from node title
Step 4: Connect to Browser Run App
- In the Connect App section:
- Select App: Choose "Browser Run by Leena" from the dropdown menu
- Select Connection: This is auto-populated (no user configuration required)
Step 5: Select Browser Action
-
In the Select Action section:
- Choose your specific browser action (e.g., "Apply Leave in SAP SuccessFactors")
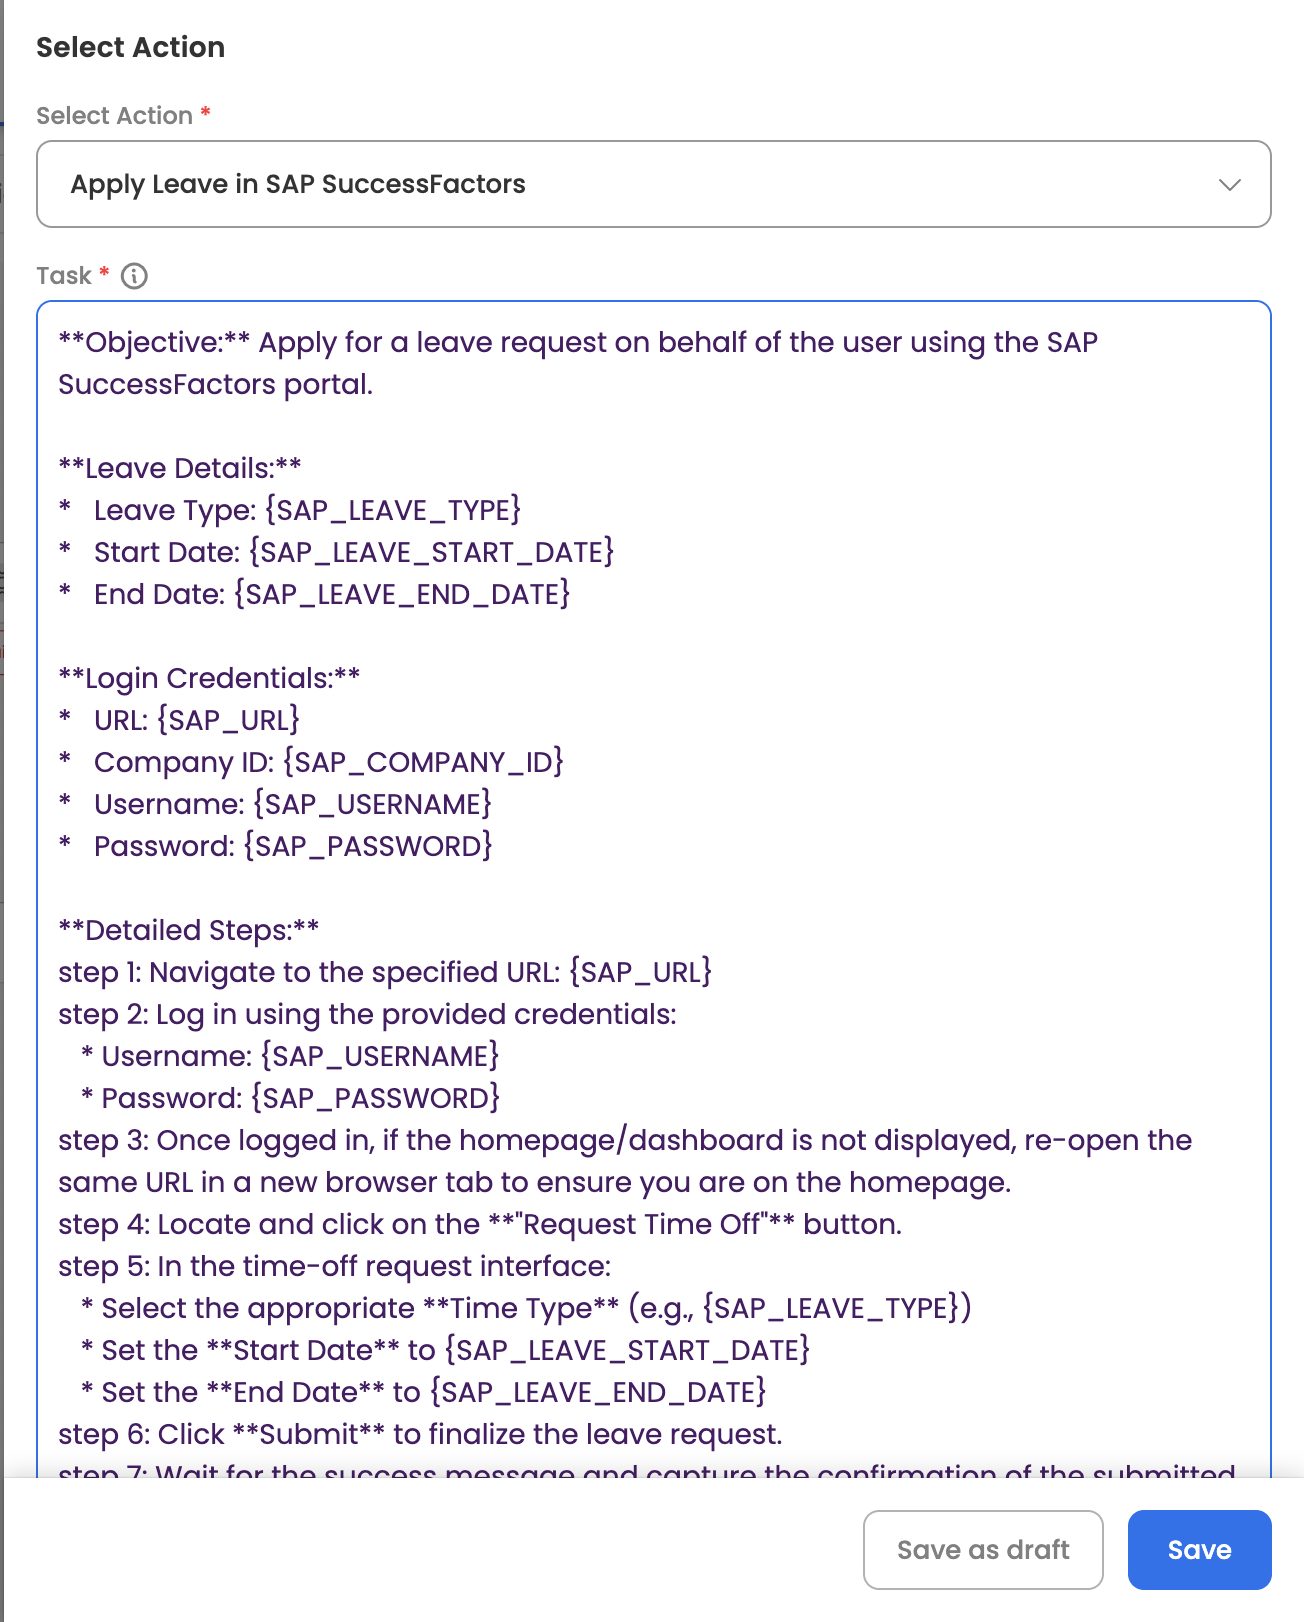
Step 6: Define Task Instructions
In the Task field, provide detailed instructions for the browser automation. Structure your instructions clearly:
Example Task Configuration
**Objective:** Apply for a leave request on behalf of the user using the SAP SuccessFactors portal.

**Leave Details:**
* Leave Type: {SAP_LEAVE_TYPE}
* Start Date: {SAP_LEAVE_START_DATE}
* End Date: {SAP_LEAVE_END_DATE}

**Login Credentials:**
* URL: {SAP_URL}
* Company ID: {SAP_COMPANY_ID}
* Username: {SAP_USERNAME}
* Password: {SAP_PASSWORD}

**Detailed Steps:**
step 1: Navigate to the specified URL: {SAP_URL}
step 2: Log in using the provided credentials
step 3: Once logged in, if the homepage/dashboard is not displayed, re-open the same URL in a new browser tab
step 4: Locate and click on the "Request Time Off" button
step 5: In the time-off request interface, select the appropriate Time Type, Start Date, and End Date
step 6: Click Submit to finalize the leave request
step 7: Wait for the success message and capture the confirmation
Step 7: Configure Metadata and AI Settings
-
Add Metadata (Optional):
- Click "Add Metadata" to enter key-value pairs for all the keywords provided under 'Task' such as, SAP_COMPANY_ID
- Note: This metadata will not be sent to the LLM for security purposes
-
Callback URL:
- Enter the callback URL to receive task results
-
LLM Provider:
- Select the AI model for task execution (e.g., "Gemini")
- This AI model will interpret and execute the browser automation instructions
Step 8: Save and Test
- Click Save as draft to save your configuration without activating
- Alternatively, click Save to save and activate the workflow
- Test the workflow with sample data to ensure proper functionality