
Zendesk
Connecting Leena AI Knowledge Management with Zendesk
This guide walks you through connecting your Zendesk Help Center to Leena AI Knowledge Management (KM), so that Zendesk articles are automatically synced into Leena AI and can be used to answer employee queries.
The setup has two parts:
- In Zendesk — create an OAuth client to get a Client ID and Client secret.
- In Leena AI KM — use those credentials to configure the integration, choose which categories to sync, and run the sync.
Why OAuth? Zendesk is retiring API tokens. It stops issuing new API tokens on 27 October 2026 and deactivates all existing ones on 30 April 2027. Use OAuth for all new connections. The API token option in Leena AI is kept only for existing connections during the migration window.
Before you begin
Make sure you have:
- Admin access in Zendesk (required to open Admin Center and create OAuth clients).
- Your Zendesk domain — for example,
company.zendesk.com. - Admin access to the Leena AI Knowledge Management dashboard.
Part 1 — Create an OAuth client in Zendesk
With OAuth, you give Leena AI a long-lived OAuth client. Leena AI then generates short-lived access tokens from it on every sync, so you never have to share or rotate a static token.
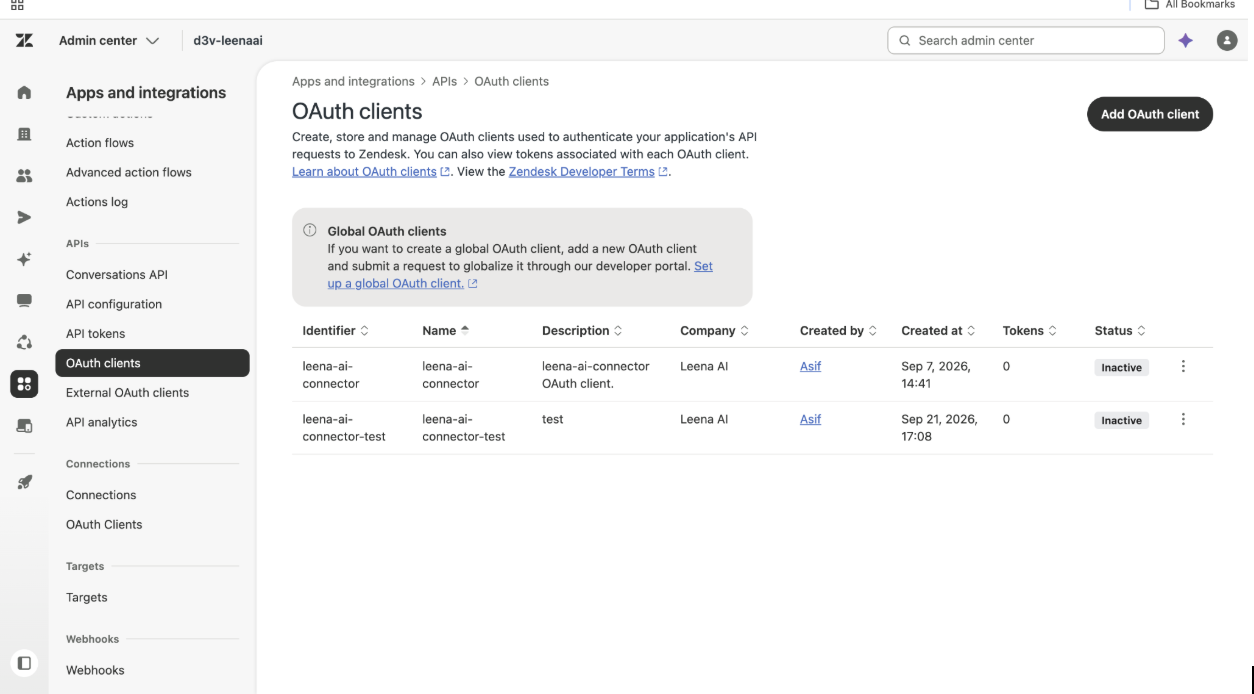
Step 1: Open OAuth clients
In Zendesk, go to:
Admin Center → Apps and integrations → APIs → OAuth clients
Click Add OAuth client in the top-right corner.
Step 2: Enter the client details
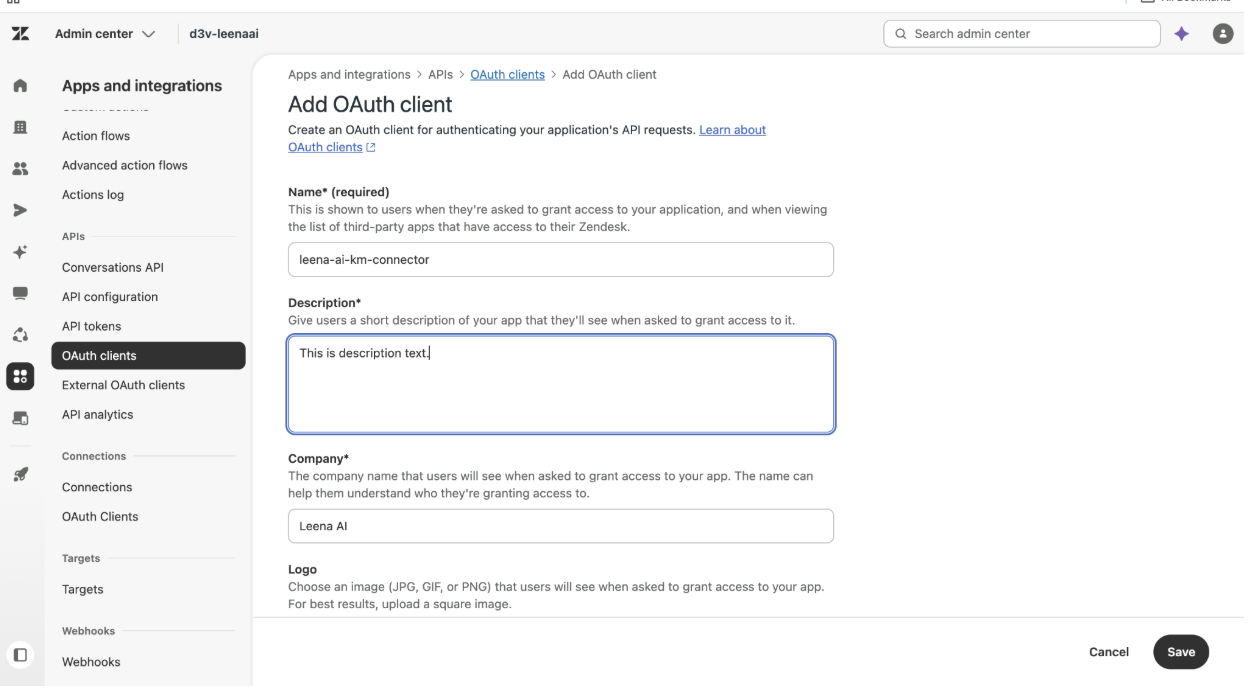
Fill in the following fields:
| Field | What to enter |
|---|---|
| Name | Any name you like — for example, leena-ai-km-connector. |
| Description | A short description, for example Leena AI KM connector. |
| Company | Your company name, or Leena AI. |
| Logo | Optional. |
Note: Zendesk creates the client's Identifier from the name you enter. The Identifier is your Client ID in Part 2, so make a note of it.
Step 3: Set the client kind and scopes
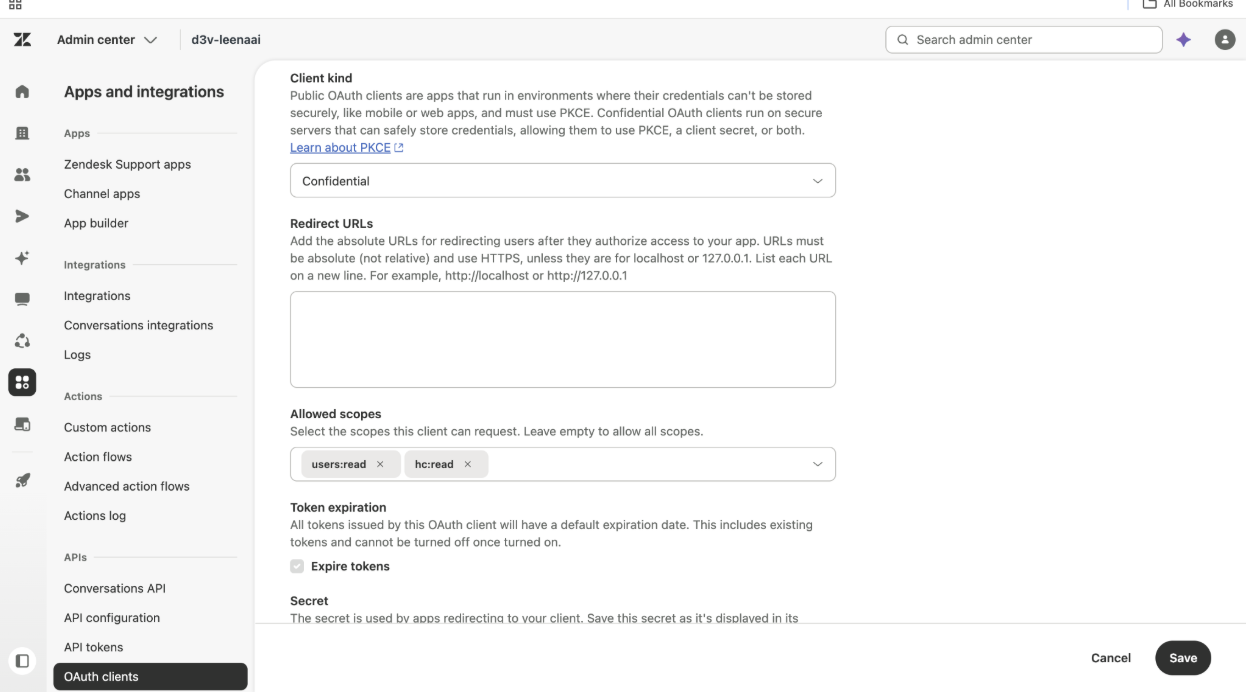
Scroll down and set the following:
| Field | What to enter |
|---|---|
| Client kind | Select Confidential. |
| Redirect URLs | Leave empty. |
| Allowed scopes | Add at least hc:read and users:read. You can add other scopes if your setup needs them. |
Important: The client kind must be Confidential. A Public client can't use the client-credentials grant, so Zendesk will reject Leena AI's token requests and the sync will fail.
Step 4: Copy the secret and save
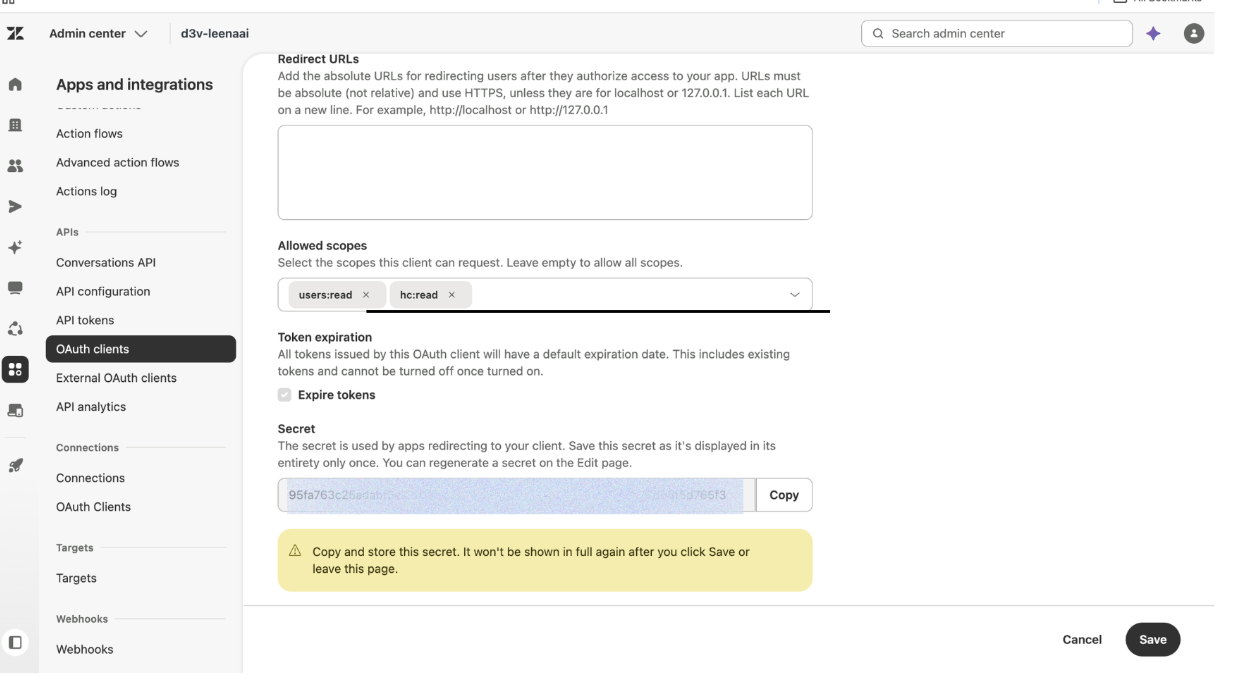
In the Secret section, click Copy and store the secret somewhere safe. Then click Save.
The secret is shown only once. After you click Save or leave the page, Zendesk won't show it in full again. If you lose it, you'll need to regenerate it from the client's Edit page and update the connection in Leena AI.
You now have the two values you need for Part 2:
- Client ID — the client's Identifier (shown in the Identifier column on the OAuth clients page).
- Client secret — the secret you just copied.
Part 2 — Configure the integration in Leena AI KM
Step 1: Open the Zendesk integration
In the Leena AI Knowledge Management dashboard, go to:
Settings → Integrations → Zendesk
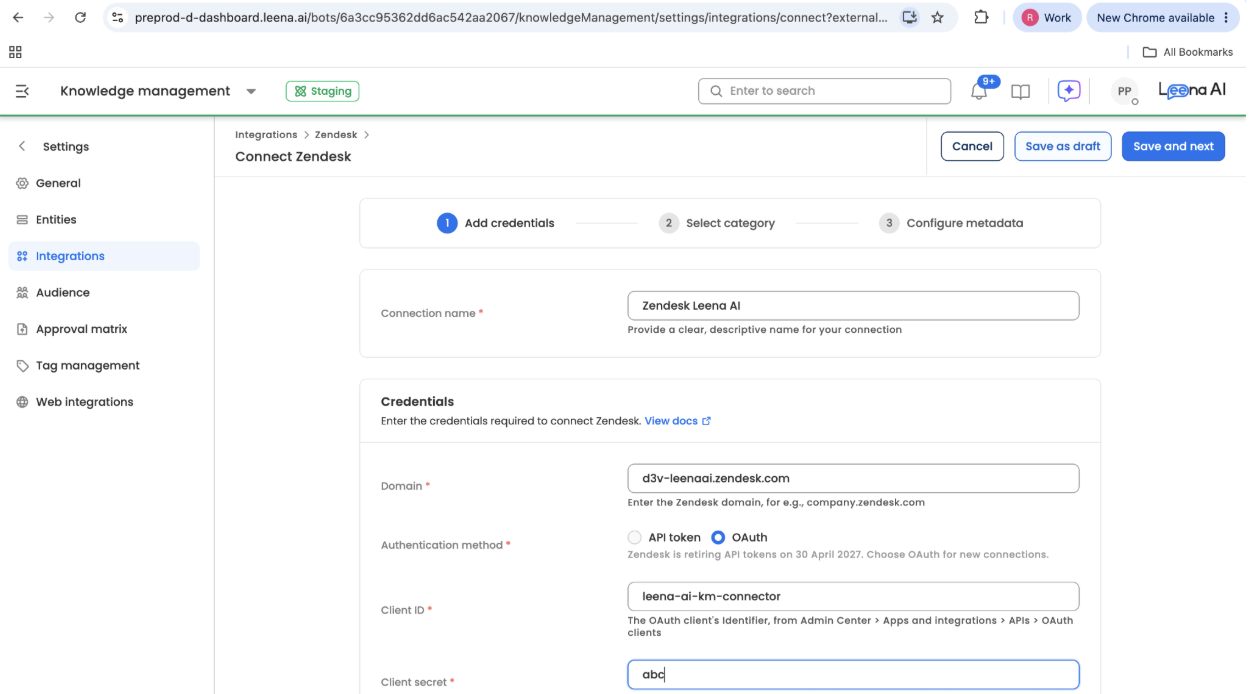
This opens the Connect Zendesk setup, which has three stages: Add credentials, Select category, and Configure metadata.
Step 2: Enter the connection name and credentials
Fill in the following fields:
| Field | What to enter |
|---|---|
| Connection name | A clear label for this connection — for example, HR Help Center or Zendesk – Production. |
| Domain | Your Zendesk domain — for example, company.zendesk.com. |
| Authentication method | Select OAuth. |
| Client ID | The OAuth client's Identifier from Part 1. |
| Client secret | The secret you copied in Part 1, Step 4. |
Step 3: Configure article settings
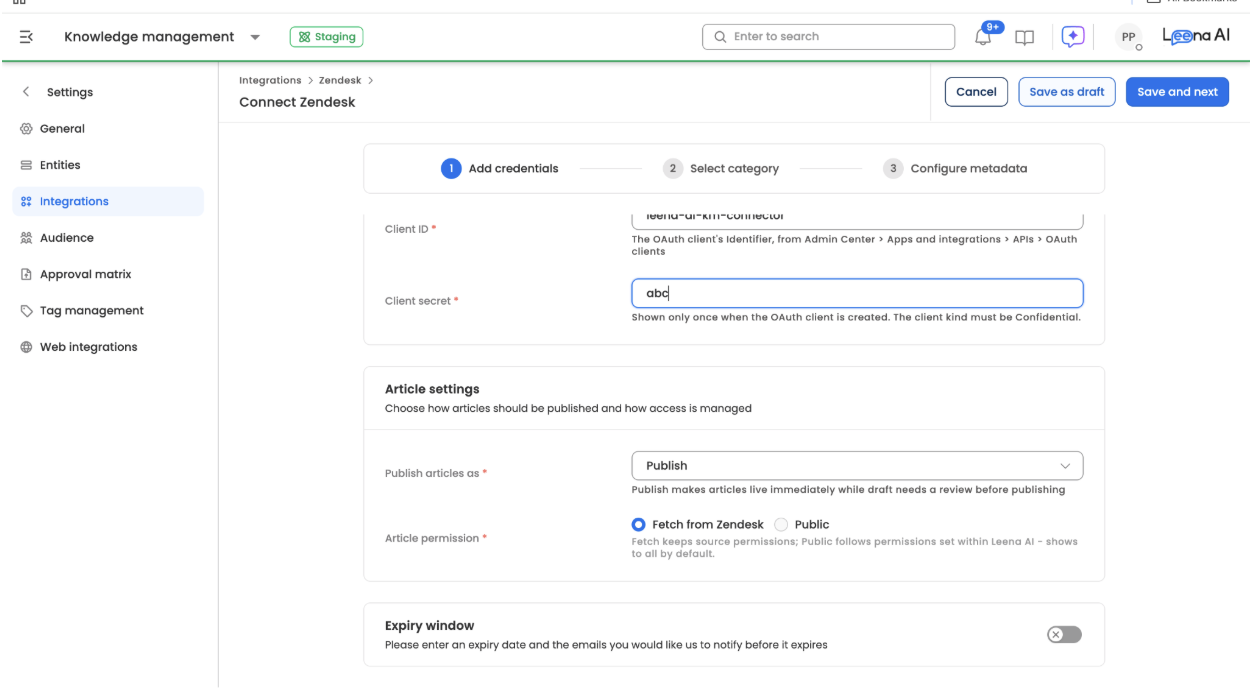
On the same page, define how synced Zendesk articles are handled in Leena AI KM:
- Publish articles as — choose Publish to make synced articles live immediately, or Draft if you want them reviewed before they're published.
- Article permission — choose Fetch from Zendesk to keep the article permissions set in Zendesk, or Public to follow the permissions set in Leena AI (visible to everyone by default).
- Expiry window — optionally turn this on to set an expiry date for synced articles and the emails to notify before they expire.
Click Save and next.
Step 4: Select categories
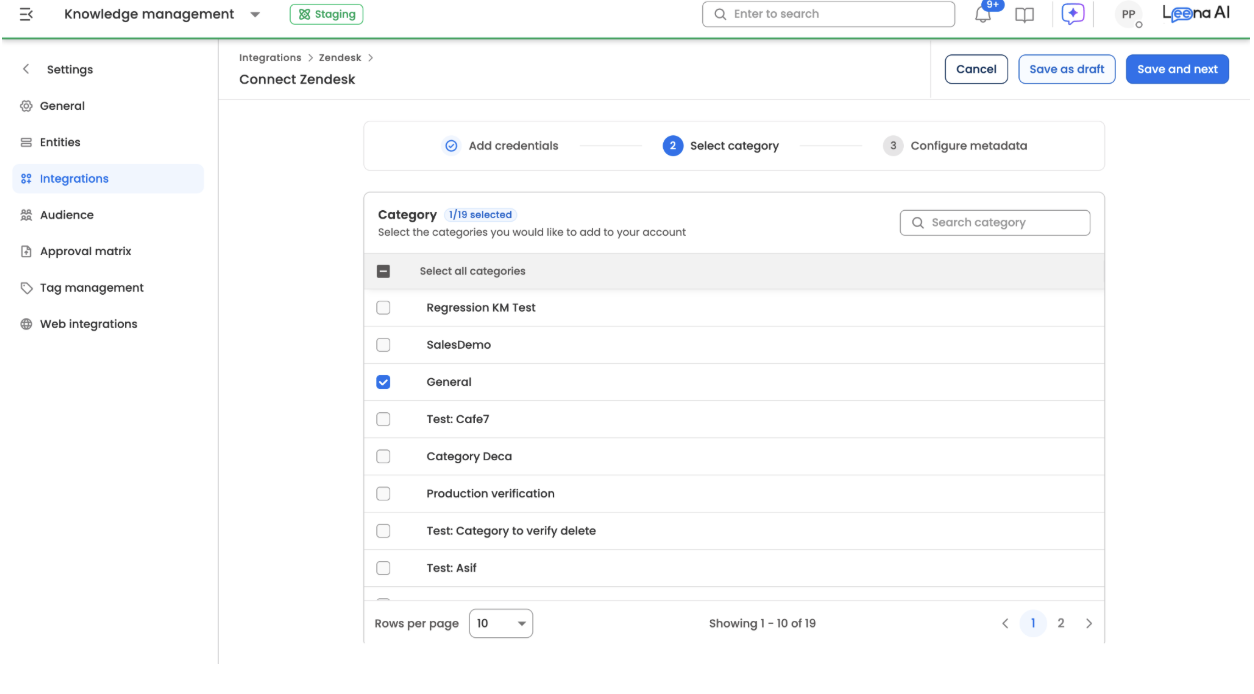
On the Select category page, Leena AI lists the categories in your Zendesk Help Center. Select the categories you want to sync, or tick Select all categories to sync everything. Use Search category to find a category quickly.
Click Save and next.
Step 5: Configure metadata (optional)
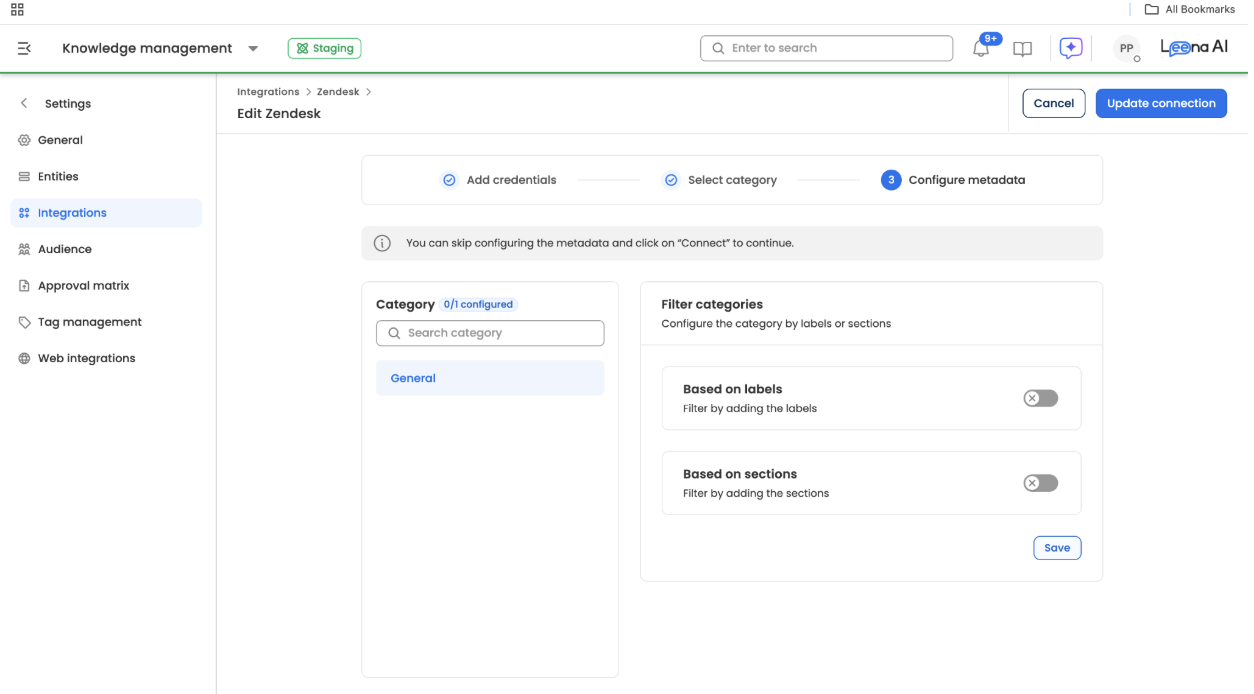
On the Configure metadata page, you can narrow down which articles are synced within each selected category. This step is optional — skip it if you want to sync every article in the selected categories.
To filter a category:
- Select the category from the list on the left.
- Turn on one or both filters:
- Based on labels — sync only articles that have the labels you add.
- Based on sections — sync only articles in the sections you add.
- Click Save.
- Repeat for any other categories you want to filter.
Step 6: Connect and run the sync
Click Connect to save the integration and start the sync. (When you edit an existing connection later, this button reads Update connection.)
Once the sync completes, your Zendesk articles will be available in the Leena AI Knowledge Management dashboard.
Quick reference
| Value | Where to get it |
|---|---|
| Domain | Your Zendesk URL, e.g. company.zendesk.com |
| Client ID | Zendesk → Admin Center → Apps and integrations → APIs → OAuth clients → Identifier column |
| Client secret | Shown once when you create the OAuth client (regenerate from the client's Edit page if lost) |
| Client kind | Must be Confidential |
| Required scopes | hc:read, users:read |
| Categories to sync | Leena AI → Connect Zendesk → Select category |
| Labels / sections (optional filter) | Leena AI → Connect Zendesk → Configure metadata |
Troubleshooting
| Problem | What to check |
|---|---|
| Connection fails with an authentication error | Confirm the Client ID is the client's Identifier (not its display name if you changed it), the secret was copied in full, and the domain has no https:// or trailing path. |
| Token request is rejected | The OAuth client's Client kind must be Confidential. |
| No categories appear, or articles are missing | Check that Allowed scopes includes hc:read and users:read. If you left Allowed scopes empty, all scopes are allowed. |
| Lost the client secret | Open the OAuth client in Zendesk, regenerate the secret, then update the Client secret in the Leena AI connection. |
Updated 30 days ago