
Generate Workflows with AI
This feature is currently in beta. The interface and capabilities may evolve based on feedback.
Workflows Studio now features a redesigned homepage powered by AI. Instead of manually configuring every node, form, and connection from scratch, you can describe the workflow you want in plain English — and AI builds it for you.
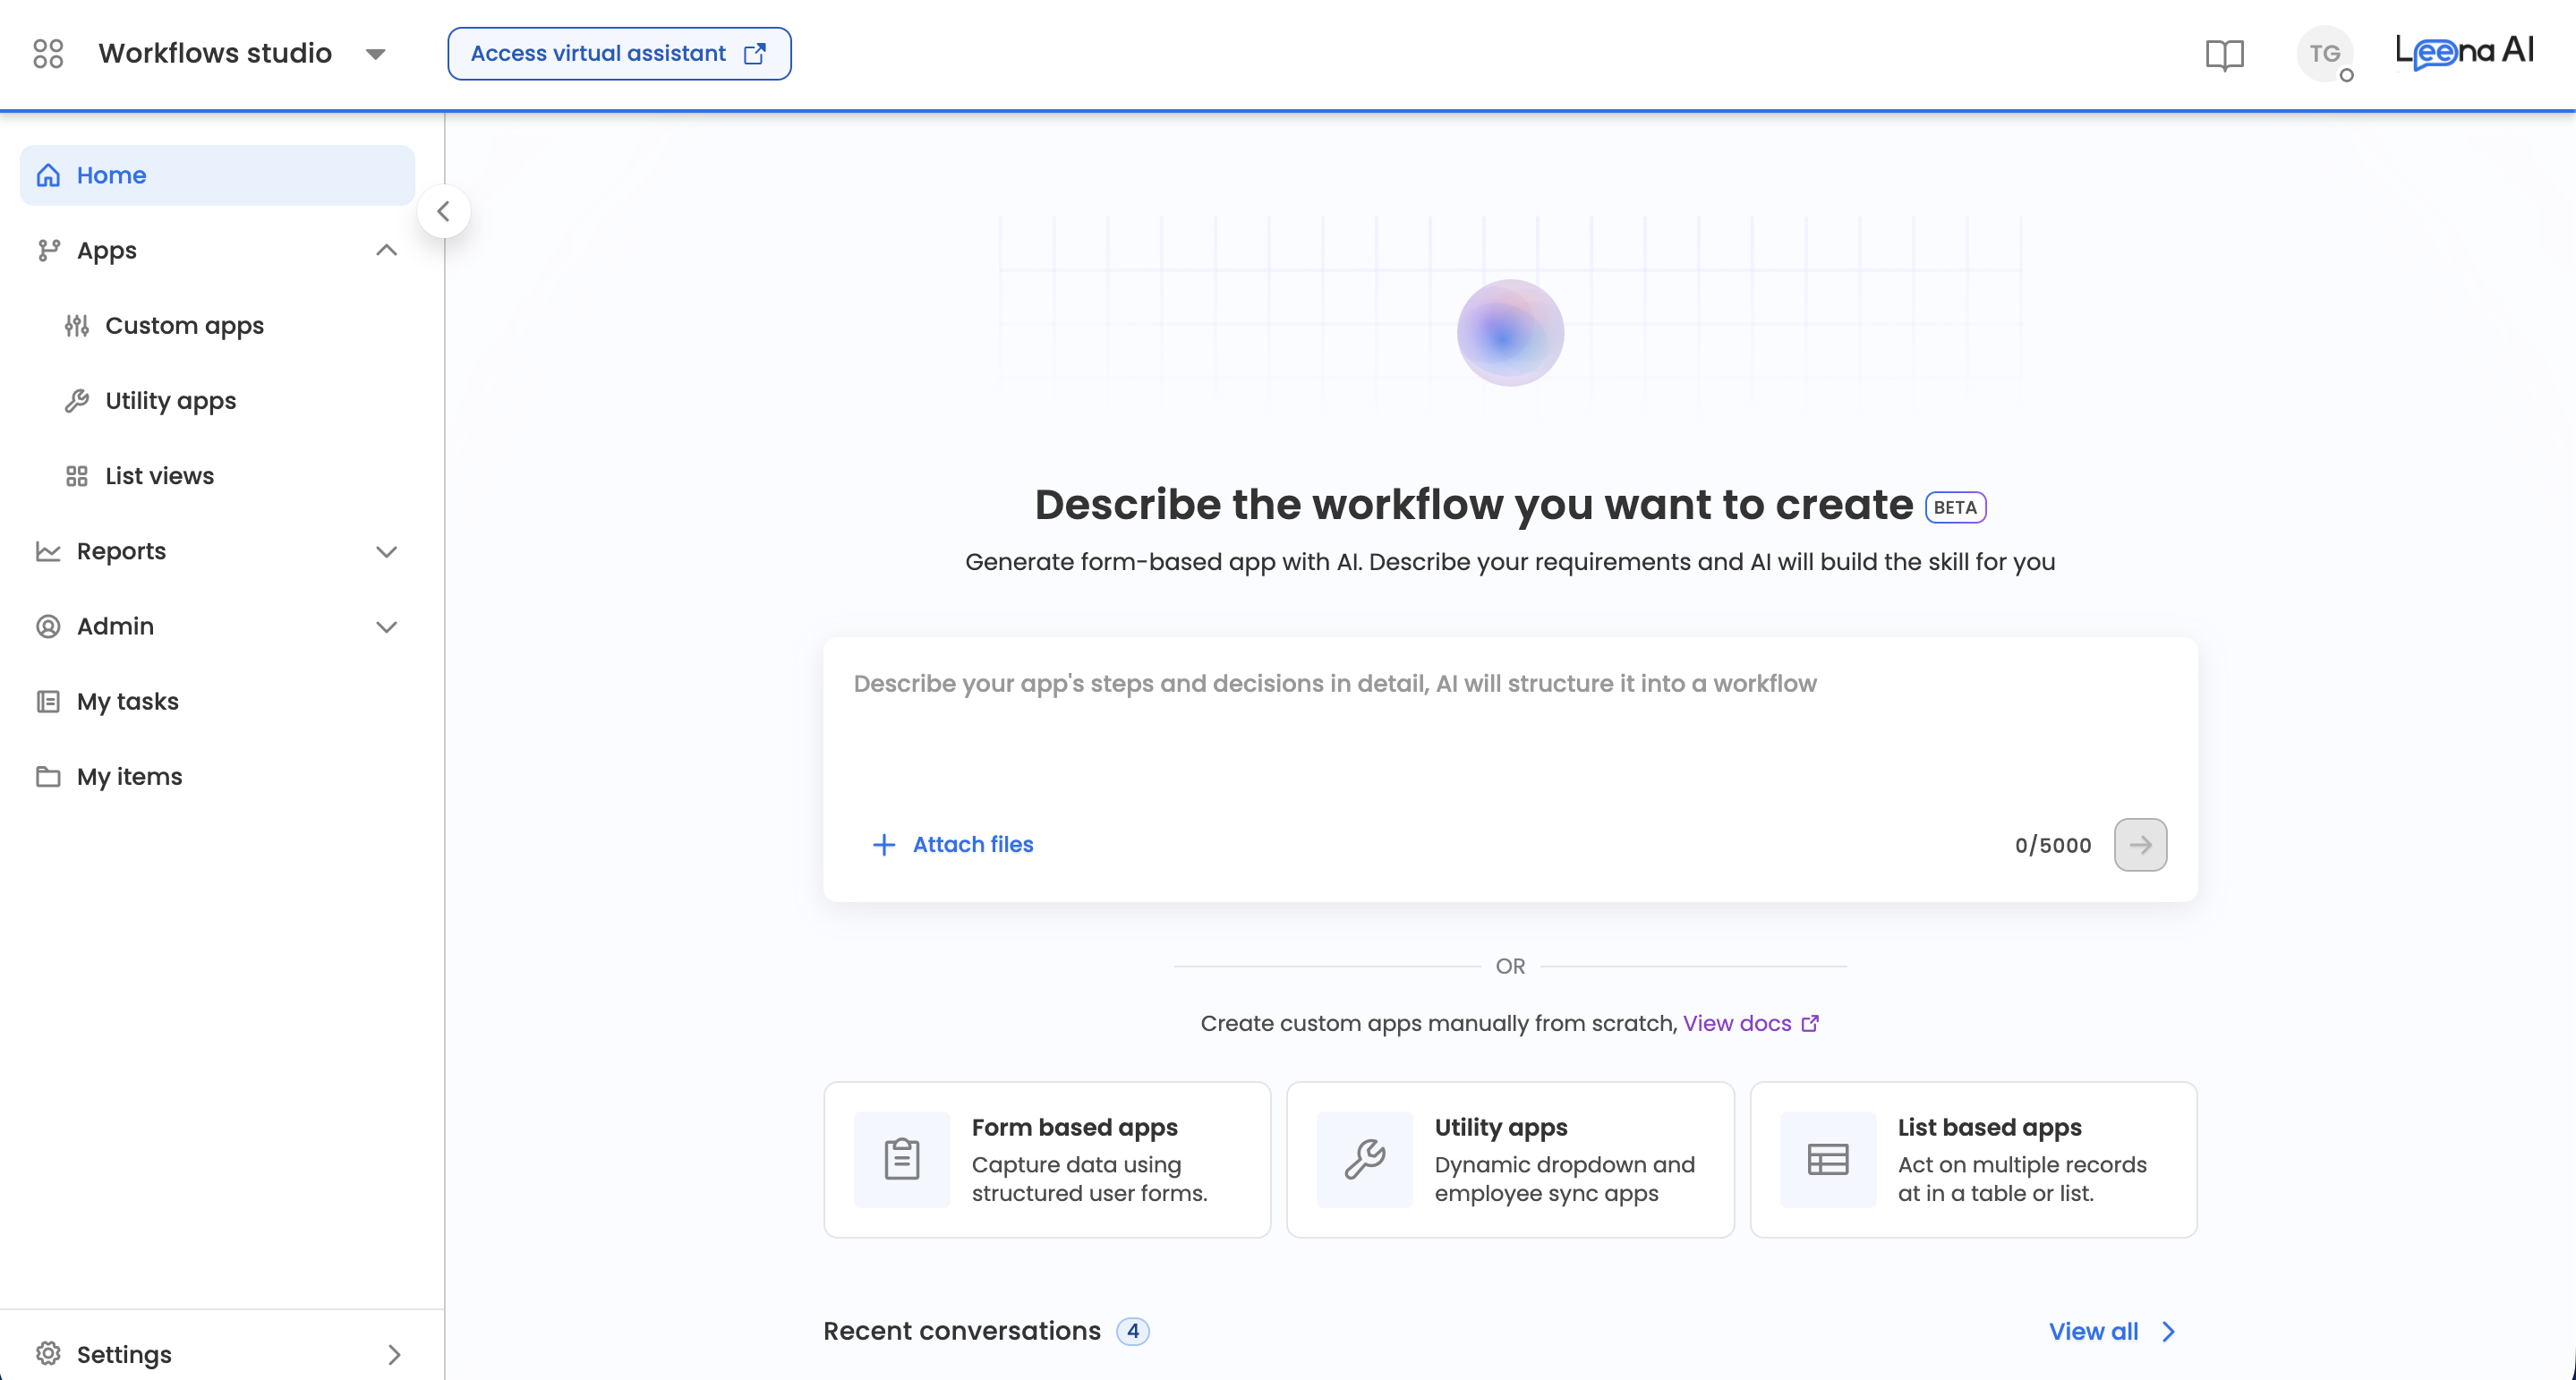
The AI-generated Workflows homepage replaces the traditional app listing as the default landing page in Workflows Studio. When you open Workflows Studio, you're greeted with a prompt-driven interface where you can:
- Describe your workflow requirements in natural language
- Attach reference documents for additional context
- Review and approve an AI-generated plan before any technical build begins
- Watch the workflow get built on a side-by-side canvas that refreshes in real time as the AI works
- Let AI generate a complete workflow app — with forms, nodes, and logic — in seconds
- Return to any existing app later and continue refining it with AI using Edit via AI
- Stop a generation mid-way, edit your prompt, and run it again
You can still create apps manually using the app listing page within Workflows Studio.
Examples
Action workflow
Workflow with a cURL
Approval workflow
Supported App Types
The AI can now build four kinds of apps. During planning, the AI classifies your request into one of these types, announces its choice up front (e.g., "Got it — I'm setting this up as a List View app. If you'd rather build a different kind of app, just let me know."), and you can change the type freely during planning. Once the app is created, its type is fixed.
1. Custom App (Form-based Workflow)
A full business workflow with human steps, forms, approvals, integrations, and persisted state. This is the default and covers the vast majority of requests — leave requests, expense reimbursement, onboarding intake, IT ticket creation, and approval flows.
2. List View App
An app whose primary surface is a table of records that users browse and act on per row — approvals queues, ticket boards, request dashboards, vendor directories, admin moderation queues. Describe it naturally: "Show me all open vendor requests with an approve button on each row."
For List View apps, the AI works within the fixed list-view scaffold (List View Trigger → Mapper → End) and builds in a specific order:
- Table columns first — the AI defines the column headers (field name, display label, type) from your description before configuring any workflow logic, since the columns determine what data the Mapper is allowed to produce.
- Data workflow — business-logic nodes (e.g., an Action node fetching records from an external system, Function nodes for filtering) are placed inside the synchronous block between the trigger and the Mapper. Only node types compatible with synchronous list-view execution are allowed.
- Mapper configuration — the Mapper maps your data source into the table columns. Mapping targets must match the defined columns, and the AI keeps the Mapper configured even as columns are iterated on via chat (unlike manual column edits, which can require re-configuring the Mapper).
- Row actions — if you ask for them, the AI configures row-level actions (redirects or workflow triggers with row data mapped into the target workflow's form).
- Filters — if you ask for filters, the AI adds fields to the list view's Filter Params form.
While building a List View app, the side-by-side panel shows the live List View builder instead of the Flow Builder canvas, and the header includes a Preview button to see the rendered table.
3. Dynamic Dropdown Utility App (Async Utility)
A small backend "data source" app whose only job is to return a list of options for a dynamic dropdown / async-select field in another app's form. It has no human steps — it runs end-to-end in a single request and returns { options, page }.
Use prompts like: "Create a dynamic dropdown that fetches cost centers from Workday" or "Build an async hook that returns all active departments."
Dynamic Dropdown utility apps are created with a fixed, protected three-node scaffold:
Trigger → Mapper → End- Trigger — fires automatically when the calling form requests options. Self-configured.
- Mapper — the heart of the app. It shapes your data into the fixed
{ label, value }option format that dropdowns expect. - End — returns the response to the calling form.
The simplest valid utility is exactly this scaffold — for a static options list, the AI only configures the Mapper. When needed, the AI inserts processing steps between the Trigger and Mapper: an Action node to fetch options from an external system, a Function node to filter/sort/dedupe, or a Decision node to branch on a filter parameter.
Two forms ship with every Dynamic Dropdown utility:
- Pagination & Search — immutable. Contains the runtime contract fields (
q,page,pageSize,skipToken,hasNext). Neither you nor the AI can modify it. - Filter Params — the only editable form. This is where the AI adds caller-provided parameters (Text fields only) based on your prompt.
4. Employee Sync Utility App (Backend data source)
A small backend "data source" app whose only job is to return a page of employee records to an external caller — typically an HRIS or employee-data sync engine that polls it on demand. Like the Dynamic Dropdown utility, it has no human steps: it runs end-to-end in a single synchronous request and returns a paginated response ({ data, page }).
Use prompts like: "Create an Employee Sync data source that returns a page of active employees from Workday for our HRIS to poll" or "Build an employee sync utility that pages through SuccessFactors workers using skip tokens."
Employee Sync utility apps are created with a fixed, protected three-node scaffold:
- Employee Sync Trigger — fires when the external caller requests a page of data. Self-configured; it also defines the paginated response shape.
- Mapper — the heart of the app. Shapes your data source into the per-record output for each page.
- End — returns the paginated response to the caller.
The simplest valid utility is exactly this scaffold. When needed, the AI inserts processing steps between the Trigger and the Mapper — an Action node to fetch a page of records from an external system (e.g., an HRIS or master table), a Function node to filter/sort/transform, or a Decision node to branch. The allowed interior node types are Decision, Merge, Branch, Action, Function, Mapper, Update, and Sticky Note (Purge is available as an inline insert after a Mapper). Other node types are rejected at build time.
One editable form ships with every Employee Sync utility:
- Pagination & Search — the only form on the app. You (and the AI) can add or remove fields, but the form itself cannot be renamed or deleted, and no additional forms can be created. Its field palette is limited to Text, Dropdown, Master, and Dynamic Dropdown fields.
Pagination mode is chosen during planning and is immutable after creation. When the AI classifies your request as an Employee Sync utility, it will ask you to confirm one of:
page— page + pageSize pagingskipToken— skipToken + pageSize (cursor-style) pagingnone— no pagination fields seeded
Because this maps to a create-time-only setting, the AI will not build the app until you've confirmed the pagination mode.
How It Works
Step 1: Describe Your Workflow
On the Workflows Studio homepage, you'll see a text input with the prompt: "Describe the workflow you want to create."
Type a natural-language description of the process you want to automate. Be as specific as possible — include details about:
- What data needs to be collected (form fields)
- Who should approve or review
- What actions should happen after submission
- Any conditions or branching logic
Example prompts:
You can be as detailed or as brief as you like. The AI adapts — detailed prompts give you a more precise first draft, while simple prompts let the AI infer the structure from action configurations and best practices.
Detailed prompts:
-
"Create a leave request workflow where employees fill in leave type, start date, end date, and reason. The request should go to their manager for approval. If approved, update the leave balance. If rejected, notify the employee."
-
"Build an expense reimbursement form that collects expense category, amount, receipt upload, and description. Route to finance for approval if amount exceeds 5000, otherwise auto-approve."
Simple prompts — naming the application lets the AI identify required fields from the integration's configuration:
-
"Create a leave request workflow using Workday with manager approval"
-
"Expense reimbursement via SAP SuccessFactors with finance approval"
-
"Raise an IT ticket in ServiceNow for new joiners"
-
"Employee onboarding checklist with tasks in BambooHR"
List View, Dynamic Dropdown, and Employee Sync prompts:
- "Show all pending reimbursement requests in a table with an approve action on each row"
- "Create a dynamic dropdown that returns all active projects from our PMO tool"
- "Create an Employee Sync data source that returns a page of active employees from Workday for our HRIS to poll"
- "Build an employee sync utility that pages through SuccessFactors workers using skip tokens"
Step 2: Attach Context (Optional)
You can attach up to 10 files to provide additional context — such as existing process documents, policy PDFs, or reference screenshots. The AI uses these to better understand your requirements and generate a more accurate workflow.
Step 3: View & Approve the Plan
Before any nodes, forms, or connections are actually created, the AI first produces a structured plan for your review. This is a deliberate checkpoint — the workflow is not built until you explicitly approve the plan. This prevents the AI from spending effort building something that doesn't match what you had in mind, and gives you a chance to course-correct cheaply.
What the plan contains
The plan is presented in the chat as a structured proposal with the following sections:
- App Type — Which kind of app the AI is proposing to build (Custom App, List View, or Dynamic Dropdown utility). The AI announces this before the plan and restates it inside the plan; if it picked the wrong kind, just say so and it will re-plan for the correct one.
- Nodes — A list of every step the AI intends to create, with each node's type (Input, Approval, Action, Decision, Function, Mapper, Update, Loop, Async Callback, End, etc.), a short name, and what that step does.
- Flow — How the nodes connect end-to-end, starting from the Trigger and the initial input, including any branches, merges, loops, or conditional paths.
- Forms — Which forms are attached to which nodes, and the list of fields each form collects. (For List View apps, this section covers table columns and filters instead; for Dynamic Dropdown utilities, only Filter Params fields.)
- Data Assets — Which DOA tables, Master Tables, Data Models, and global constants the workflow will use. Existing assets the AI intends to reuse are listed by name; anything the AI proposes to create new is shown with its proposed name, columns or schema, and sample rows so you can review it before it exists.
- Trigger & Audience — Who can initiate the workflow (e.g., specific roles or groups), how it can be triggered (Manual / API / Webhook), and any audience restrictions.
- Error Handling — What happens if a critical step fails or gets rejected — for example, fallback paths, retries, or notifications.
- Additional Notes — Other design decisions such as whether a Sync Block is used, timeout values, and notification requirements.
Naming your workflow during planning
While reviewing the plan, the AI will also ask whether you have a preferred name and identifier for the workflow, or whether it should auto-generate them.
- If you provide a name (e.g., "Call it Travel Reimbursement Request"), the AI uses your name as the first candidate when creating the app.
- If you don't provide one, the AI generates a set of candidate names derived from your prompt and picks the first available one.
- You can change the name later from the app settings, but providing it here saves a step.
Requesting changes vs. approving
The plan is iterative — you can refine it as many times as you need before approving:
- Request changes by replying in chat — e.g., "Add a step to notify HR after approval", "Make the amount field required", "Change the approver to the skip-level manager", or "Remove the decision node, route everything through finance". The AI re-presents the full updated plan (not just the diff) after every change so you always see the latest version in one place.
- Approve the plan by sending a clear confirmation in chat — e.g., "Looks good", "Go ahead", "Build it", or "Approved". Only after this confirmation does the AI start creating the actual app.
Tip: Review the App Type, Approvers, Trigger & Audience, and Error Handling sections carefully — these are the parts that are most expensive to fix later, since the app type is immutable after creation and the rest affect routing and visibility.
Step 4: AI Generates the App
Once you approve the plan, the AI creates the app and begins building. The interface switches into a side-by-side view:
- Left panel — Chat: The AI continues to communicate progress in the chat, showing "thinking" indicators as different specialist agents (Workflow Designer, Form Builder, Node Configurator) take turns building parts of the workflow.
- Right panel — Live builder: For workflow apps, the Flow Builder canvas opens alongside the chat; for List View apps, the List View builder opens instead. Either way, the panel refreshes automatically every time the AI commits a change — when a node is added, an edge is drawn, a form is generated, a column is defined, or an action is configured, you see it appear within seconds.
You don't need to click refresh — the canvas listens for updates from the AI in real time and re-renders as the workflow takes shape. You can keep chatting on the left while watching the structure grow on the right.
Under the hood, this is what happens during build:
- A new workflow app is created automatically with the name and identifier you confirmed in the plan (or an AI-generated one if you didn't specify), and with the app type fixed from the plan.
- AI generates the workflow structure — trigger nodes, input forms, approval steps, action nodes, decision logic, loops, branches, merges, and end states are added to the canvas one phase at a time.
- Forms are built and attached to the relevant nodes.
- Action nodes are configured end-to-end, including connection selection, action discovery, field mapping, and auto-test (see AI-Assisted Action Node Configuration below).
- Permissions are set up automatically as a final pass — the AI resolves per-field permissions (editable / read-only / hidden) for every form-bearing step.
Stopping a generation
You don't have to wait out a generation that isn't going the way you wanted. While the AI is working, a Stop control appears in the chat panel.
Clicking Stop halts the generation immediately. The builder unlocks and the canvas reflects whatever was committed before you stopped — no half-finished loading state is left behind.
Your submitted prompt is returned to the input field in an editable state. Edit it and send it again — you don't have to retype it from scratch.
Any partial artifacts from the interrupted run are cleaned up or clearly marked as incomplete, so a stopped build doesn't leave orphaned nodes on the canvas.
Stop is available during initial workflow generation and during Edit via AI sessions alike.
Step 5: Review and Refine
After the initial generation completes, you can:
- Continue chatting with the AI to modify the workflow — add nodes, change form fields, adjust approval logic, or update conditions. The canvas on the right will continue to refresh with each change.
- Switch to the Flow Builder to visually inspect and fine-tune the generated nodes and edges on the canvas directly. You can freely mix manual edits and AI edits — see Editing with AI below.
- Edit forms in the Form Builder to customize field types, validations, and layout.
- Delete the app if the generated draft isn't a useful starting point. Apps can be deleted at any point up until they are published for the first time.
Once satisfied, publish the app to make it available to employees.
What AI Generates
When you describe a workflow, the AI creates a fully functional draft app that includes:
Forms
Structured input forms with relevant field types — text inputs, dropdowns, date pickers, file uploads, checkboxes, and more — based on the data you described.
You don't always need to specify every form field explicitly. When your prompt names a specific application (e.g., "raise a ticket in ServiceNow" or "submit leave in Workday"), the AI reads that integration's action configuration and documentation to identify the required fields. It then suggests and adds the relevant form fields automatically — so even a simple prompt with just the application name and intent can produce a complete, well-structured form.
Workflow Nodes
The AI assembles the appropriate nodes on the Flow Builder canvas, including Trigger, Input, Approval, Action, Decision, Branch/Merge, Delay, End, and the following:
- Mapper — Maps and transforms data between nodes or external systems. Commonly used to restructure data from one format to another before passing it to an integration.
- Function — Runs custom JavaScript logic for data transformation, computation, or conditional evaluation that goes beyond what Decision nodes offer.
- Update — Modifies form data or workflow variables mid-execution without requiring a new Input node.
- For Loop — Repeats a set of steps for each item in an array — e.g., "for each employee, send a welcome email" or "for every line item, create a Jira ticket". The AI creates the loop as a start/end block pair, builds the loop body between them, and configures the array source and maximum iterations.
- While Loop — Repeats steps while a condition holds — e.g., "keep polling until the status is 'done'". The AI configures the loop condition, maximum iterations, and failure behavior.
- Async Callback — Pauses the workflow until an external system calls back via webhook, then resumes. The AI configures the correlation identifier that matches the callback to the waiting item, the timeout (default 15 minutes), what happens on timeout or failure, and optional mapping of callback payload fields back into forms or constants — including masking of sensitive fields.
Edges & Logic
Connections between nodes with appropriate conditions and routing rules are generated automatically based on the logic described in your prompt.
Workflow Data Assets
Workflows often depend on bot-level data assets — a DOA table for approval routing, a Master Table backing a dropdown, a Data Model describing a complex payload, or global constants holding environment-specific values. The AI can both select existing assets and create new ones without you leaving the chat.
What each asset does in a generated workflow
- DOA (Delegation of Authority) table — resolves approvers and assignees, e.g. routing by department and amount threshold.
- Master Table — supplies dropdown and reference data to form fields.
- Data Model — defines the JSON schema for structured or nested data passed between nodes and integrations.
- Global Constants — hold reusable values such as base URLs, tenant IDs, or SLA thresholds. The AI can list, add, update, and delete constants during generation.
- Two ways an asset gets created
You ask for it. Describe the asset in chat and the AI builds it — for example, "create a master table for cost centres" or "create a DOA for expense approvals by department and amount."
The AI proposes it. If the workflow needs an asset that doesn't exist yet, the AI derives one from your use case and proposes it as part of the build.
Nothing is created silently. Whenever the AI proposes a new asset, it surfaces the proposed name, columns or schema, and sample rows in chat for your review. The asset is persisted only after you explicitly confirm it. You can rename it, change the columns, or tell the AI to use an existing asset instead.
Duplicate names are not allowed. An asset cannot be created with the same name as an existing asset of the same type on the same bot. If a name collides, you'll see a clear error and will need to rename the new asset or select the existing one.
Assets created this way are saved as ordinary bot-level assets — identical to those created from the Workflows Admin (Governance) console — and are reusable across workflow versions and other apps. The generated workflow is wired to them automatically: DOA for assignee resolution, Master Table for dropdown and reference fields, Data Model for schema binding.
AI-Assisted Action Node Configuration
When the AI generates an Action node that connects to an external integration (e.g., HRIS, ITSM, CRM), it doesn't just place a placeholder — it walks through the full configuration setup:
-
Application & Connection Selection The AI identifies the relevant integration application based on your prompt (e.g., Workday, ServiceNow, SAP SuccessFactors). It then asks you to select or confirm an active connection — the authenticated credential linking Leena AI to that external system.
-
Action Discovery Once the application and connection are set, the AI fetches the available actions for that integration (e.g., "Create Employee," "Submit Time Off Request," "Fetch Leave Balance") and selects the most relevant one based on your workflow description.
-
Dynamic Field Identification The AI reads the selected action's configuration and documentation to determine the exact fields required — field names, data types, required vs. optional, dropdown options, and contextual help text. It uses this information to set up the correct input fields for the Action node. When the action alone doesn't provide enough detail (e.g., a custom REST endpoint), the AI can also search the web for the external API's documentation to configure the request correctly.
-
Auto-Fill from Workflow Context After identifying the required fields, the AI can automatically populate them using data already available in the workflow — such as form submissions from earlier nodes, global constants, or system variables. This auto-fill step maps existing workflow data to integration fields, reducing manual configuration. If your prompt contains an environment-specific value (like a base URL), the AI will offer to store it as a global constant so it's reusable across nodes.
-
Auto-Test Once the Action node is configured and fields are mapped, the AI automatically tests the action to verify that the connection is working and data flows correctly. You can review the test results and adjust field mappings if needed before publishing the workflow.
This means that for supported integrations, the AI handles the end-to-end setup — from picking the right app and action to mapping fields — so you spend less time on repetitive configuration.
Editing with AI (Edit via AI)
AI editing is no longer limited to the initial generation session. Any editable app — whether it was originally created with AI or built manually — can be refined with AI at any time using the Edit via AI button.
Where you'll find it
When an app is in edit mode (draft), an Edit via AI button appears in the header of:
- the Flow Builder (custom workflow apps),
- the List View builder (List View apps), and
- the utility app builder (Dynamic Dropdown utility apps, Employee Sync utility apps).
Clicking it opens an AI chat side panel alongside the builder. You describe changes in chat on the left and watch them applied on the canvas on the right — the same split experience as the initial generation.
How the session works
- If the app has an active AI session, the panel resumes it — your full chat history continues where you left off.
- Otherwise, a fresh edit session is created against the app's current draft. The AI takes stock of the existing workflow state first, so it modifies what's there rather than rebuilding from scratch.
- Use Clear chat in the panel to discard the conversation and start a fresh session for the same app.\
- The Stop control works here too — halt an edit mid-way, adjust your instruction in the input field, and send it again. See Stopping a generation above.
Manual edits and AI edits now coexist
Previously, manually editing a workflow permanently detached it from AI. This restriction has been removed. You can now:
- Make manual changes on the canvas, then hand back to the AI — the AI inspects the current structure each turn and respects your manual changes rather than reverting them.
- Ask the AI to adjust or fix something you changed manually.
- Switch back and forth between manual and AI editing as often as you like, including after publishing (edits apply to the new draft as usual).
The only constraint: while the AI is actively applying changes, the builder is temporarily locked for manual edits (you'll see an "applying changes" indicator). This prevents your manual edits and the AI's writes from conflicting. Once the AI's turn completes, the canvas unlocks and refreshes.
Chat History
Every AI workflow generation session is preserved as a chat history that you can revisit and continue.
Accessing Chat History
When you navigate to an AI-generated workflow app, the chat interface loads the full conversation history from that session — including your original prompt, the plan you approved, any follow-up refinements, and the AI's responses. Messages are loaded in reverse chronological order and paginated automatically as you scroll up to view older messages.
Resuming a Session
If you leave the chat mid-conversation, you can return to the same session later. The system automatically reconnects to the existing session associated with the app. You can pick up where you left off — send new messages to continue refining the workflow, and the AI retains the full context of the previous conversation. If you return mid-build, the side-by-side canvas resumes refreshing as the AI continues working.
Session Scope
Each AI chat session is tied to a specific workflow app. Starting a new workflow from the homepage creates a new session. You cannot merge sessions across different apps. Your sessions list on the homepage shows the sessions you created.
Deleting apps and sessions
Deleting a draft app. Any app can be deleted up until it is published for the first time. This applies to all four app types — Custom, List View, Dynamic Dropdown utility, and Employee Sync utility — regardless of whether it was created with AI or manually. Delete is available from the app listing page and from the app itself while it is in draft. Once an app has been published, it can no longer be deleted; unpublish or archive it instead.
Deleting a chat session. Sessions you created appear in the sessions list on the Workflows Studio homepage, and can be deleted from there. Deleting a session removes the conversation permanently.
Delete vs. Clear chat. These do different things:
- Clear chat discards the current conversation and starts a fresh AI session against the same app. The app and everything the AI built stay exactly as they are.
- Delete removes the session, or the draft app, entirely.
Tips for Better Results
-
Be specific about data fields. Instead of "collect employee details," say "collect employee name, employee ID, department, and designation."
-
Mention approvers explicitly. For example, "send to the reporting manager for approval" gives the AI clear routing instructions.
-
Describe conditions clearly. "If the amount is greater than ₹10,000, route to the finance head; otherwise, auto-approve" is much more effective than "add some approval logic."
-
Say what kind of app you want when it isn't obvious. Words like "table of requests with row actions" (List View), "dynamic dropdown / async hook" (dropdown utility), or "backend data source my HRIS polls for employee records" (Employee Sync) let the AI classify correctly on the first pass. If it picks the wrong kind, correct it during planning — the type is locked once the app is created.
-
Attach reference documents. If you have an existing SOP, policy document, or process flowchart, upload it. The AI uses the content to generate a more accurate workflow.
-
Iterate on the plan before approving. It's much cheaper to fix the plan in chat than to fix the built workflow. Push back on anything that doesn't match your intent — the planner is designed to re-present the full updated plan after every change.
-
Provide a workflow name upfront. When the planner asks for a name and identifier, give one if you have a naming convention. This avoids renaming the app afterwards.
-
Iterate through chat after build, too. The first generation is a starting point. Use follow-up messages to refine — "add a notification step after approval," "make the department field a dropdown," or "add a delay of 2 days before escalation." The canvas will refresh after each change.
-
Use loops deliberately. Ask for a loop only when repetition is the actual control structure — "for each new joiner, raise a ticket" creates a For Loop; simply mentioning "multiple employees" in a form does not require one.
Limitations (Beta)
- On List View, Dynamic Dropdown, and Employee Sync apps, the pre-built scaffold nodes (trigger, seed Mapper, End) are protected — the AI can configure and rename them, but they cannot be deleted or replaced, and only whitelisted node types are allowed inside these apps.
- The AI generates a draft — review the workflow carefully before publishing, especially approval routing, conditions, and form validations.
- While the AI is applying changes, manual editing is temporarily locked to prevent conflicts. Stopping the generation releases the lock immediately.
- File attachments provided as context are processed for content understanding but are not embedded into the workflow itself.
- Data assets created during AI generation always require your explicit confirmation before they are saved, and cannot reuse the name of an existing asset of the same type.
Apps can only be deleted before their first publish. Published apps cannot be deleted from Workflows Studio.
FAQs
Can I edit the AI-generated workflow manually? Yes. You can switch to the Flow Builder at any time and make manual changes. Manual editing no longer detaches the workflow from AI — you can return to the AI chat via Edit via AI afterwards, and the AI will respect the manual changes you made.
Can I use AI on a workflow that was built manually? Yes. Open the app in edit mode and click Edit via AI in the header. The AI reads the current workflow state and modifies it based on your instructions, rather than rebuilding it.
Can I skip the plan review step? No. The plan review is a required checkpoint — the workflow is not built until you explicitly approve the plan in chat. This is by design, to prevent the AI from building something that doesn't match your intent. However, you can approve a plan in a single message (e.g., "Looks good") if you're satisfied with the first proposal.
Can I change the app type after creation? No. The app type (Custom, List View, or Dynamic Dropdown utility) is decided during planning and is immutable once the app is created. You can change it freely while iterating on the plan.
What if I don't give the workflow a name during planning? The AI will generate a set of candidate names from your prompt and pick the first available one. You can rename the app from settings later.
Do I have to keep the chat open to watch the workflow get built? No. The side-by-side canvas refreshes automatically as the AI commits each change — you can watch it live, or step away and return later. If you navigate back to the app, the canvas will reflect the current state of the build.
Does AI generation consume any credits or tokens? During the beta period, AI generation is included at no additional cost. This may change based on the pricing model in the general availability release.
Can I go back to the old app listing homepage? All existing apps remain accessible from the Apps listing page within Workflows Studio. You can continue to create and manage apps manually from there.
What happens if the AI doesn't understand my prompt? The AI will respond through the chat interface with clarifying questions or a best-effort attempt. You can refine your description and continue the conversation to get closer to the desired result.
Can I resume an AI chat session later? Yes. Your chat history is saved and tied to the workflow app. Navigate back to the app to reload the conversation and continue refining. You can also clear the chat to start a fresh session for the same app.
Is my data used to train the AI model? No. Your workflow descriptions and attached documents are processed in real-time to generate the workflow and are not used for model training.
Updated about 2 months ago