
Setting up triggers
A trigger defines how an AOP starts. All triggers are configured and managed from the Workbench. There are two types:
- Scheduled — run an AOP at a set time, once or on a recurring cadence (time-based).
- Inbound Webhook — let any external system start an AOP by sending it JSON (event-based).
This page walks through setting up each type. For editing, pausing, and monitoring existing triggers, see Manage schedules & triggers.
Watch the tutorial
1. Scheduled triggers
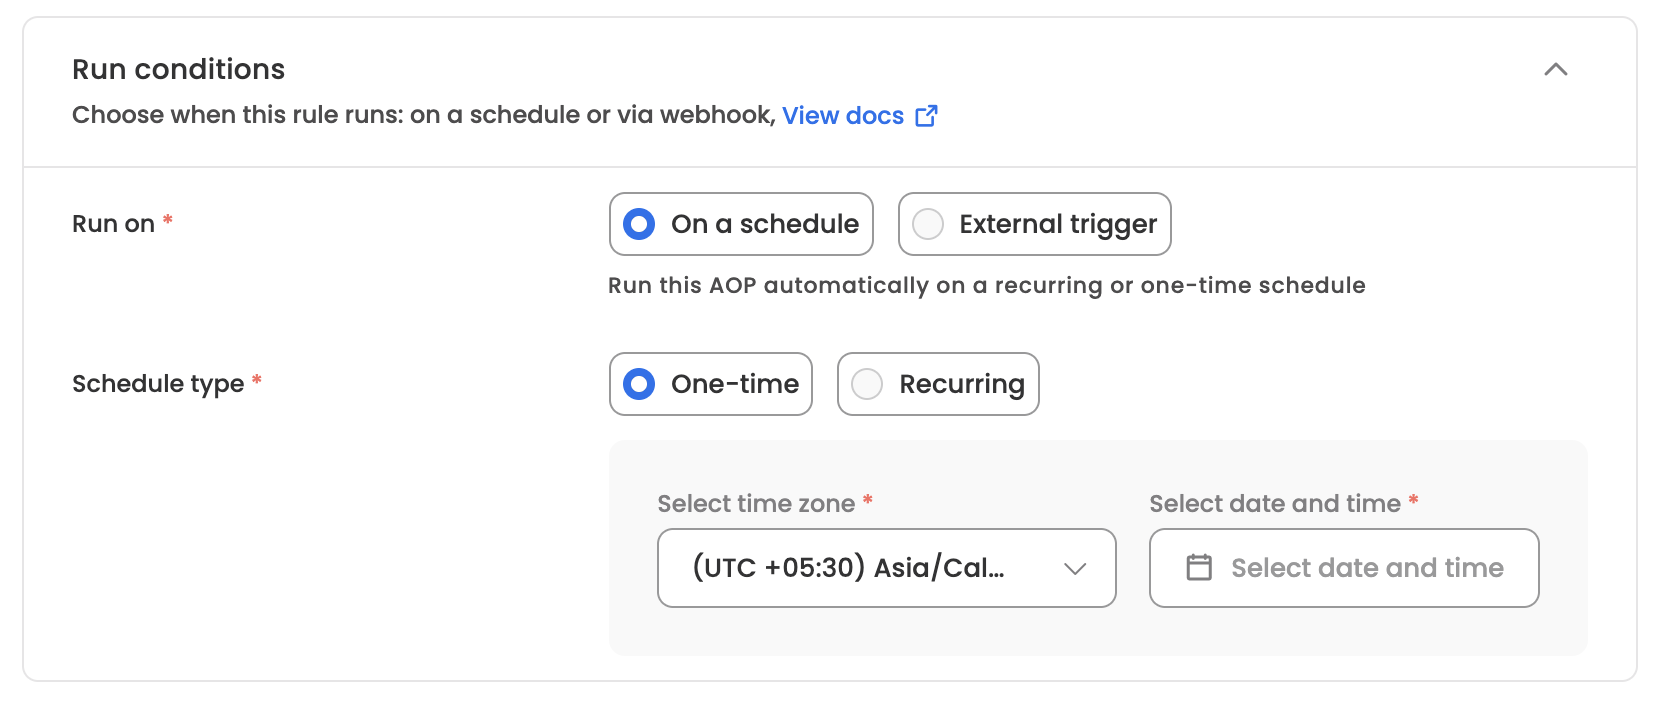
A schedule runs an AOP automatically at a time you choose — either once, or on a recurring cadence. Schedules are ideal for routine, time-bound processes such as daily reports, attendance reviews, or monthly compliance audits.
Accessing schedule creation
- Navigate to Workbench — click Workbench in the left navigation menu. You'll see the List of schedules with any existing schedules.
- Initiate schedule creation — click Create schedule in the top-right corner. The schedule creation form opens.
Step 1: Basic details
Name of schedule
- Give the schedule a descriptive name that clearly indicates its purpose.
- Examples: Check application access, Daily attendance review, Monthly compliance audit.
- Best practice: use consistent naming conventions across your organization.
AI Colleague selection
- Choose which AI Colleague will execute this schedule.
- The dropdown lists all AI Colleagues available in your system.
AOP selection
- Select the specific AOP to execute.
- Only AOPs associated with the selected AI Colleague appear in the list.
- The AOP must permit scheduled execution. If it's restricted to other start methods, it won't be selectable here.
Step 2: Schedule type configuration
Choose one of two schedule types.
Non-recurring (one-time execution)
Use for a one-off process or a specific date requirement.
- Time zone — select the time zone the execution time should be interpreted in.
- Date and time — choose the exact date and time to run.
Recurring (repeated execution)
Use for ongoing processes that need to run on a regular cadence.
- Frequency — how often the schedule repeats:
- Minutes — 15, 30, or 45 minutes (15 minutes is the minimum interval)
- Hours
- Days
- Weeks
- Months
- Repeat interval — the interval within the chosen frequency (for hours/days/weeks/months, any value from 1 to 99 — e.g., every 2 weeks, every 3 months).
- Time zone — select the appropriate time zone (e.g., (UTC +05:30) Asia/Kolkata). Defaults to your local time zone.
- Execution time — the time of day the schedule runs, in 24-hour format.
- Start date — when the recurring schedule begins.
End condition — decide when a recurring schedule should stop:
- End on a date — the schedule stops after this date.
- After a number of occurrences — the schedule stops once it has run the specified number of times.
- If neither is set, the schedule continues until you deactivate it.
Month-end handling: for monthly schedules set to a day that doesn't exist in a shorter month (e.g., the 31st), the run is adjusted to the last valid day of that month.
Previewing and saving
- Before saving, review the configured cadence to confirm it matches your intent.
- After you save, the schedule appears in the List of schedules with an Active status, and its upcoming runs become visible in the Workbench.
Good to know
- The minimum frequency is 15 minutes for sub-hourly schedules.
- Time zones are honored per schedule, so schedules in different zones run at the correct local time.
2. Inbound Webhook triggers
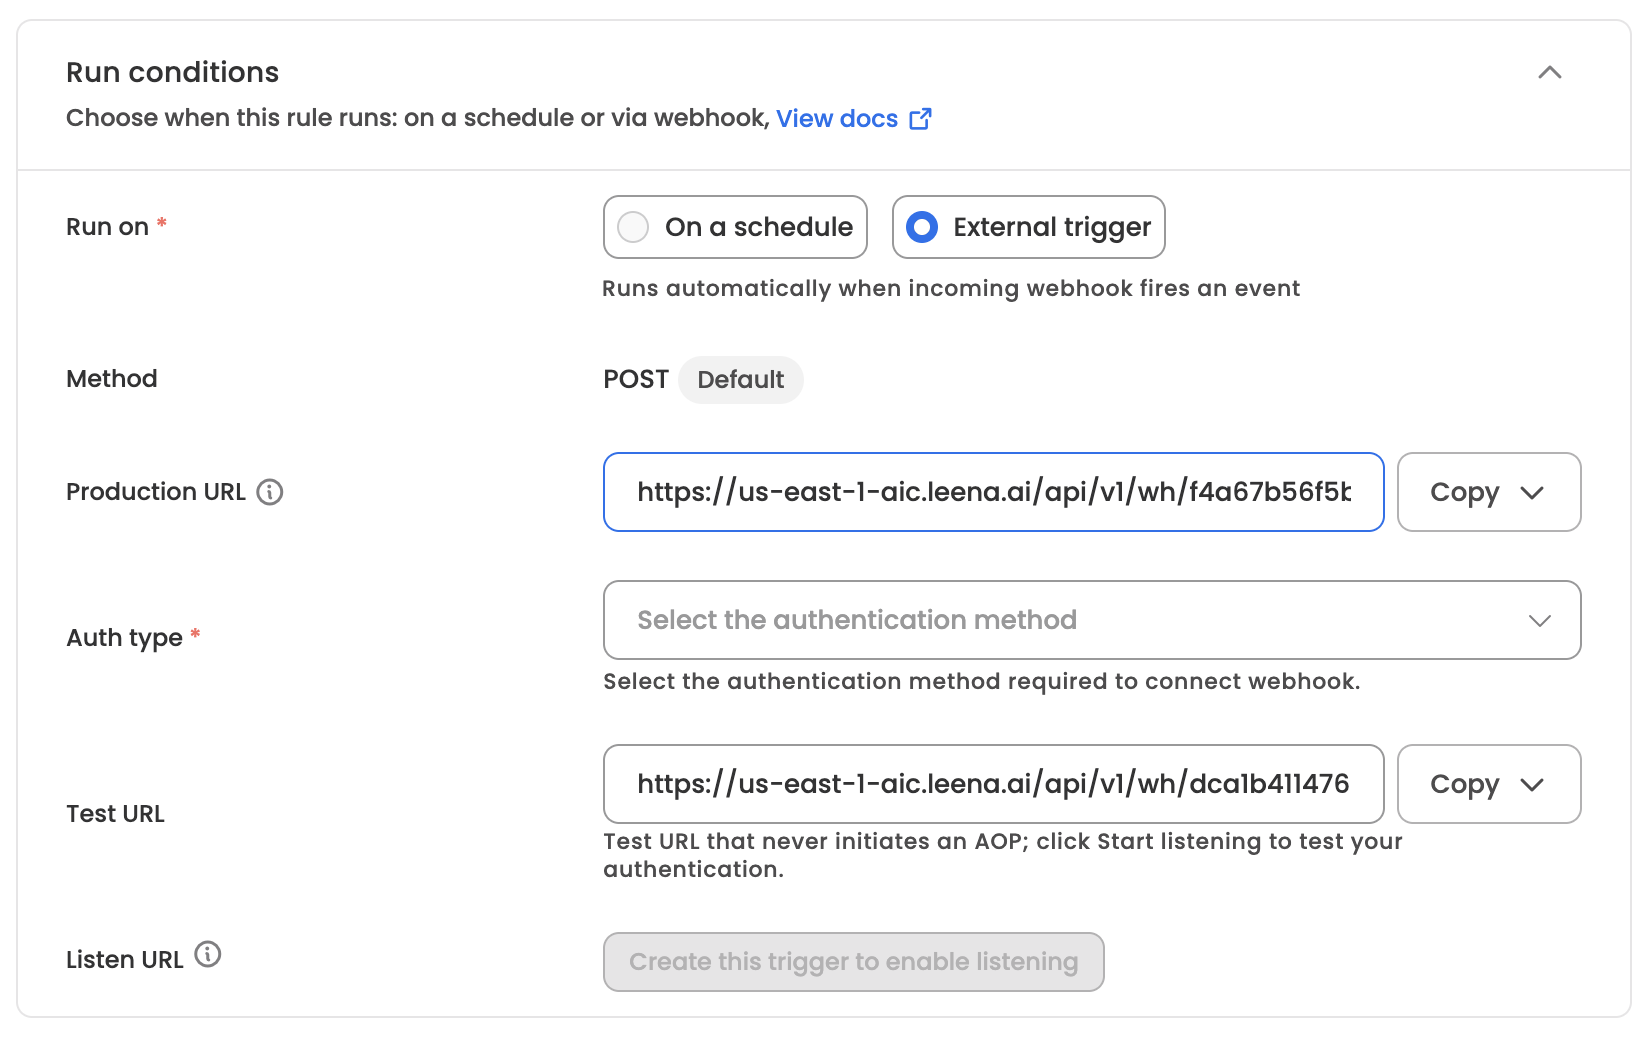
An Inbound Webhook lets any external system start an AOP by sending it a JSON payload. When something happens in the source system (a new hire is created, a ticket is updated, a job finishes), that system sends an HTTP request to a secure URL, and the AOP runs immediately with the request data available as context.
Use a webhook trigger when the source system can send outbound HTTP requests and you want the AOP to react in real time.
Before you start
- The AOP you want to trigger must exist.
- You need an auth config set up in your platform's auth setup to secure the webhook. If the one you need doesn't exist yet, create it there first — it will then appear in the Auth type dropdown. (Creating and managing auth configs happens in the platform auth setup, not on the trigger page.)
Step 1 — Add a webhook trigger
- Open the AOP and go to the Triggers area.
- Choose Inbound Webhook as the trigger type.
The setup page shows the following fields.
| Field | Description |
|---|---|
| Method | Fixed to POST. Read-only, with a copy icon. |
| Production URL | Auto-generated, unique, read-only. Used by the source system in live operation. Copy-only. |
| Listen URL | Auto-generated, unique, read-only. For testing only — never starts a run. Copy-only. |
| Auth type | Dropdown of auth configs already set up on the platform. Select one to secure the webhook. |
| Sample request body | Editable JSON. Represents what the source system will send. Used for documentation and for the Copy as cURL action. |
| Rate limit / Max payload size | Enforced by the platform, shown as read-only informational values. |
The Production URL and Listen URL are clearly differentiated on the page — copy the right one for the right purpose. Use the Listen URL for testing and the Production URL for the live integration.
Step 2 — Choose an auth config
Select an auth config from the Auth type dropdown. This secures both the Production and Listen URLs.
- The credential itself (e.g., a header token, or a userID + password for Basic Auth) lives in the platform auth setup — it is not shown, copied, or regenerated on the trigger page.
- To rotate a credential, do it in the platform auth setup. Every trigger that references that config picks up the change automatically.
- Changing the auth config after the webhook is live will require the source system to be reconfigured with the new credential. You'll see a confirmation prompt before the change is applied.
Step 3 — Enter a sample request body
In the Sample request body field, enter a representative JSON payload that mirrors what your source system will actually send. For example:
{
  "employee_id": "EMP-4821",
  "employee_name": "Priya Sharma",
  "department": "Engineering",
  "start_date": "2026-04-15",
  "manager": "Rahul Mehta",
  "location": "Bangalore"
}
This body serves two purposes: it tells whoever configures the source system what payload to send, and it is used as the request body when you test with Copy as cURL.
- The body must be valid JSON. Errors are flagged inline as you type, and an invalid body blocks saving the trigger.
- Don't include a
_trigger_metaobject — that envelope is added automatically by the platform at run time (see What your AOP receives below).
Step 4 — Save the trigger
Save the trigger. Saving enables the Listen and Copy as cURL actions used for testing.
Step 5 — Test with the Listen URL
Before going live, verify your setup against the Listen URL (which never starts a run):
- Click Listen to start capturing against the Listen URL.
- Send a test request to the Listen URL. The fastest way is Copy as cURL — it composes a ready-to-run cURL command using the Listen URL, the selected auth, the content type, and your sample body. Paste it into a terminal (or fire a request from Postman / the source system's sandbox).
- The request appears in the Test request log on the setup page, showing the timestamp, validation outcome (accepted / rejected with reason), and the response returned to the caller.
- Listening stops automatically as soon as the first request is received (pass or fail). Review the result, fix anything in the source system if needed, and click Listen again to test the next attempt.
The composed cURL includes your auth credentials — handle it with care.
Testing against the Listen URL never affects the Production URL, so live traffic keeps flowing during your test session.
Step 6 — Go live
- Copy the Production URL and Method from the trigger page.
- In the source system, configure an outbound webhook / integration that fires on the event you care about, and point it at the Production URL.
- Set the auth header using the credential from your platform auth setup, and map the source event data into the JSON request body.
Once live, each valid request to the Production URL starts exactly one AOP run.
What your AOP receives
On each run, the AOP receives the request body plus a platform-added _trigger_meta envelope, so downstream steps can reference both the source data and how the run was triggered:
{
  "employee_id": "EMP-4821",
  "employee_name": "Priya Sharma",
  "department": "Engineering",
  "start_date": "2026-04-15",
  "manager": "Rahul Mehta",
  "location": "Bangalore",
  "_trigger_meta": {
    "trigger_type": "webhook",
    "received_at": "2026-04-15T09:42:11Z",
    "request_id": "req_a8f2c"
  }
}
The _trigger_meta envelope is also surfaced in the Trigger Context step on the AOP run details page.
Response and error codes
The webhook returns generic caller-facing responses (identical on both URLs):
| Situation | Response |
|---|---|
| Valid request (Production URL) | Run started; returns an accepted status with a run ID |
| Invalid auth | 401 Unauthorized |
| Wrong method (not POST) | 405 Method Not Allowed |
| Body is not valid JSON | 400 Bad Request |
| Rate limit exceeded | 429 Too Many Requests |
| Payload too large | 413 Payload Too Large |
Detailed rejection reasons appear in your logs — Production URL failures in Run History, Listen URL failures in the Test request log on the setup page.
Good to know
- POST + JSON only. There is no method or format selector.
- No batching or deduplication. Each valid request fires one run.
- Unique URLs. Every webhook trigger gets its own distinct Production and Listen URLs; no two triggers share a URL.
Monitoring triggered runs
All trigger runs — from every trigger type — are recorded in Run History. Open Run History and use the filters to narrow by Trigger Type (Scheduled and Webhook); filtered views are captured in the URL for bookmarking or sharing. Each triggered run includes a Trigger Context step showing how it started. For failed trigger evaluations, the Trigger Context step also shows the failure reason.
See Manage triggers for editing, pausing, and deleting triggers.
Updated 3 months ago