
Emp sync
Employee Sync keeps your employee list in Leena AI aligned with your source system — an HRMS, a directory, or any other employee database. An accurate directory underpins access control (terminated people shouldn't stay active), the attributes used across audiences, personalization and workflows, and every downstream experience that relies on knowing who someone is.
Data arrives one of two ways: a spreadsheet you upload, or a scheduled pull from your HRIS. A bot uses one of them, not both.
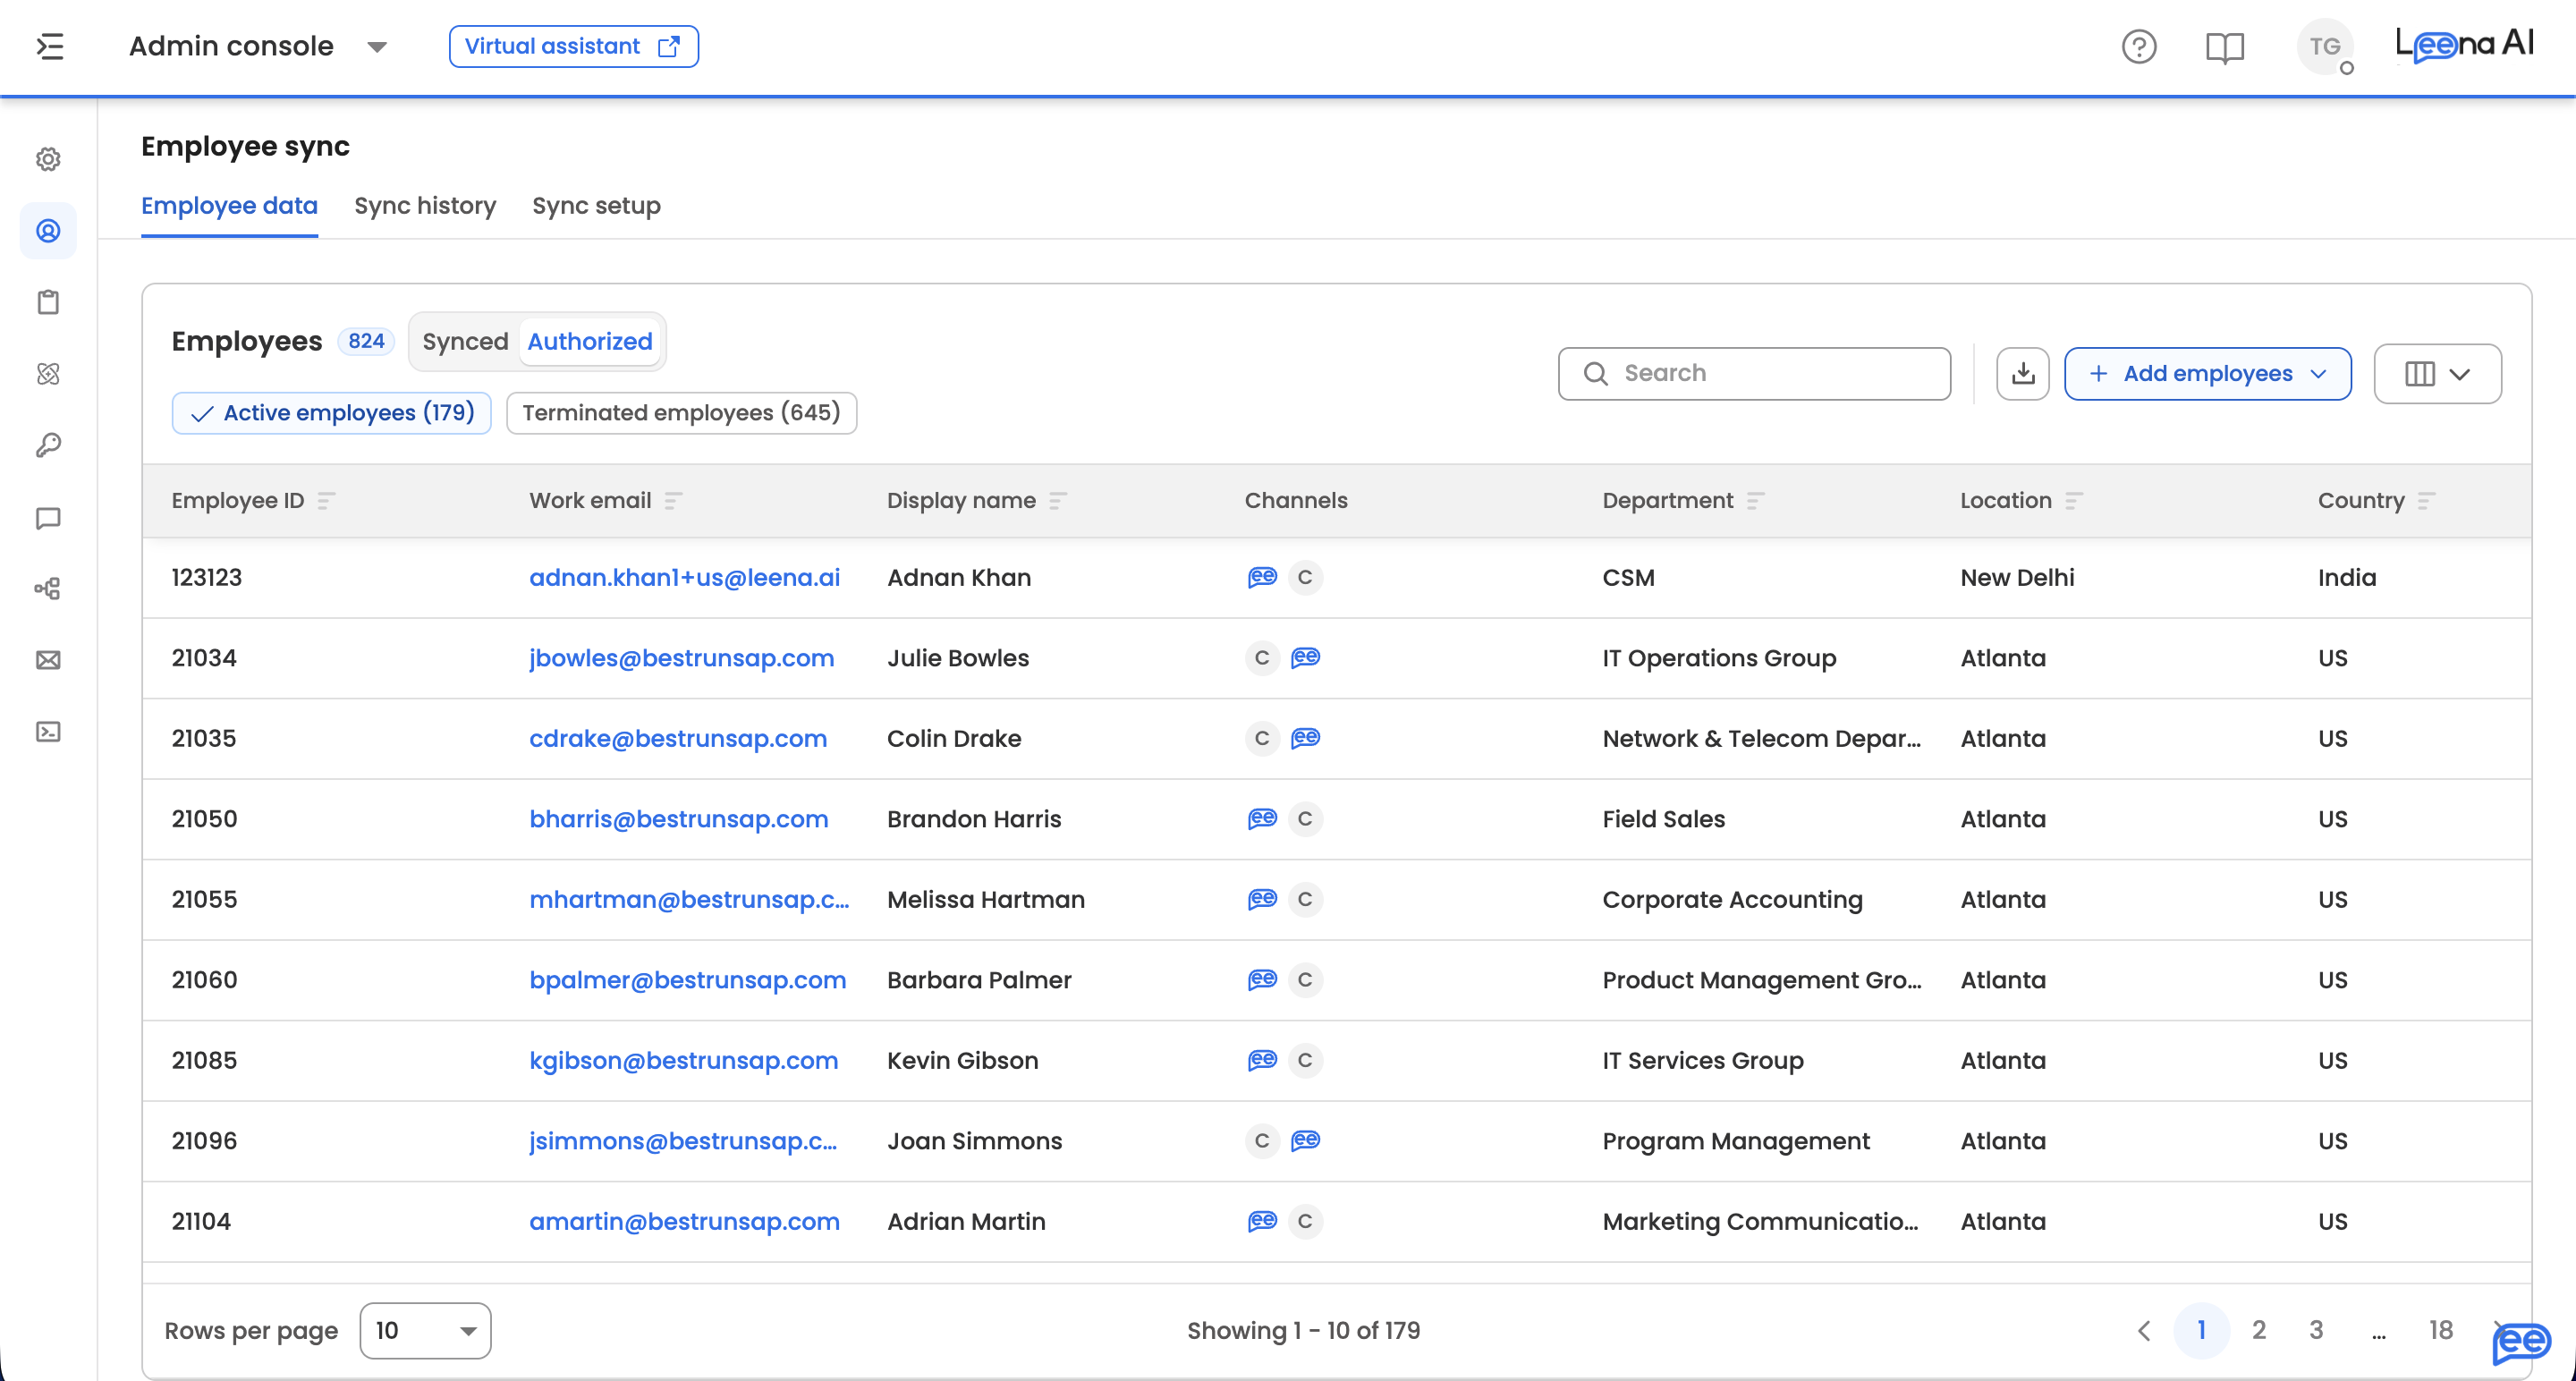
Where to find it
Open the Admin Console, then go to Bot users → User Sync.
The page has three tabs:
- Employee data — the resulting directory. Every bot lands here, configured or not.
- Sync history — the audit log of every run, manual and automated.
- Sync setup — how employee data gets in.
AccessUser Sync is available to roles holding the employee sync capability — in most deployments, System Admin.
Choosing a sync method
| Method | How it works | Best for |
|---|---|---|
| Manual | You define field mappings, then upload an Excel or CSV file against them | One-time loads, small organizations, or ad-hoc corrections |
| Automated | A scheduled sync via a Workflows utility app that fetches data from your HRIS | Ongoing, hands-off synchronization with your source system |
A bot uses one method. Switching from one to the other replaces the existing setup — the wizard asks you to confirm, and the replacement can't be undone.
Sync setup
With nothing configured, the tab offers Add sync. Once a sync is saved, the tab becomes a read-only summary of it, with Edit in the header to reopen the wizard.
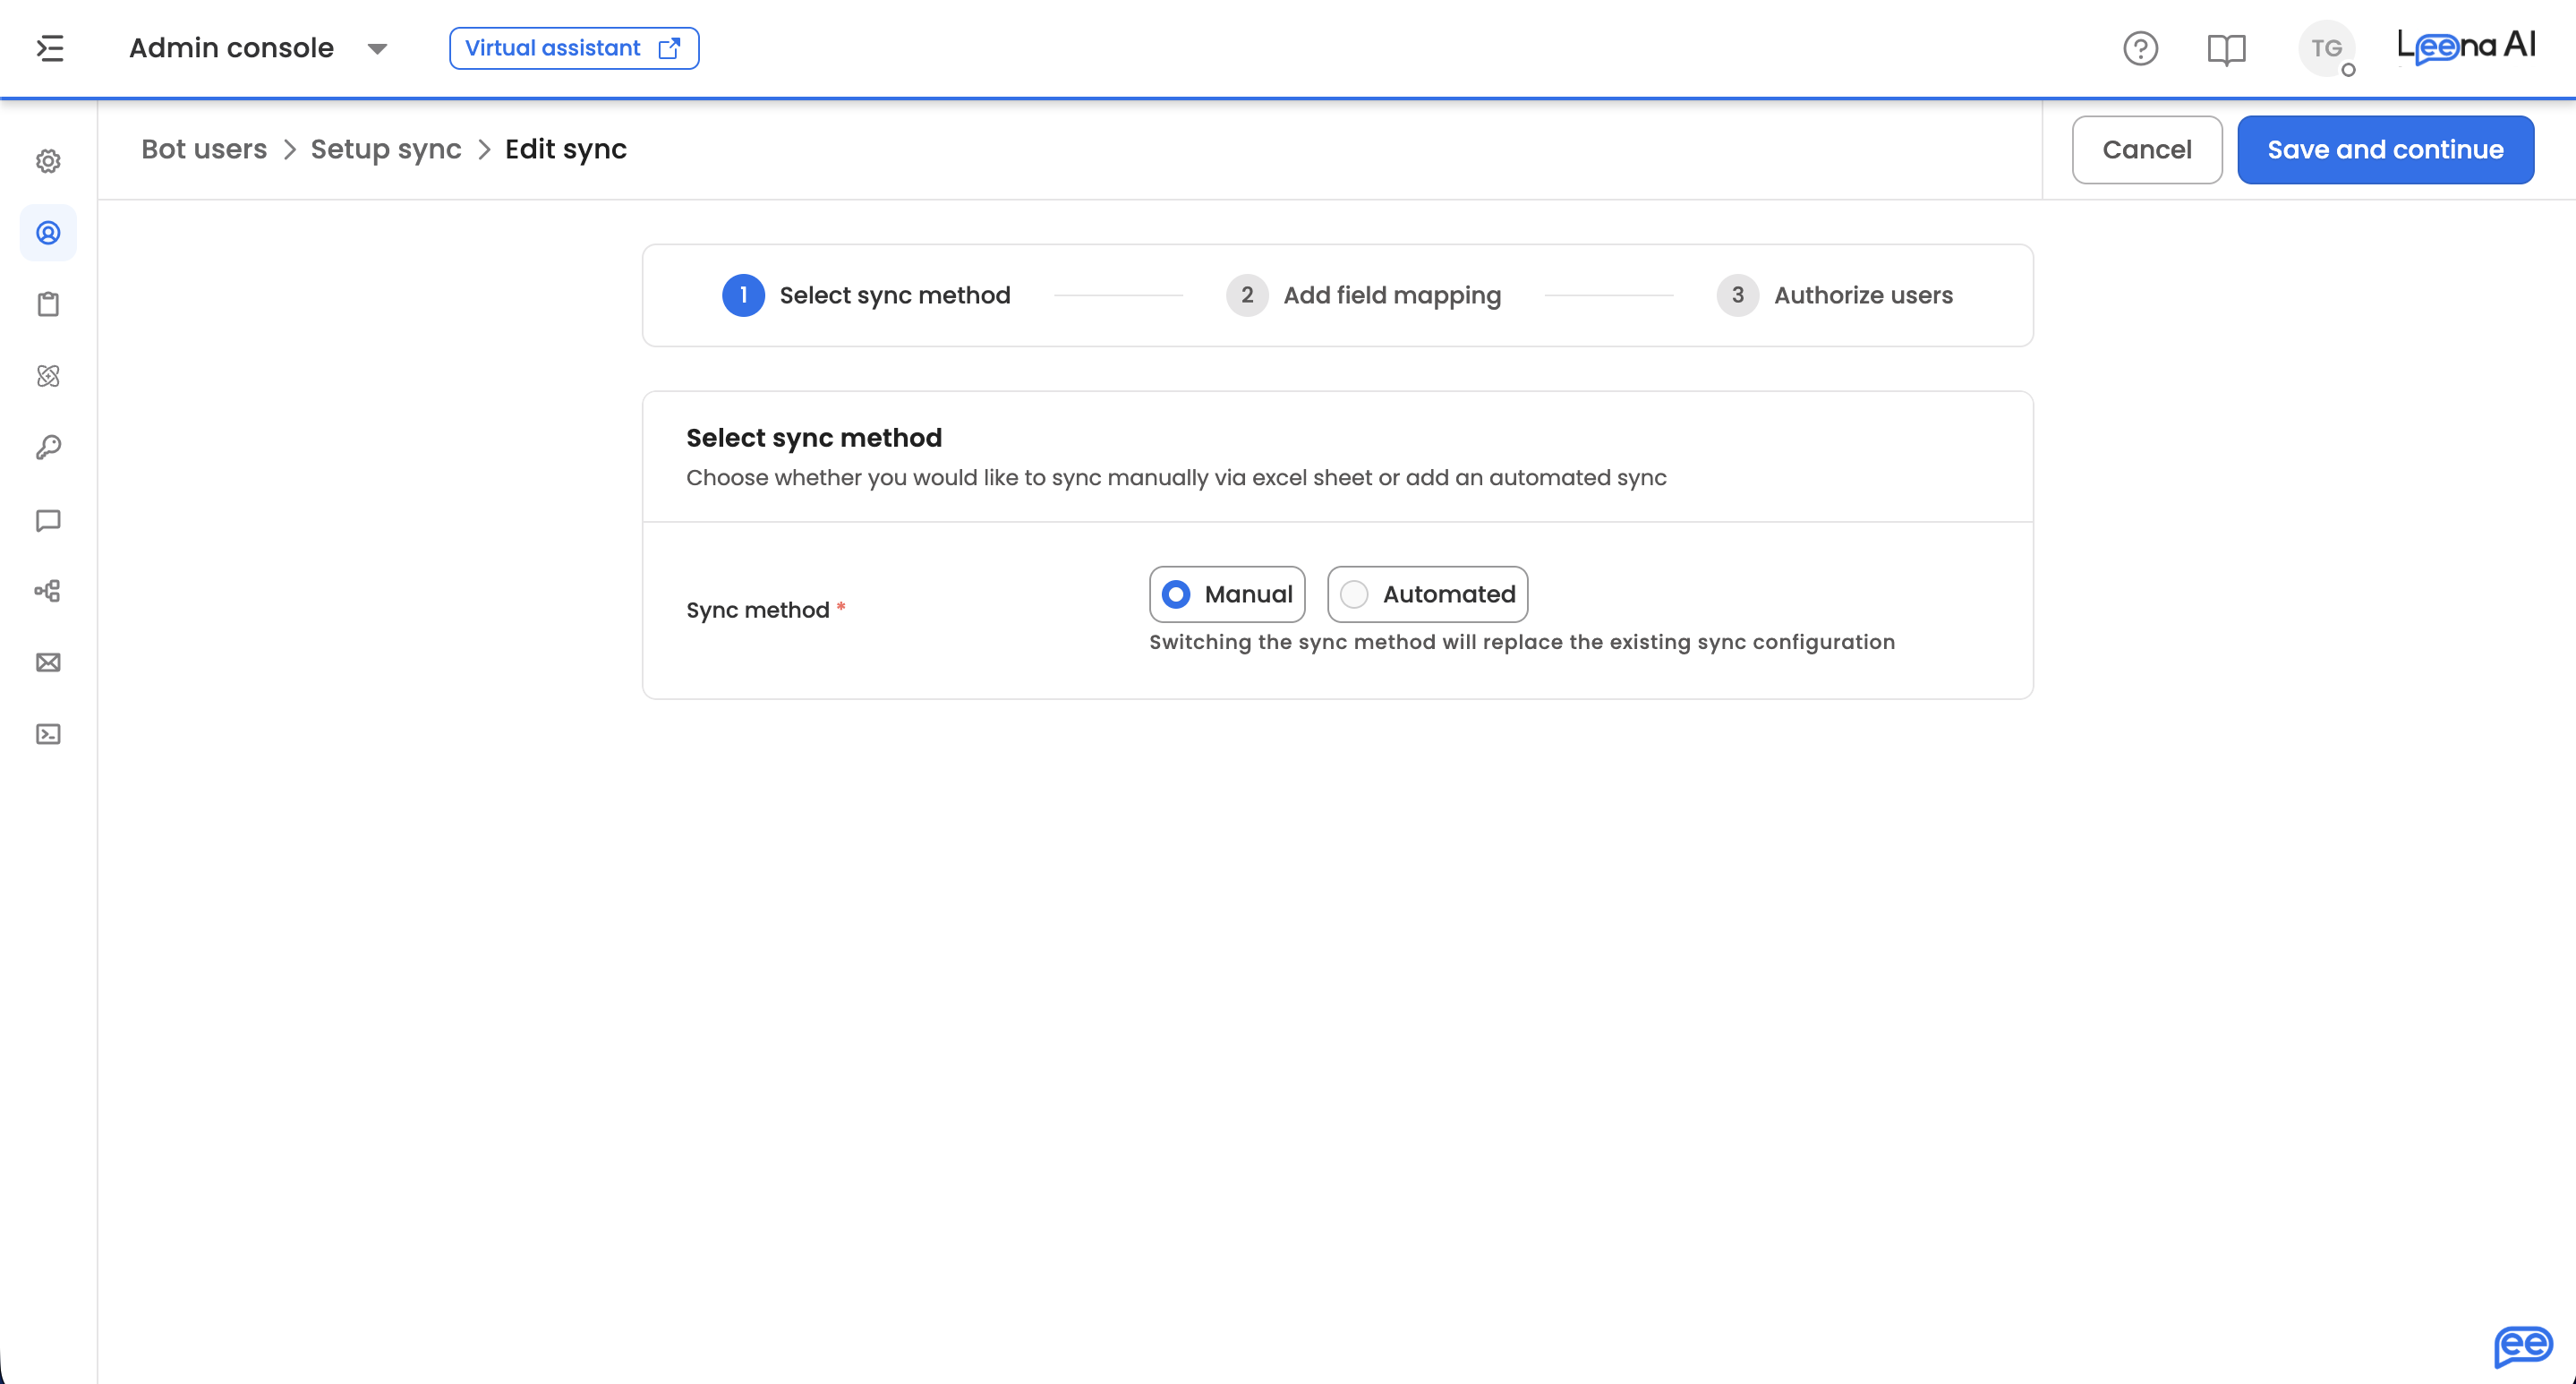
The wizard has three steps, and the third one applies to both methods:
- Select sync method — Manual or Automated
- Add field mapping (manual) or Sync users (automated)
- Authorize users
Each step saves as you continue; the final step's button reads Save and sync.
Switching method replaces your employeesSwitching to manual means the employees added by your automated sync are replaced by the file you upload. Switching to automated means employees you added manually are replaced by the utility app's data on the next sync.
Neither can be undone.
Step 2 (manual) — Map fields
Match the columns in your file to Leena AI fields. Each row is one mapping.
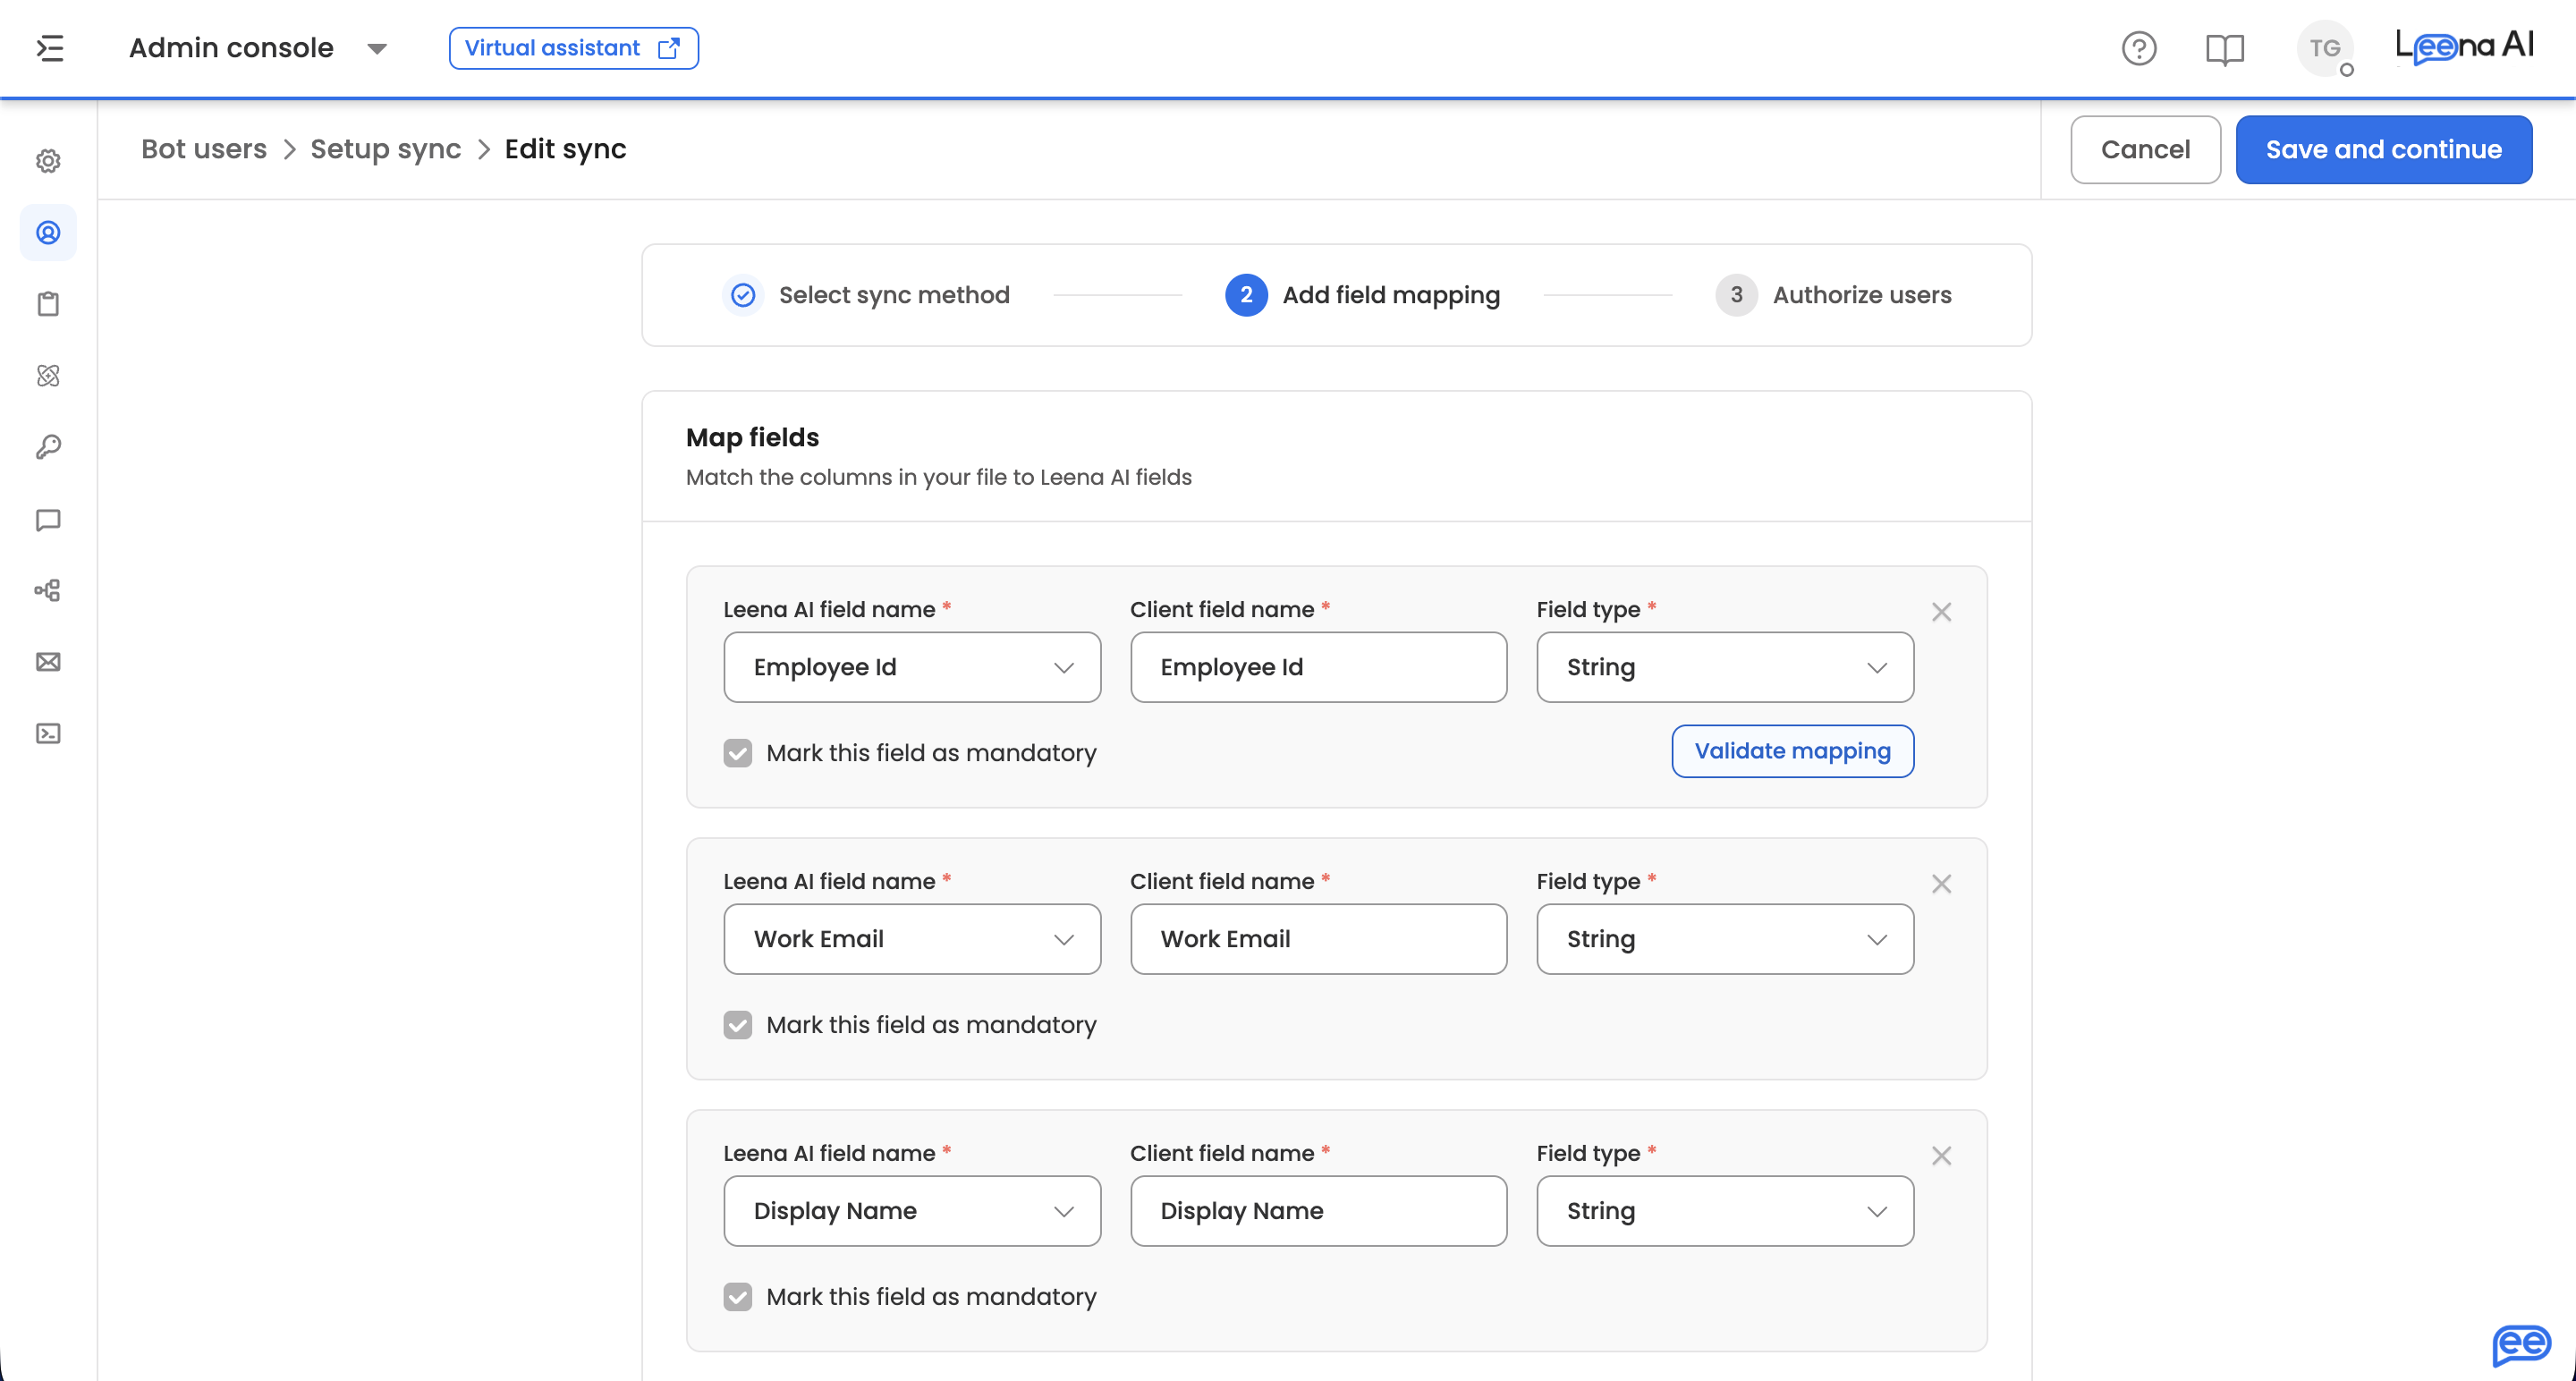
| Configuration | Description |
|---|---|
| Leena AI field name | Select an existing Leena field, or create a new custom field from the same dropdown |
| Client field name | The column name in your file. Cannot be empty, and cannot contain . or $ |
| Field type | String, Date, Boolean, Phone number, or Array. Numeric-only input is enforced through a String validation |
| Mandatory | Whether a value must exist for every employee |
| Validation rules | Opens a side sheet of rules for that field's type |
A few things worth knowing:
- Mandatory Leena fields are seeded for you and can't be removed. Their type may also be locked, and they are always mandatory.
- Each Leena field can be mapped only once — two columns pointing at the same field is rejected on save.
- Available validations depend on the field type. Boolean fields have none, Date fields require a format, and Phone number fields support uniqueness and regex only.
- String fields support uniqueness, number-only, allowed email domains, custom values, and a regex pattern with an inline Test regex option.
- Array fields hold several values in one cell. The cell is read as comma-separated text, split, trimmed, and each element validated individually. Use it for attributes like multiple roles or locations.
Mapping fields does not load any employees — uploading a file is a separate action from the Employee data tab.
Step 2 (automated) — Sync users
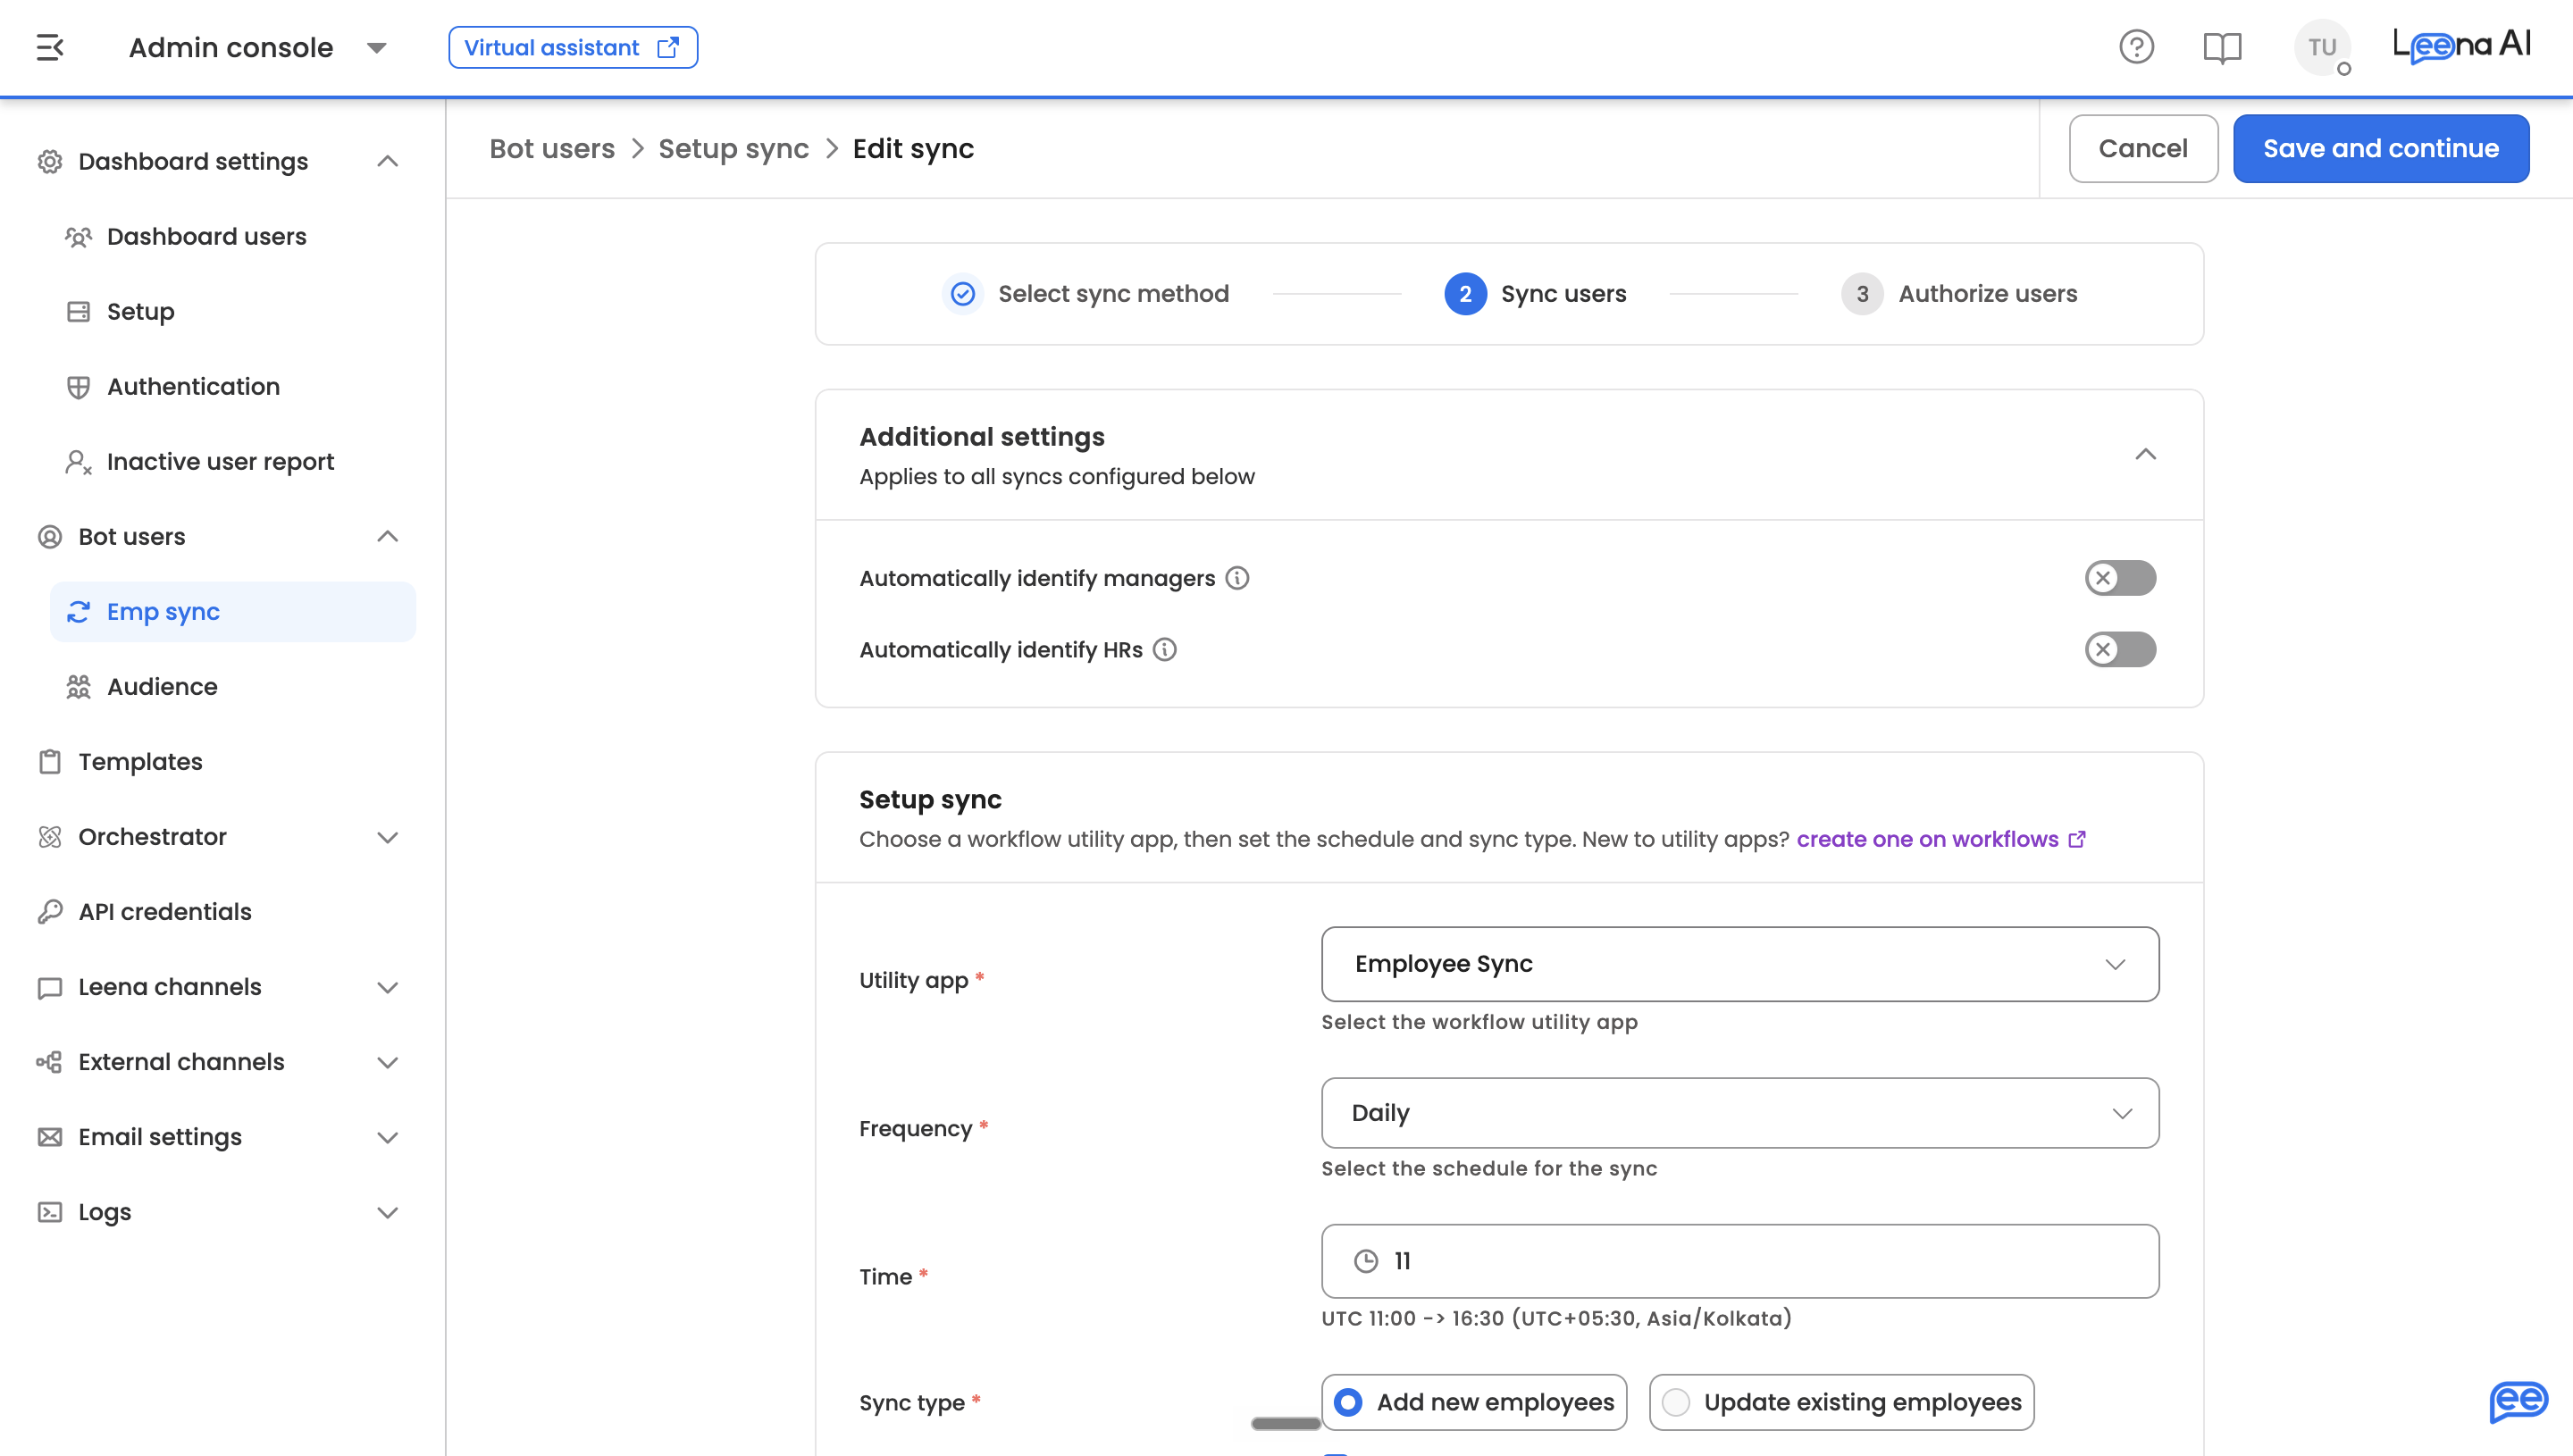
Automated sync pulls employee data from your source system on a schedule using an Employee Sync utility app built in Workflows Studio.
Before you start
You need a published Employee Sync utility app — without one, the Utility app dropdown is empty. The step links to Workflows so you can build one.
To create the app: go to Workflows Studio → App Listing → Create App and set the Utility Type to Employee Sync Utility. Configure pagination to match how your HRIS API returns data (page-number or skip-token), add an Action node to call the API, use the Mapper node to transform source fields into Leena AI's employee schema, set the Response Template on the Trigger node with the data array and pagination fields, then publish. It will then appear in the dropdown. Full instructions are in User Sync Utility Apps.
Additional settings
Two settings apply to every sync on the bot. Both are off by default.
| Setting | What it does |
|---|---|
| Automatically identify managers | Employees with active direct reports are marked as managers after every sync. Needs manager data in your synced fields |
| Automatically identify HRs | Employees assigned as the HR of at least one active employee are marked as HR after every sync. Needs HR data in your synced fields |
Both are recalculated across the whole directory after each run, not just for the records that run returned. Someone stops being marked a manager or HR once no active employee points to them.
HR IDs must be Employee IDsEach employee's HR ID is matched against the Employee IDs in the directory, so your utility app should return the HR's Employee ID — not their email or another identifier. A leading
Pis tolerated:P12345matches Employee ID12345.
Configuring a sync
| Setting | What it does |
|---|---|
| Utility app | The Employee Sync utility app to run. Each sync must use a different app, and the choice can't be changed later |
| Frequency | Daily, Weekly (pick a day), or Custom (every N days, weeks, or months) |
| Time | The sync hour, in UTC, with a local time hint. Only the hour is used |
| Sync type | Add new employees adds new people and updates existing ones. Update existing employees only updates, matched by Employee ID — no one new is created, and unmatched records are skipped and counted |
| Terminate employees missing from this sync | Available with Add new employees only. Makes this sync authoritative: anyone absent from its response is marked Terminated |
Save and preview fetches sample records from the app and shows them before anything is committed. Review the rows, then confirm with Add sync — or go back and change the configuration.
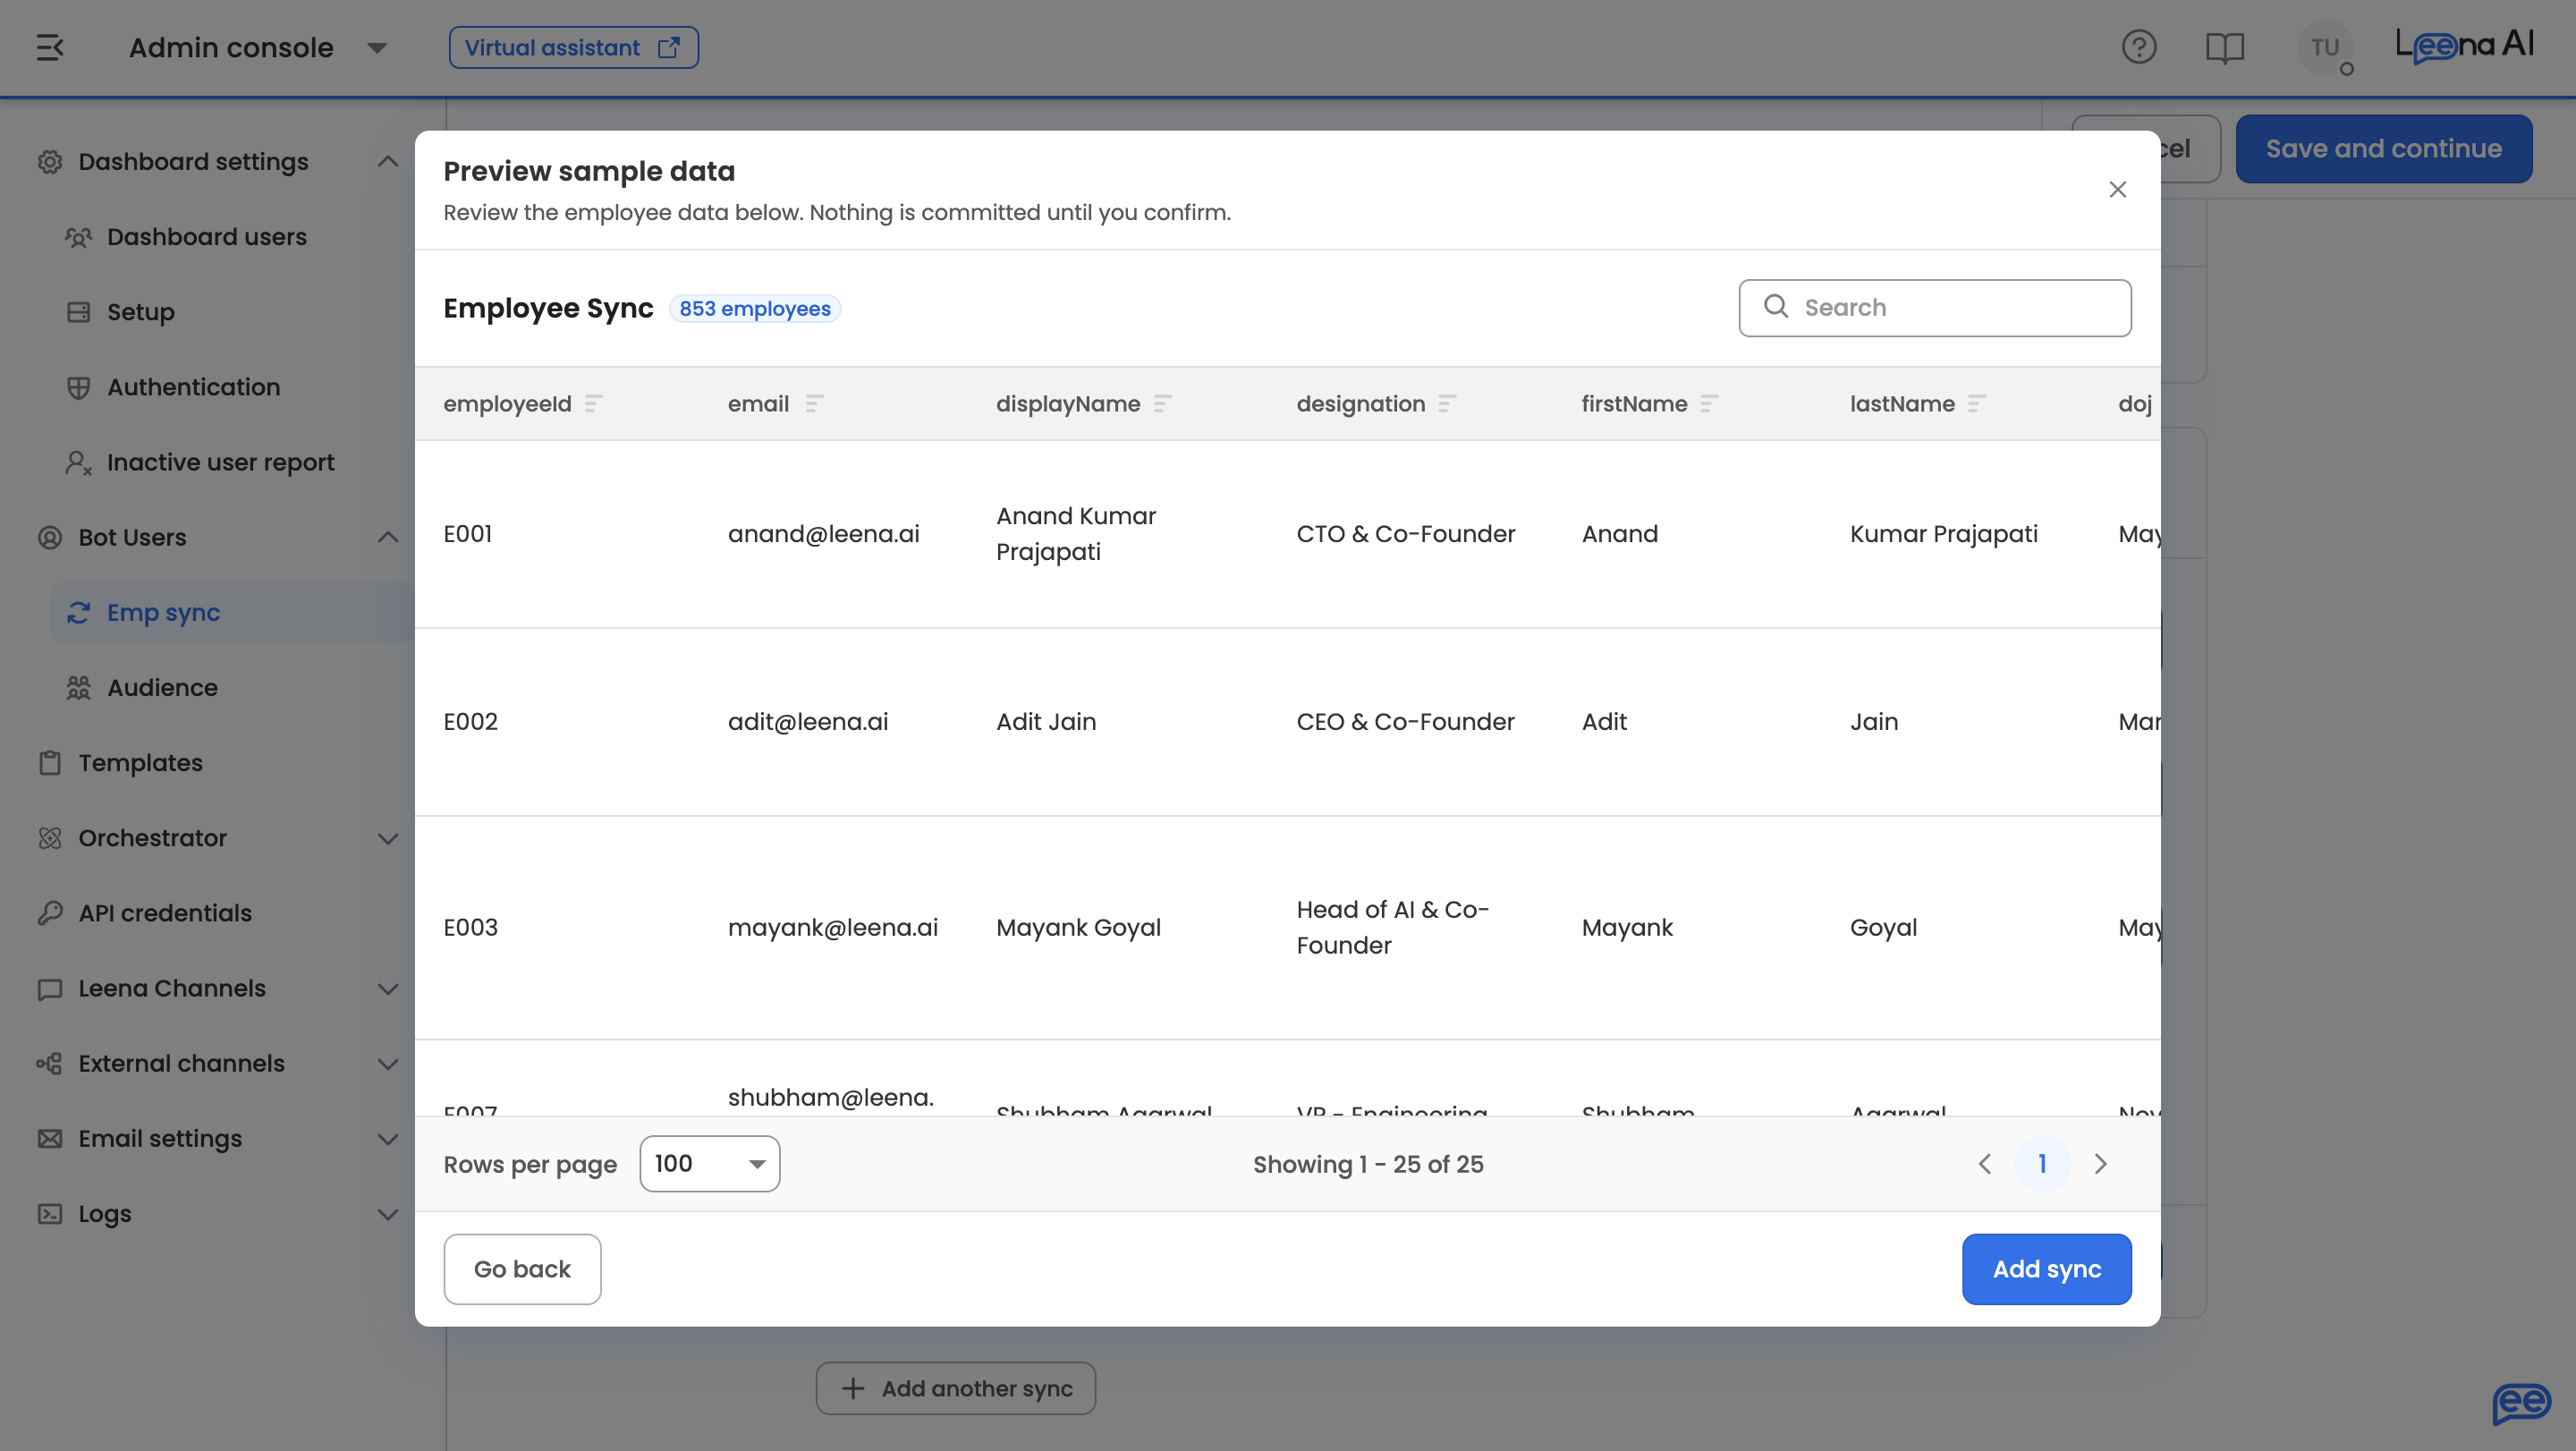
You can configure more than one sync. Add another sync validates and collapses the open one first; an incomplete card is blocked until you finish it or use Remove sync to discard it. Saved syncs collapse into a summary showing the app name, Active/Inactive, schedule and sync type, with Edit, Deactivate and Delete in the menu.
Only one authoritative sync per botJust one sync can have "Terminate employees missing from this sync" enabled. If another sync already owns it, the checkbox is unavailable and the panel explains why.
Step 3 — Authorize users
Who can actually reach the bot. This step applies whichever sync method you chose.
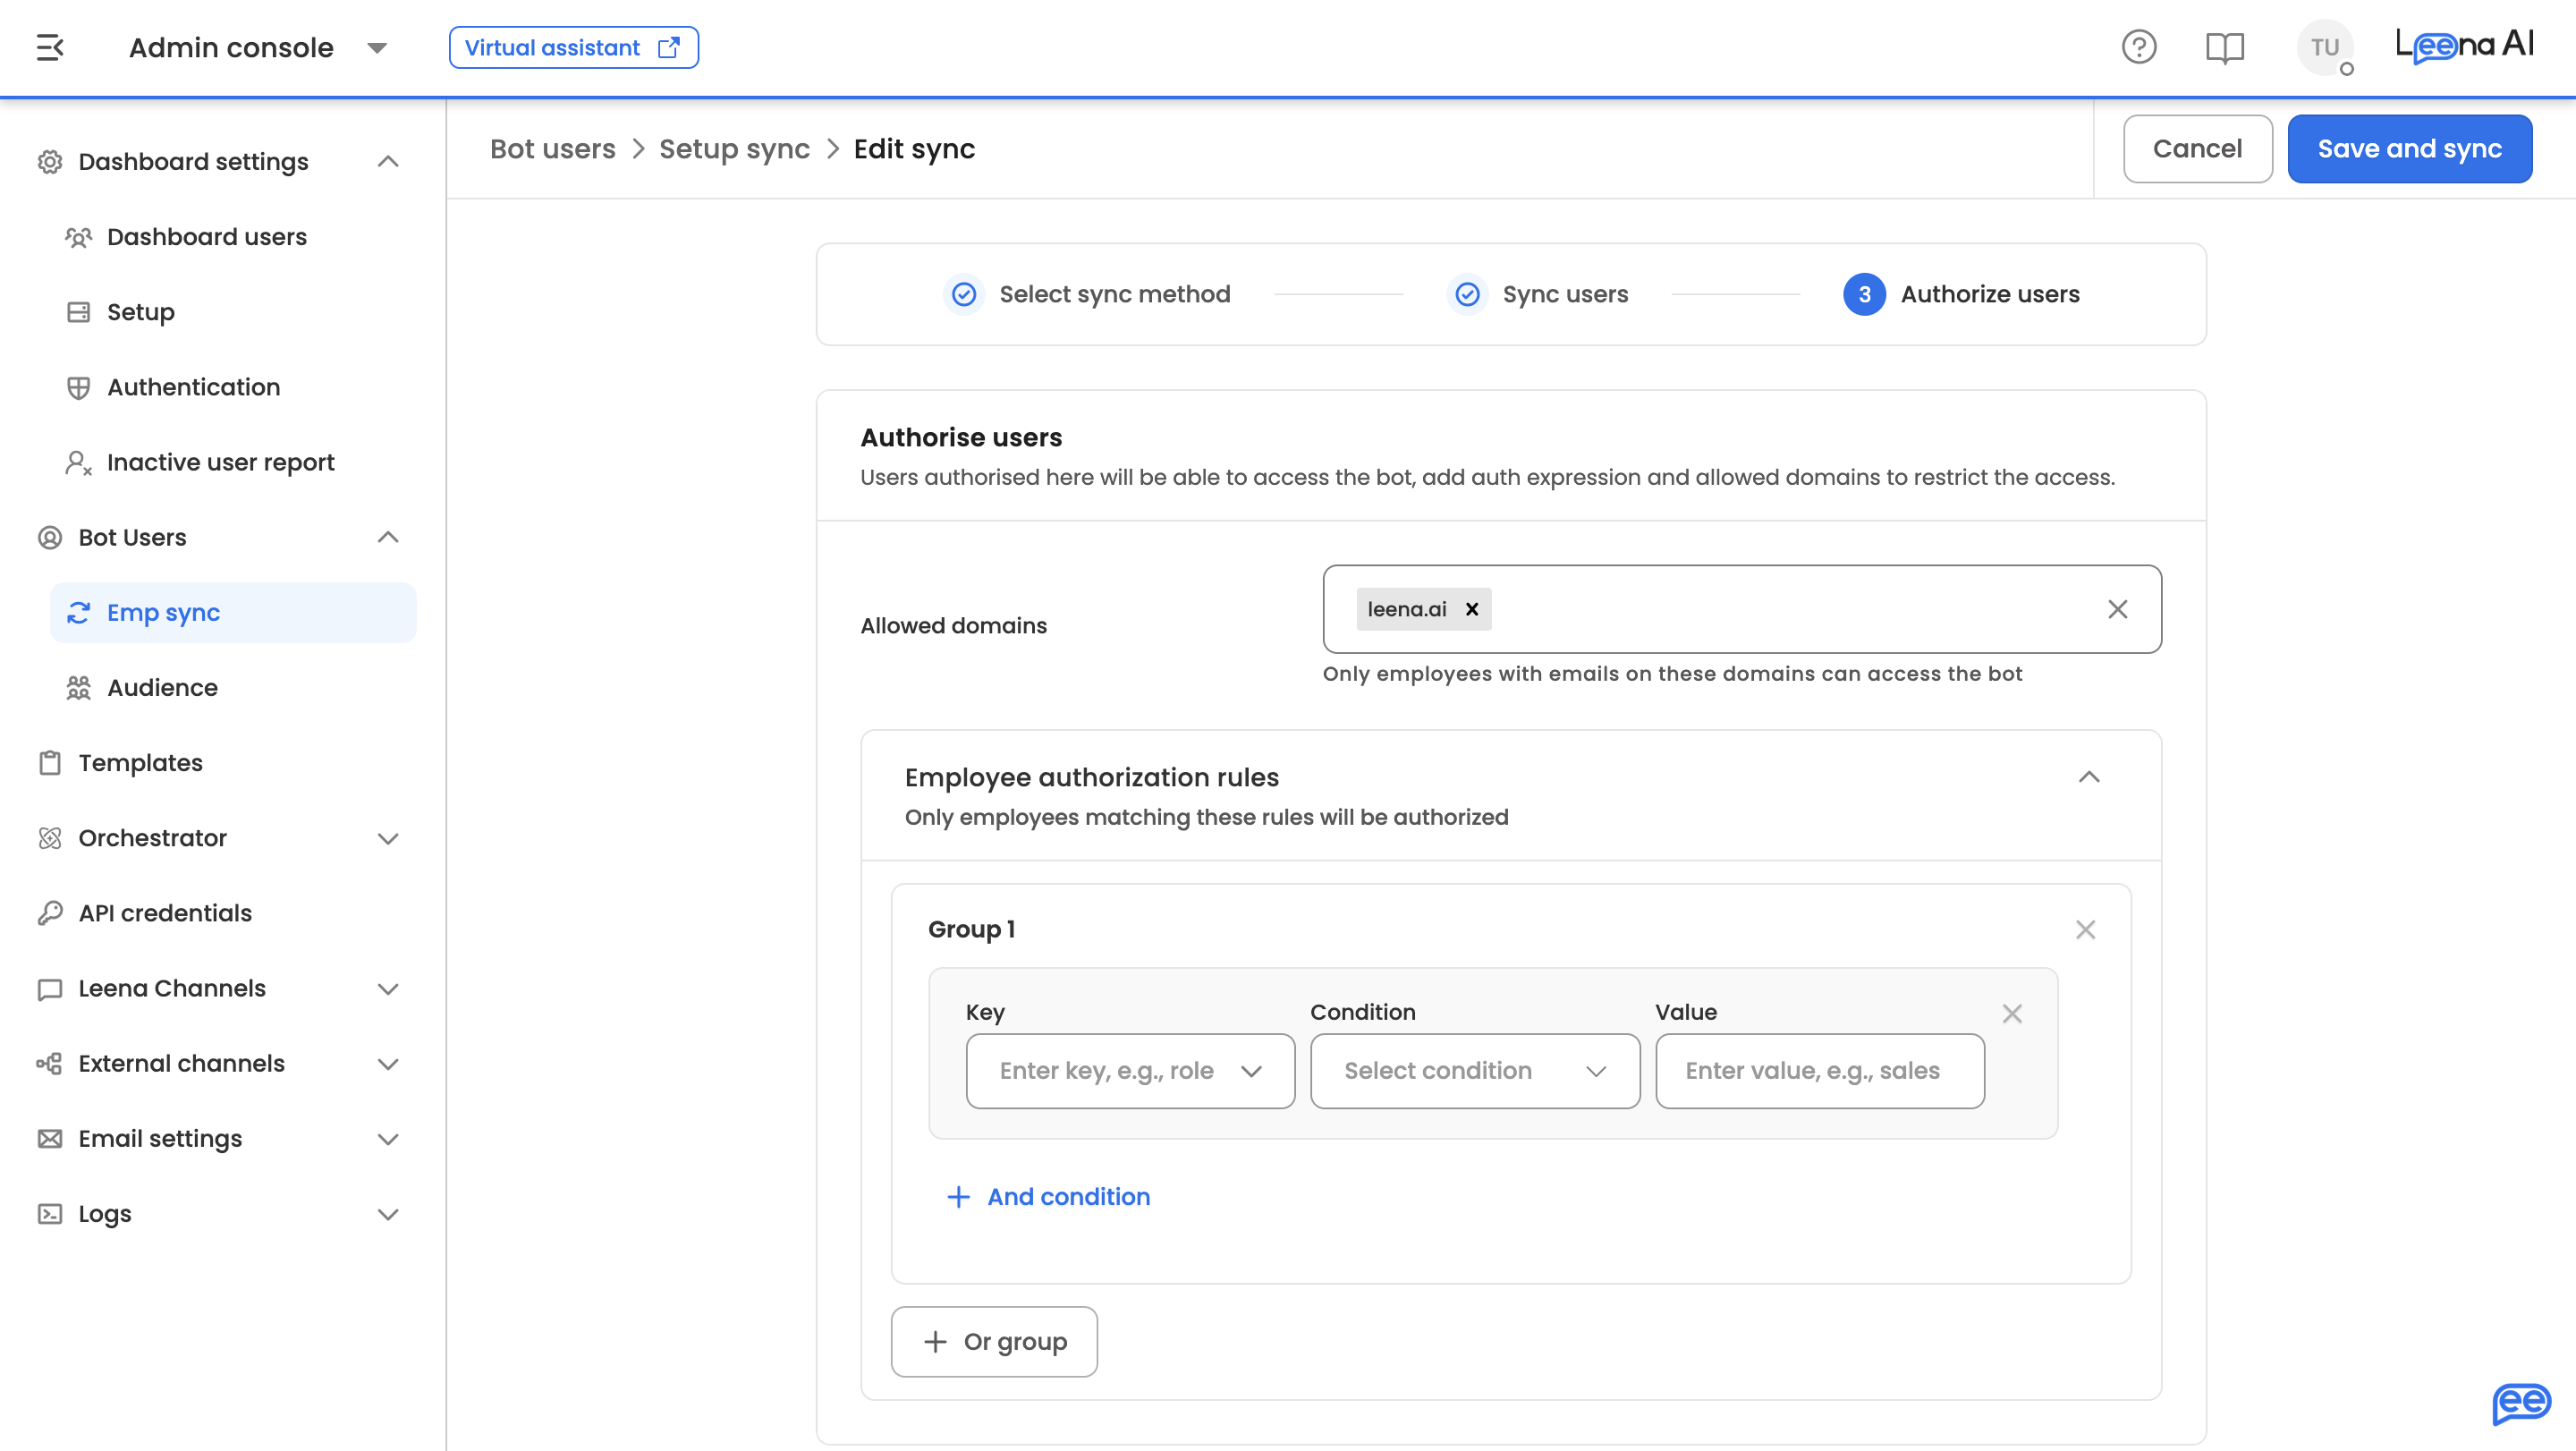
| Setting | What it does |
|---|---|
| Allowed domains | Only employees with emails on these domains can access the bot. Type a domain and press enter |
| Employee authorization rules | Only employees matching these rules are authorized |
Rules are built as groups. Conditions inside a group are joined with And; groups are joined with Or. Each condition is a Key (an employee attribute, such as role), a Condition, and a Value.
Available conditions: is equal to, is not equal to, equals (ignore case), is any of, is none of, contains, does not contain, starts with, ends with. The "is any of" and "is none of" conditions accept several values.
Leave the rules empty to authorize on domains alone. A half-finished rule is rejected on save — a rule missing a key, condition or value would match nobody.
Two related policies are shown here read-only, because they're owned by General settings: Only authorize synced users and Block login from personal email domains.
Saving authorization settings does not run a sync. The rules take effect at login and on the next employee sync. To apply them to people who are already in the directory, run a sync.
The saved setup
Once saved, Sync setup shows the configuration read-only: the sync method, your field mappings or utility apps, the additional settings for automated syncs (each shown as On or Off), and the authorization settings.
For automated syncs, each utility-app card's menu carries Sync now — the only way to run a sync on demand. It confirms first, because a sync can be triggered only once an hour per sync; if you're inside that window, the page tells you how many minutes remain.
Employee data
The directory, and the tab every bot lands on.
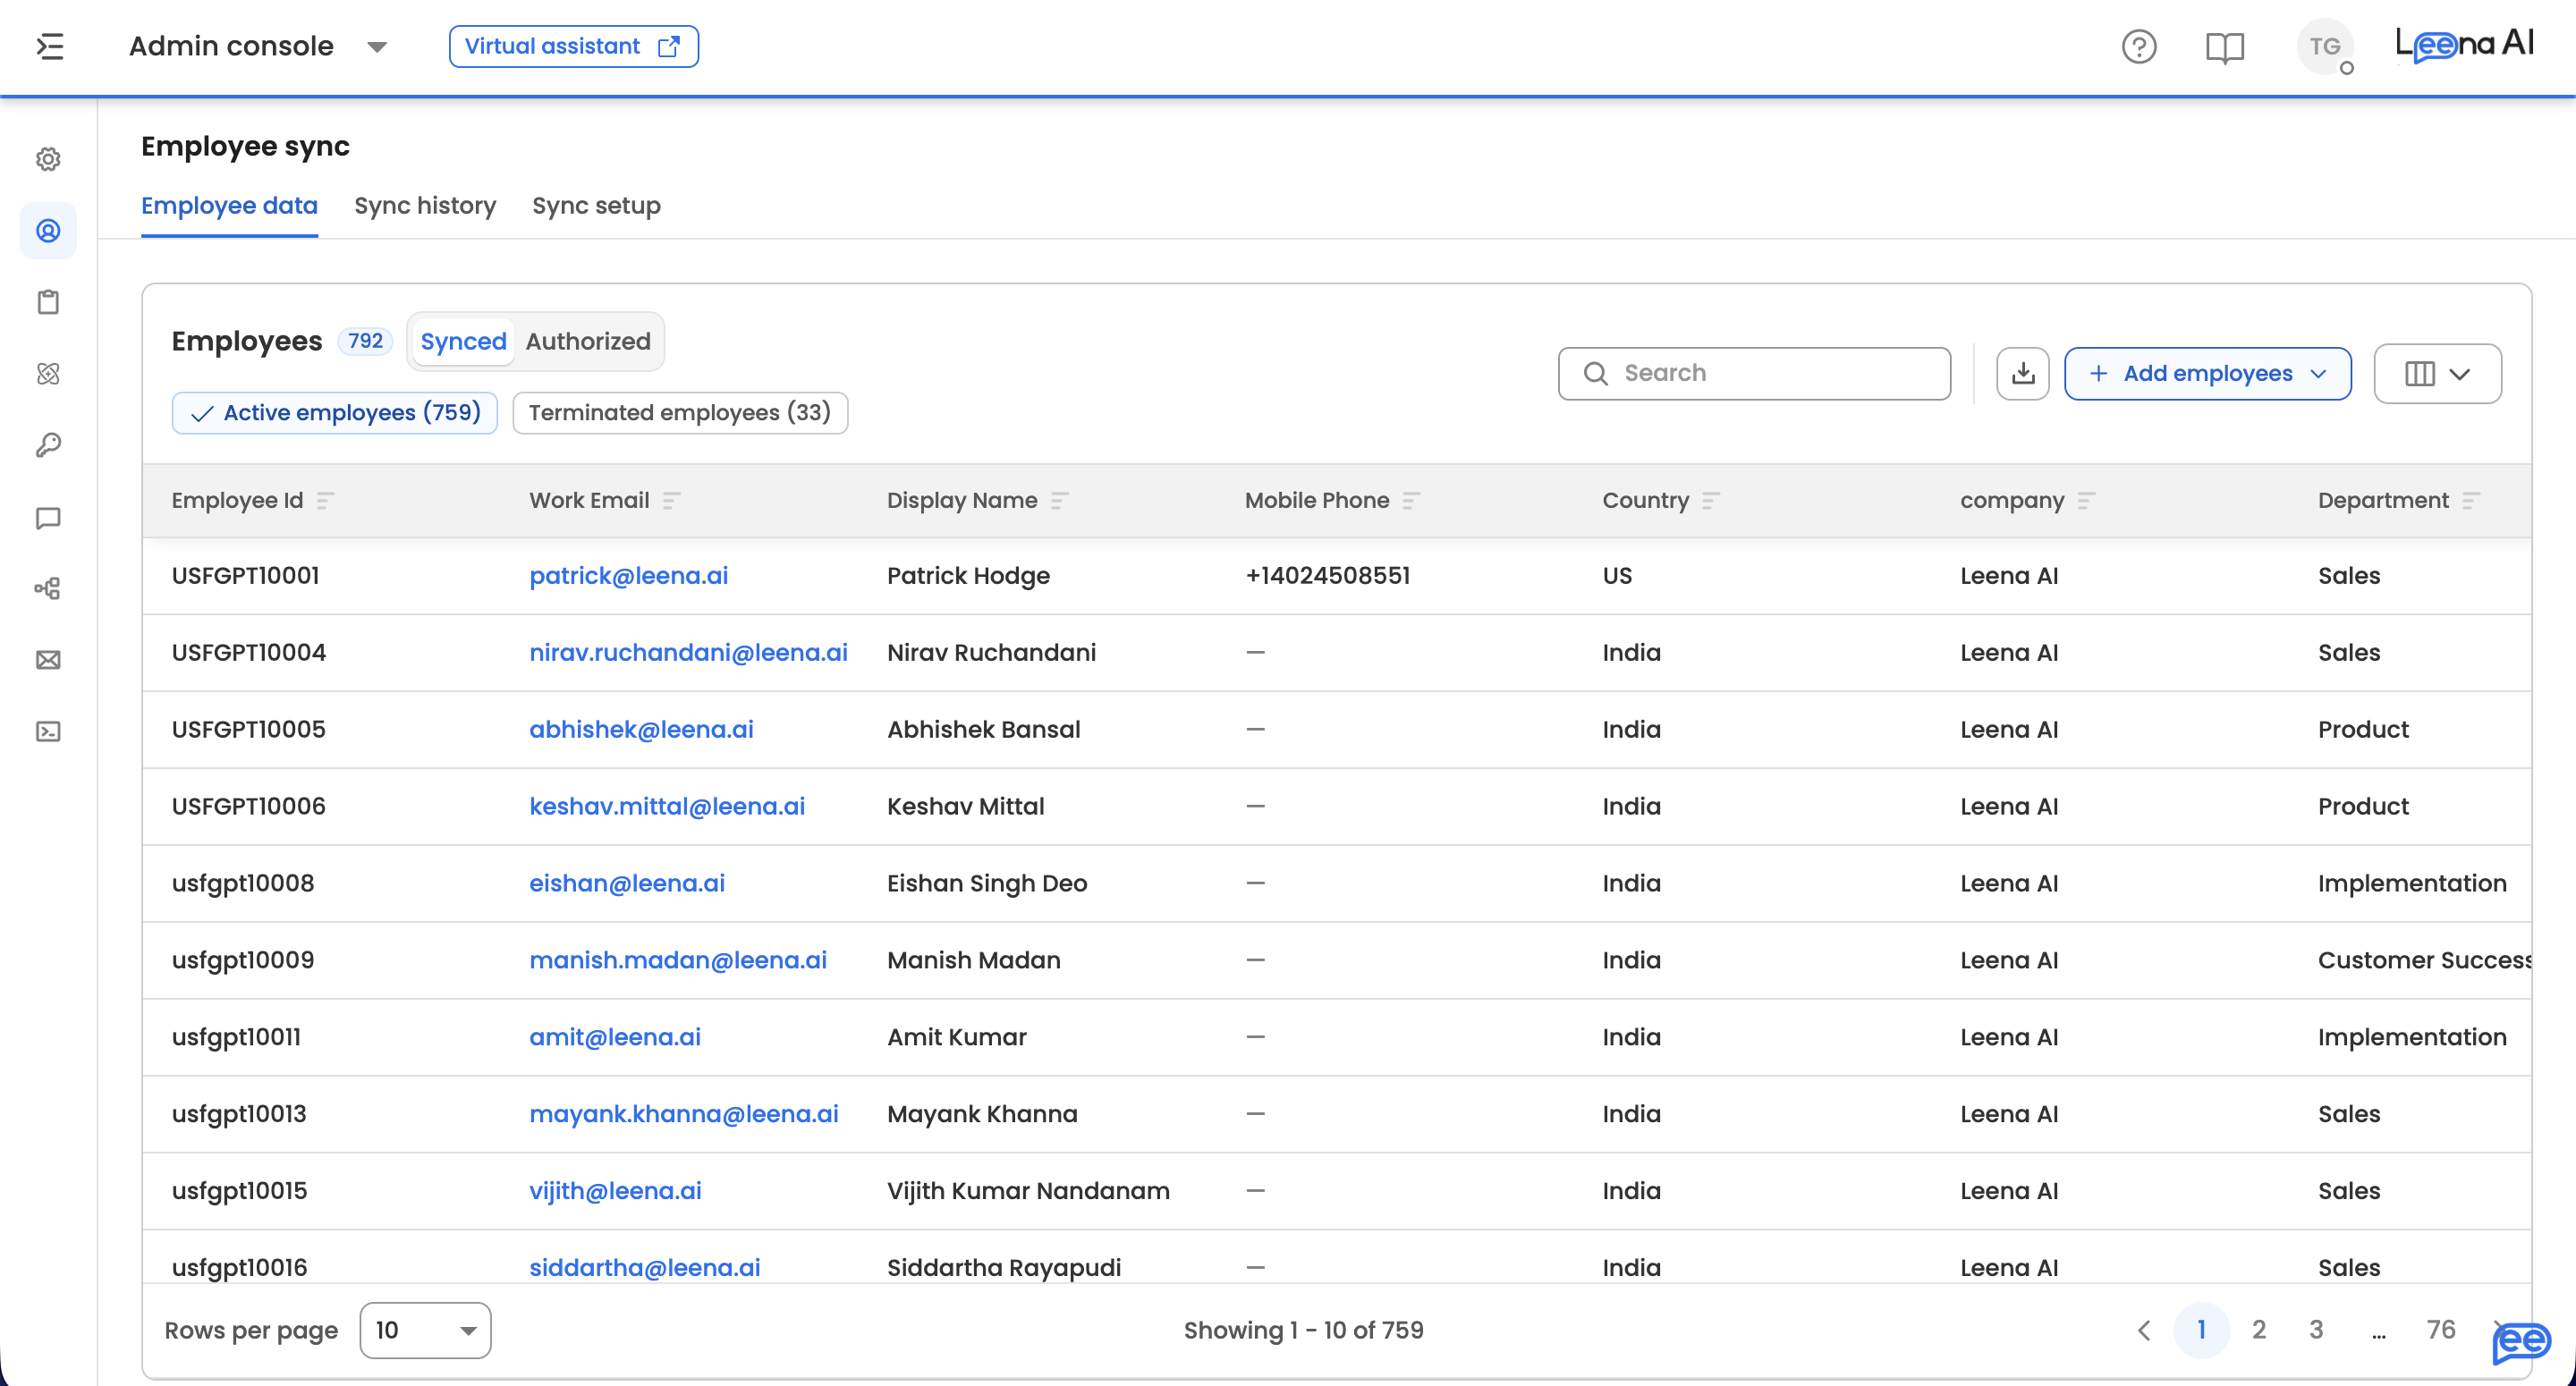
Two views answer two different questions:
| View | Who it shows |
|---|---|
| Synced | Employees the sync wrote |
| Authorized | People who can actually reach the bot, and on which channels |
Within either, switch between Active and Terminated, each with a live count. Search and sort across any column to spot-check records, and use Manage columns to show or hide fields — your choices are remembered. Clicking a row opens the full employee record, including fields hidden from the table. In the Synced view, a row's menu also offers Edit user data.
Download employee data exports every employee, Active and Terminated, as an XLSX regardless of the filters currently applied.
Adding employees
Add employees offers two routes: Upload a file for a spreadsheet, or Add manually for one person.
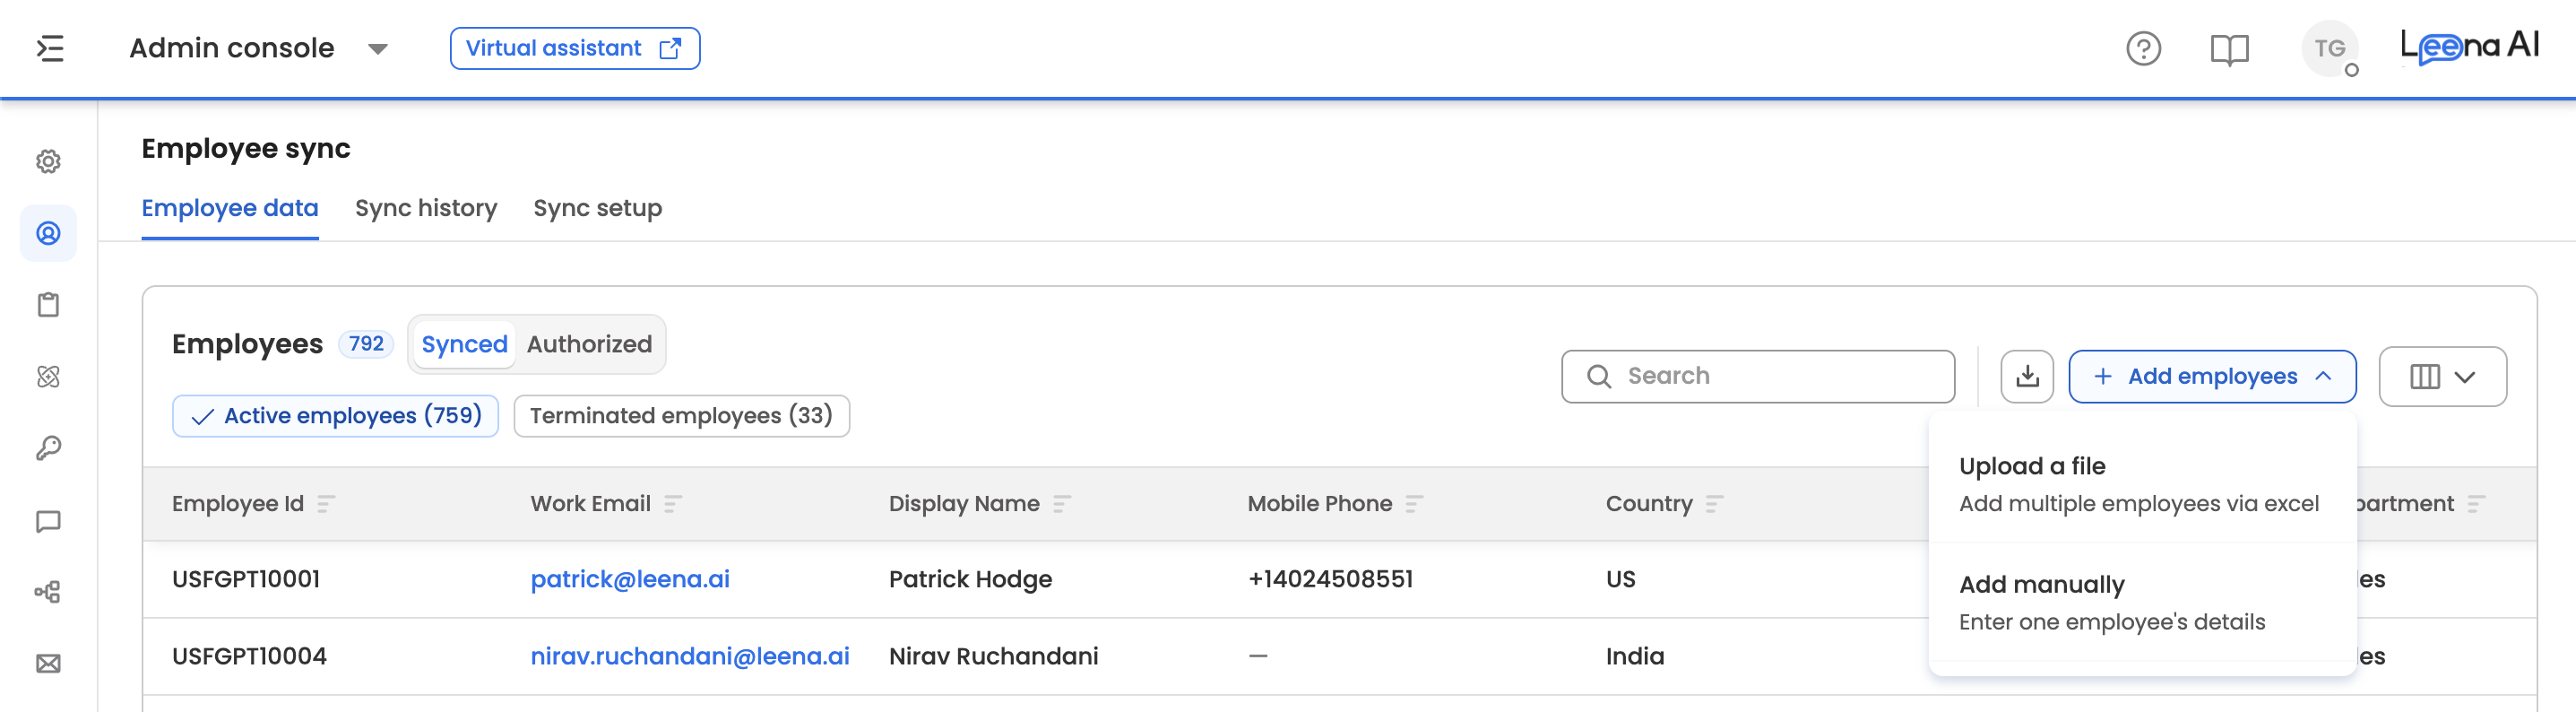
The button is unavailable in two cases: the bot syncs automatically — in which case the sync owns the employee list — or mandatory fields aren't mapped yet. Configure those in Sync setup first.
Upload a file
Before uploading, consider downloading the template — it contains column headers matching your current client field names exactly.
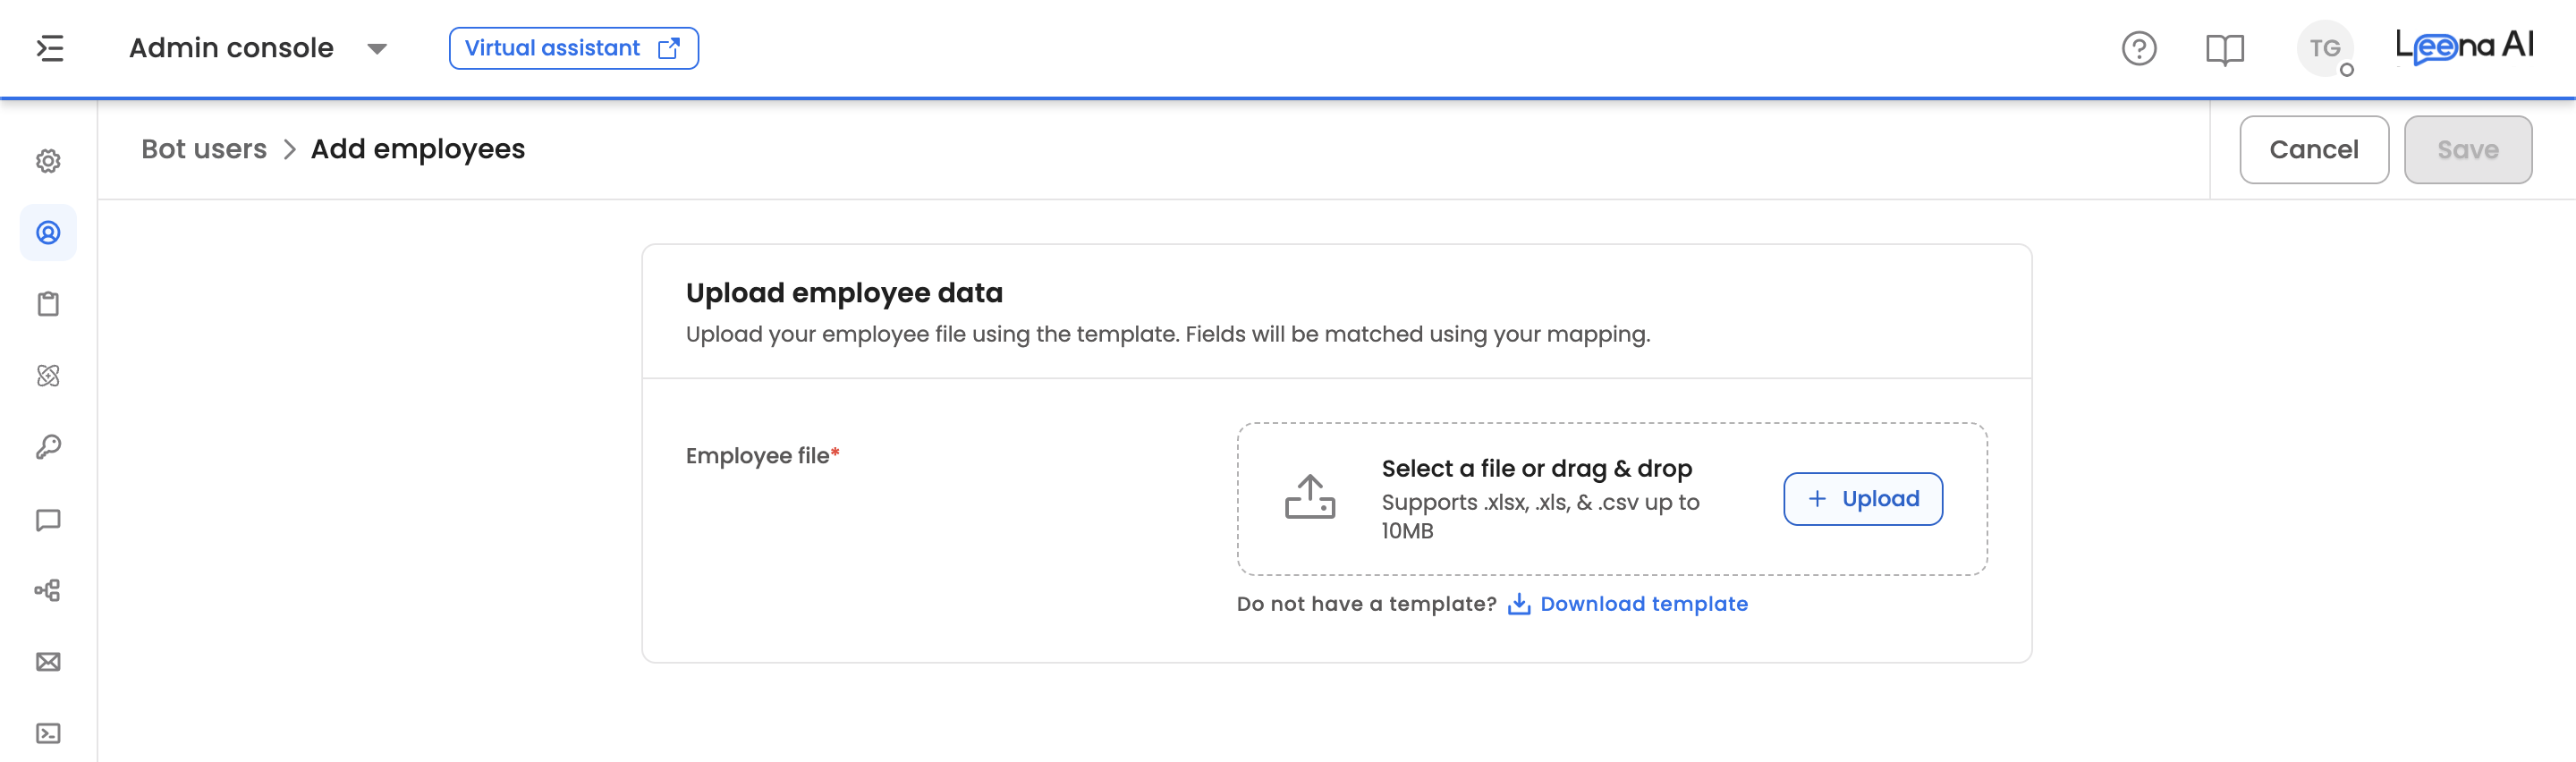
Your file must be:
.xls,.xlsx, or.csv- No larger than 10 MB
- A single, non-empty file
The file is checked the moment you select it, so you don't press Save to find out whether it's valid. A verified file shows a green check; a rejected one shows what went wrong. If columns couldn't be matched to your field mappings, fix the file and upload it again.
Save then takes you to that upload's page in Sync history.
Uploading does not syncAt this point the data is staged and validated. No employee record has been created or updated yet — you complete the sync from Sync history, below.
Add manually
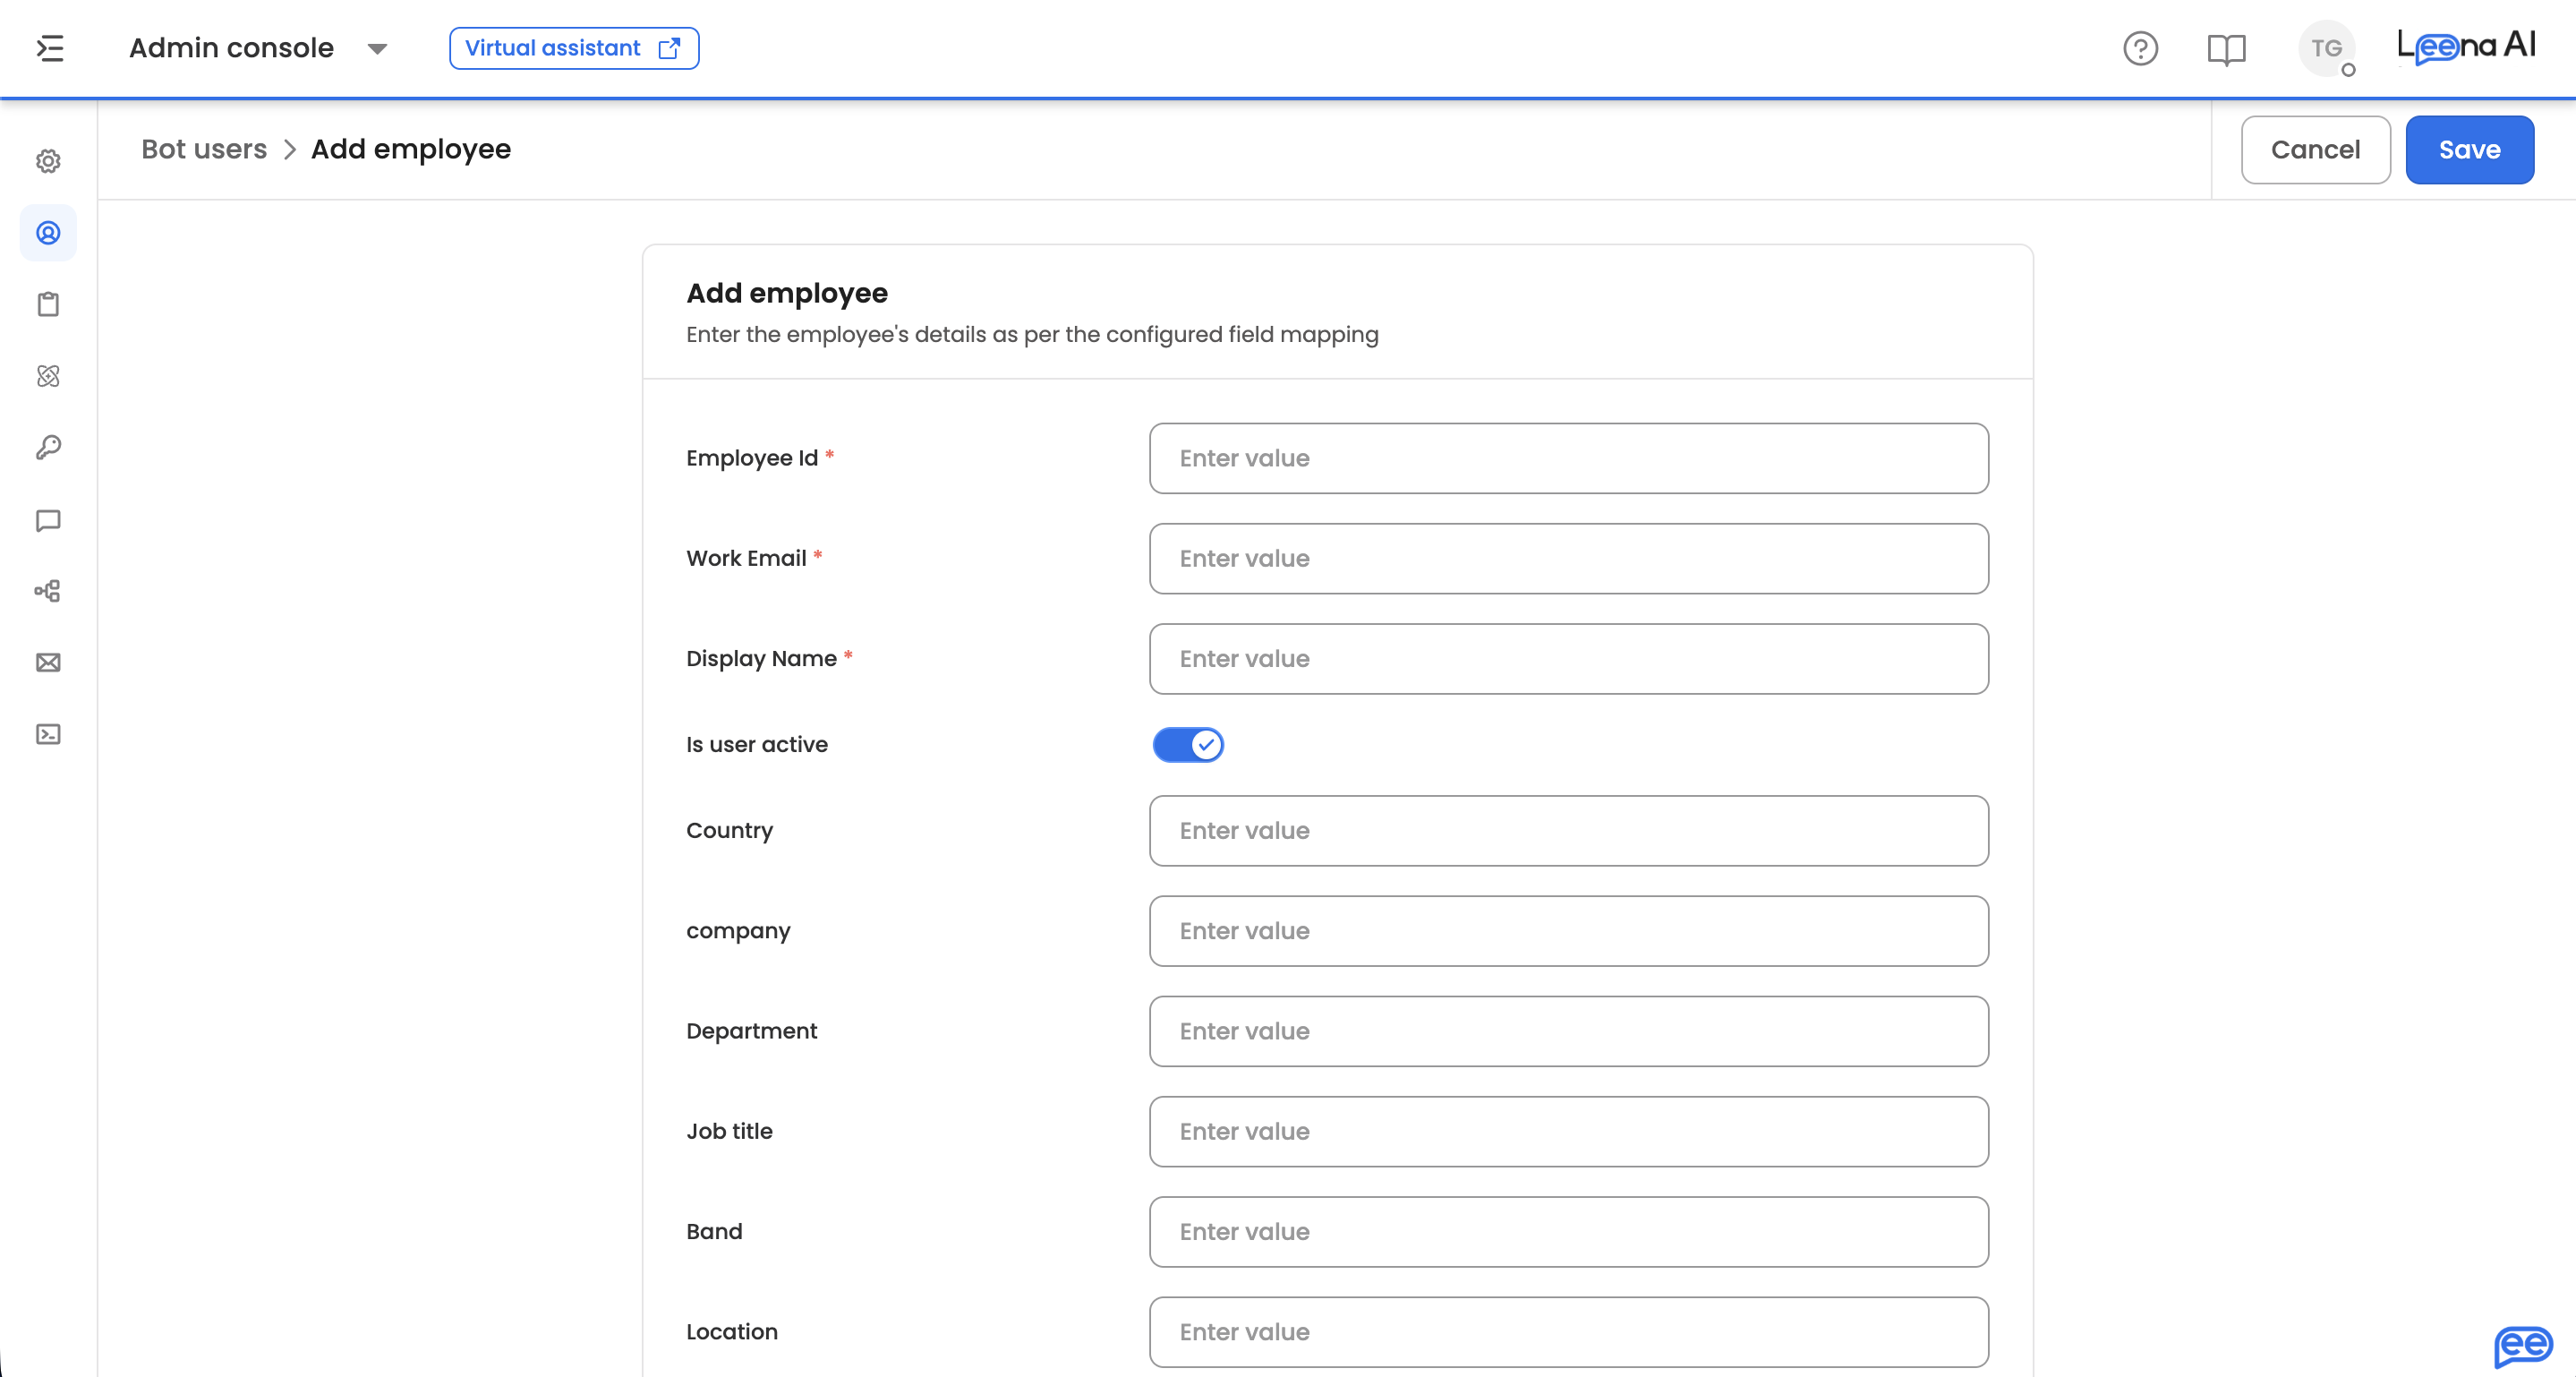
Enter one employee's details. On a manual bot the form follows your configured field mapping; on other bots it follows the existing record. Fields the sync owns — manager, HR ID and similar — aren't editable here. The manager and HR flags can't be changed here either; they're set by the sync.
Sync history
The audit log for every run, uploaded and automated alike. For uploads it's also where you complete the sync.
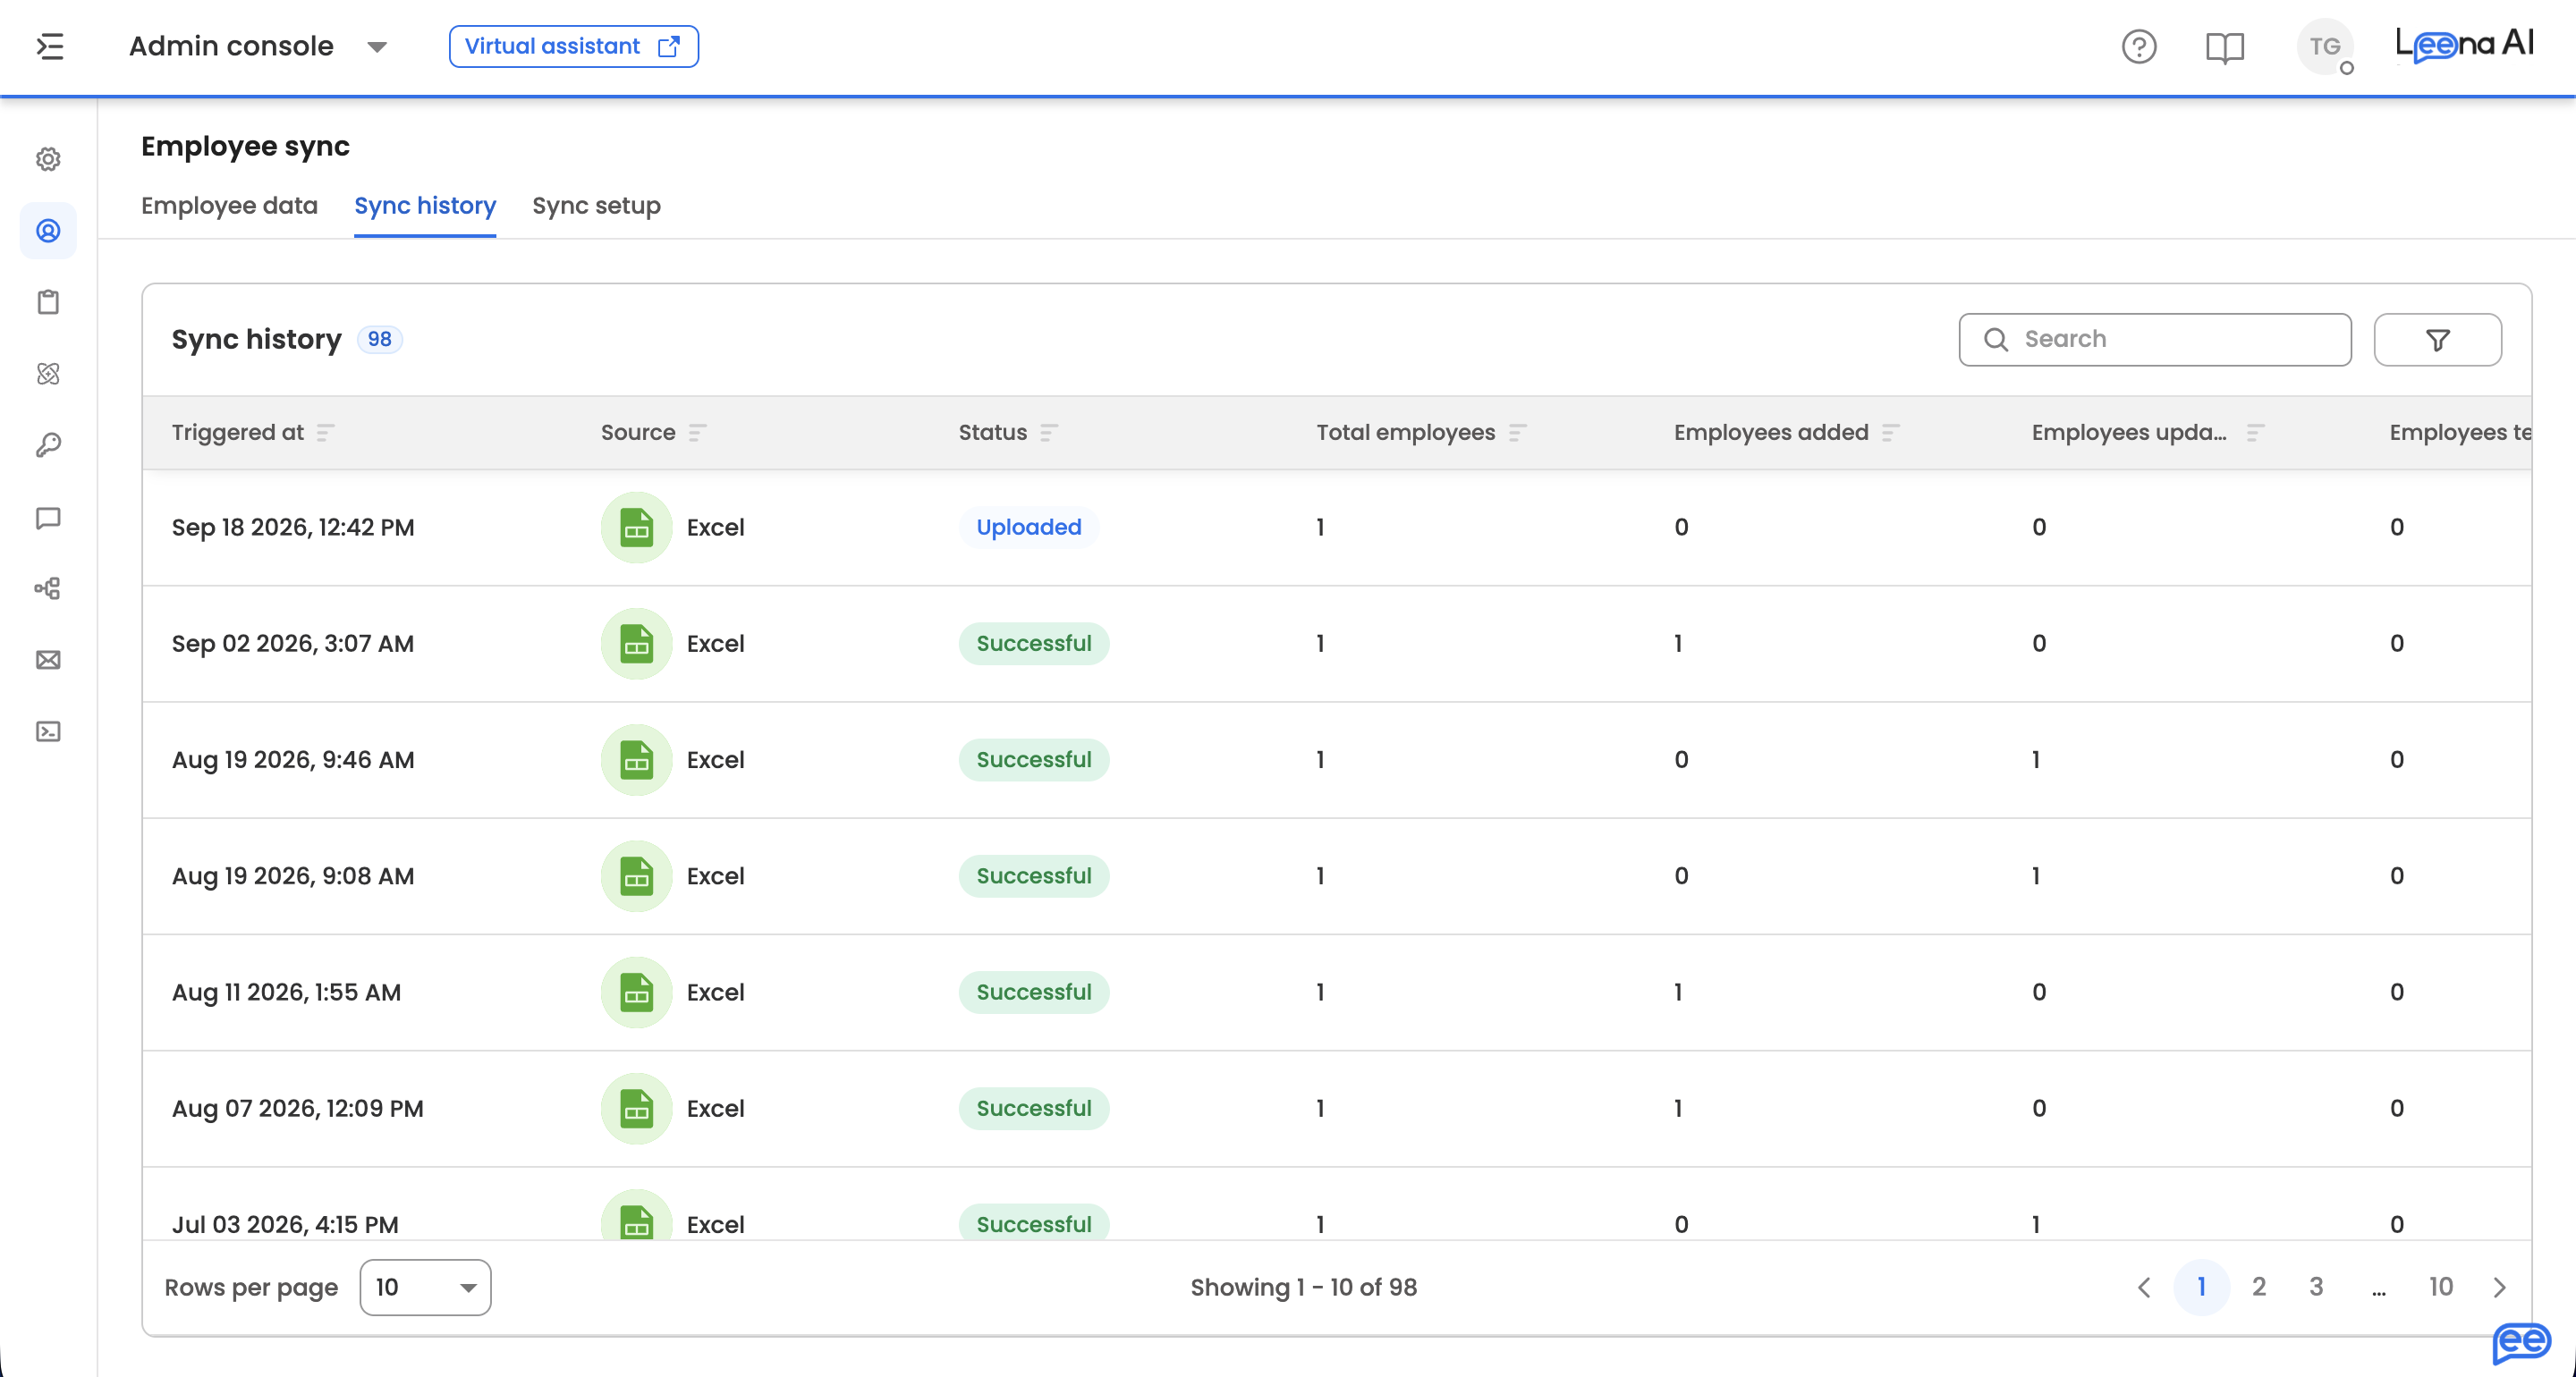
| Column | What it shows |
|---|---|
| Triggered at | When the run occurred |
| Source | Excel or API. API runs show the utility app name |
| Status | See the reference below. Hover a failed run for the reason |
| Total employees | Records processed in the run |
| Added / Updated / Terminated | How many employees were added, updated, and terminated |
| Download data | Downloads the uploaded spreadsheet. Excel runs only |
Completing an upload
- Open the run with status Uploaded or Uploaded with errors to see its record-level detail.
- Review the records. Each row shows its parsed values, with warning icons and tooltips on any field that failed validation. Use the All / No Errors / Errors toggle to isolate problems.
- Click Save. For a run with errors, a confirmation appears first — proceeding syncs the valid records and excludes the rest. To include them, fix the source file and re-upload.
- The run moves to Sync in progress, then Successful or Synced with errors. Added, Updated and Terminated counts populate on the run, and the results appear under Employee data.
Until you click Save, the run sits in Uploaded status and nothing reaches the directory. If you re-upload a corrected file, start the sync from the newest run.
Status reference
| Status | Meaning |
|---|---|
| In progress | The uploaded file is still being processed and validated |
| Uploaded | Validated and staged — not yet synced. Open the run and click Save |
| Uploaded with errors | Staged, but some records failed validation. Save syncs the valid ones only |
| Sync in progress | The sync is running |
| Successful | Completed, all records applied |
| Synced with errors | Completed, but some records failed — open the run to inspect them |
Automated runs use only the last three, since they have no upload or staging step.
Filters and search
Narrow the list by Sync status (multi-select), Sync type (Excel or API), and Utility app (multi-select, shown when the type is API). Search, sorting and filters are held in the page URL, so a filtered view can be shared as a link.
Run details and downloads
Clicking an Excel run opens its record-level detail, where each row shows its values with warning icons and tooltips for validation errors, and the All / No Errors / Errors toggle isolates problems. For runs still in Uploaded status, this is where you click Save. The uploaded file can be downloaded from either the row or the detail page, with an extra column listing each row's errors.
Fully successful runs don't open a detail page — the sync is already complete, so use the row's Download option instead. API runs have no detail page or download; use the stats columns and the failure reason tooltip.
RetentionRow-level data behind a completed run is purged 7 days after upload, so download an error report while you still need it. Runs that were never synced are preserved.
Troubleshooting
What to check regularly
Watch Sync history to confirm runs happened at the expected UTC hour, that the status is Successful, and that the record counts line up with your HRMS. Also check that no uploads are sitting in Uploaded or Uploaded with errors — those are staged files waiting for someone to open them and click Save.
Automated sync failures
Missing identifier — records without an Employee ID, User ID, or Email are skipped, since they can't be matched or created. Make sure your utility app returns at least one identifier per record.
Pagination error — the run stopped because pagination didn't advance: either the page number or skip token repeated, or three consecutive pages returned no new employees. This is a safeguard against runaway loops. Check the utility app's pagination configuration.
Termination limit — if a sync set to terminate absent employees would terminate more than 50% of the employees it owns, terminations are blocked and the run is marked with errors. Confirm the source system returned the full employee list before re-running. This guard only applies once the owned population exceeds 10, so very small directories aren't protected by it.
Sync now is refused — a sync can only be triggered once an hour. The message tells you how long is left.
HR flags aren't being set — check that Automatically identify HRs is on and that your utility app returns an HR ID for employees. If fewer than half of the HR IDs in the directory match an Employee ID — usually because the source sends the HR's email or a separate internal ID — the HR step is skipped for that run and existing HR flags are left as they were. The same happens when no active employee has an HR ID. The sync itself still completes.
Manual sync issues
Add employees is unavailable — either the bot syncs automatically, in which case the sync manages the employee list, or mandatory fields are still unmapped. Finish the mappings in Sync setup.
File rejected — check the format, the size limit of 10 MB, and that the file isn't empty or corrupt.
Columns couldn't be matched — the file's headers don't line up with your client field names. Download the template, or correct the headers, and upload again.
File uploaded but Employee data hasn't changed — the run is almost certainly still in Uploaded status. Uploading only stages data; open the run in Sync history and click Save.
Validation errors — open the run to see them per record, fix the source file or the field validations, and re-upload. Saving an "Uploaded with errors" run excludes the failing records.
Duplicate value errors on a unique field — uniqueness is checked within the uploaded file, so two rows sharing a value are both flagged even when neither conflicts with existing data.
Authorization issues
An employee is in Employee data but can't use the bot — compare the Synced and Authorized views. Synced means the sync wrote the record; Authorized means they pass the domain and rule checks. Check the rules in Sync setup, and remember they only apply to existing employees after the next sync.
Updated about 17 hours ago