
Setup in Microsoft Copilot Studio
This guide walks you through adding your Leena AI Colleague to a Microsoft Copilot Studio agent, one step at a time. There are two ways to do it, and this page covers both:
- As an MCP tool — the Copilot Studio agent calls Leena's MCP server on behalf of the signed-in user. Answers and actions are scoped to that person's Leena permissions. This is the main path, covered in the step-by-step below.
- As a connected A2A agent — the Copilot Studio agent delegates tasks to your AI Colleague over the open Agent2Agent (A2A) protocol, treating Leena as a peer agent in a multi-agent setup. Covered in the second half of this page.
Both routes use the same OAuth application and the same credentials from the Leena settings page — you enable the surface(s) you need, generate one secret, and reuse it.
This page assumes you've already enabled the Leena MCP server (and, for the A2A route, the A2A toggle). If you haven't, do that first (see Leena MCP Server → How to Enable It and Generate Credentials), then come back here.
MCP tool or A2A agent — which should you use?
| MCP tool | A2A connected agent | |
|---|---|---|
| Where it lives in Copilot Studio | Tools page | Agents page |
| Integration model | Copilot Studio calls Leena's tools (send_message, etc.) | Copilot Studio delegates a task to Leena as a peer agent |
| Identity | The signed-in end user — per-user OAuth, per-user permissions | The OAuth connection configured by the maker |
| What Leena receives | A natural-language message via send_message | An A2A task with rich metadata (including chat history) |
| Best for | Employee-facing scenarios where answers must be scoped to each user's data and permissions (leave balance, my tickets, my payslip) | Multi-agent orchestration where Copilot Studio routes whole tasks to specialist agents |
Rule of thumb: if end users will ask personal, permission-sensitive questions, use the MCP tool route — it's the only one that binds every call to the individual user's Leena identity. Use the A2A agent route when you're composing a multi-agent system and want Copilot Studio's orchestrator to hand off entire tasks to Leena alongside other connected agents. You can also use both on the same Copilot Studio agent.
Part 1 — Add Leena as an MCP tool
What you'll need before you start
On the Leena side — open your AI Colleague's Settings → Orchestrator Settings → MCP server page and have these values ready. You'll paste each one into Copilot Studio:
| From the Leena MCP server settings page | Used in Copilot Studio as |
|---|---|
MCP URL (ends in /mcp/) | Server URL |
| Client ID | Client ID |
| Client secret (generate it, shown once) | Client secret |
| Authorization URL | Authorization URL |
| Token URL | Token URL template |
| Refresh URL | Refresh URL |
On the Microsoft side:
- A Copilot Studio agent you can edit (or create a new one).
- Permission to create Power Platform connections in your environment. (Behind the scenes, Copilot Studio registers the MCP server as a Power Platform connector, so any data-loss-prevention policy on connectors also applies here.)
One compatibility note: Copilot Studio talks to MCP servers over the Streamable HTTP transport, which is exactly what the Leena MCP server uses — so the two are compatible out of the box. (The older SSE transport is no longer supported by Copilot Studio.)
Tip — do the credential prep first. Generate the Leena client secret right before you start, because Leena shows the full secret only once. If you lose it, generate a new one (which replaces the old).
Step-by-step
Step 1 — Open the MCP onboarding wizard
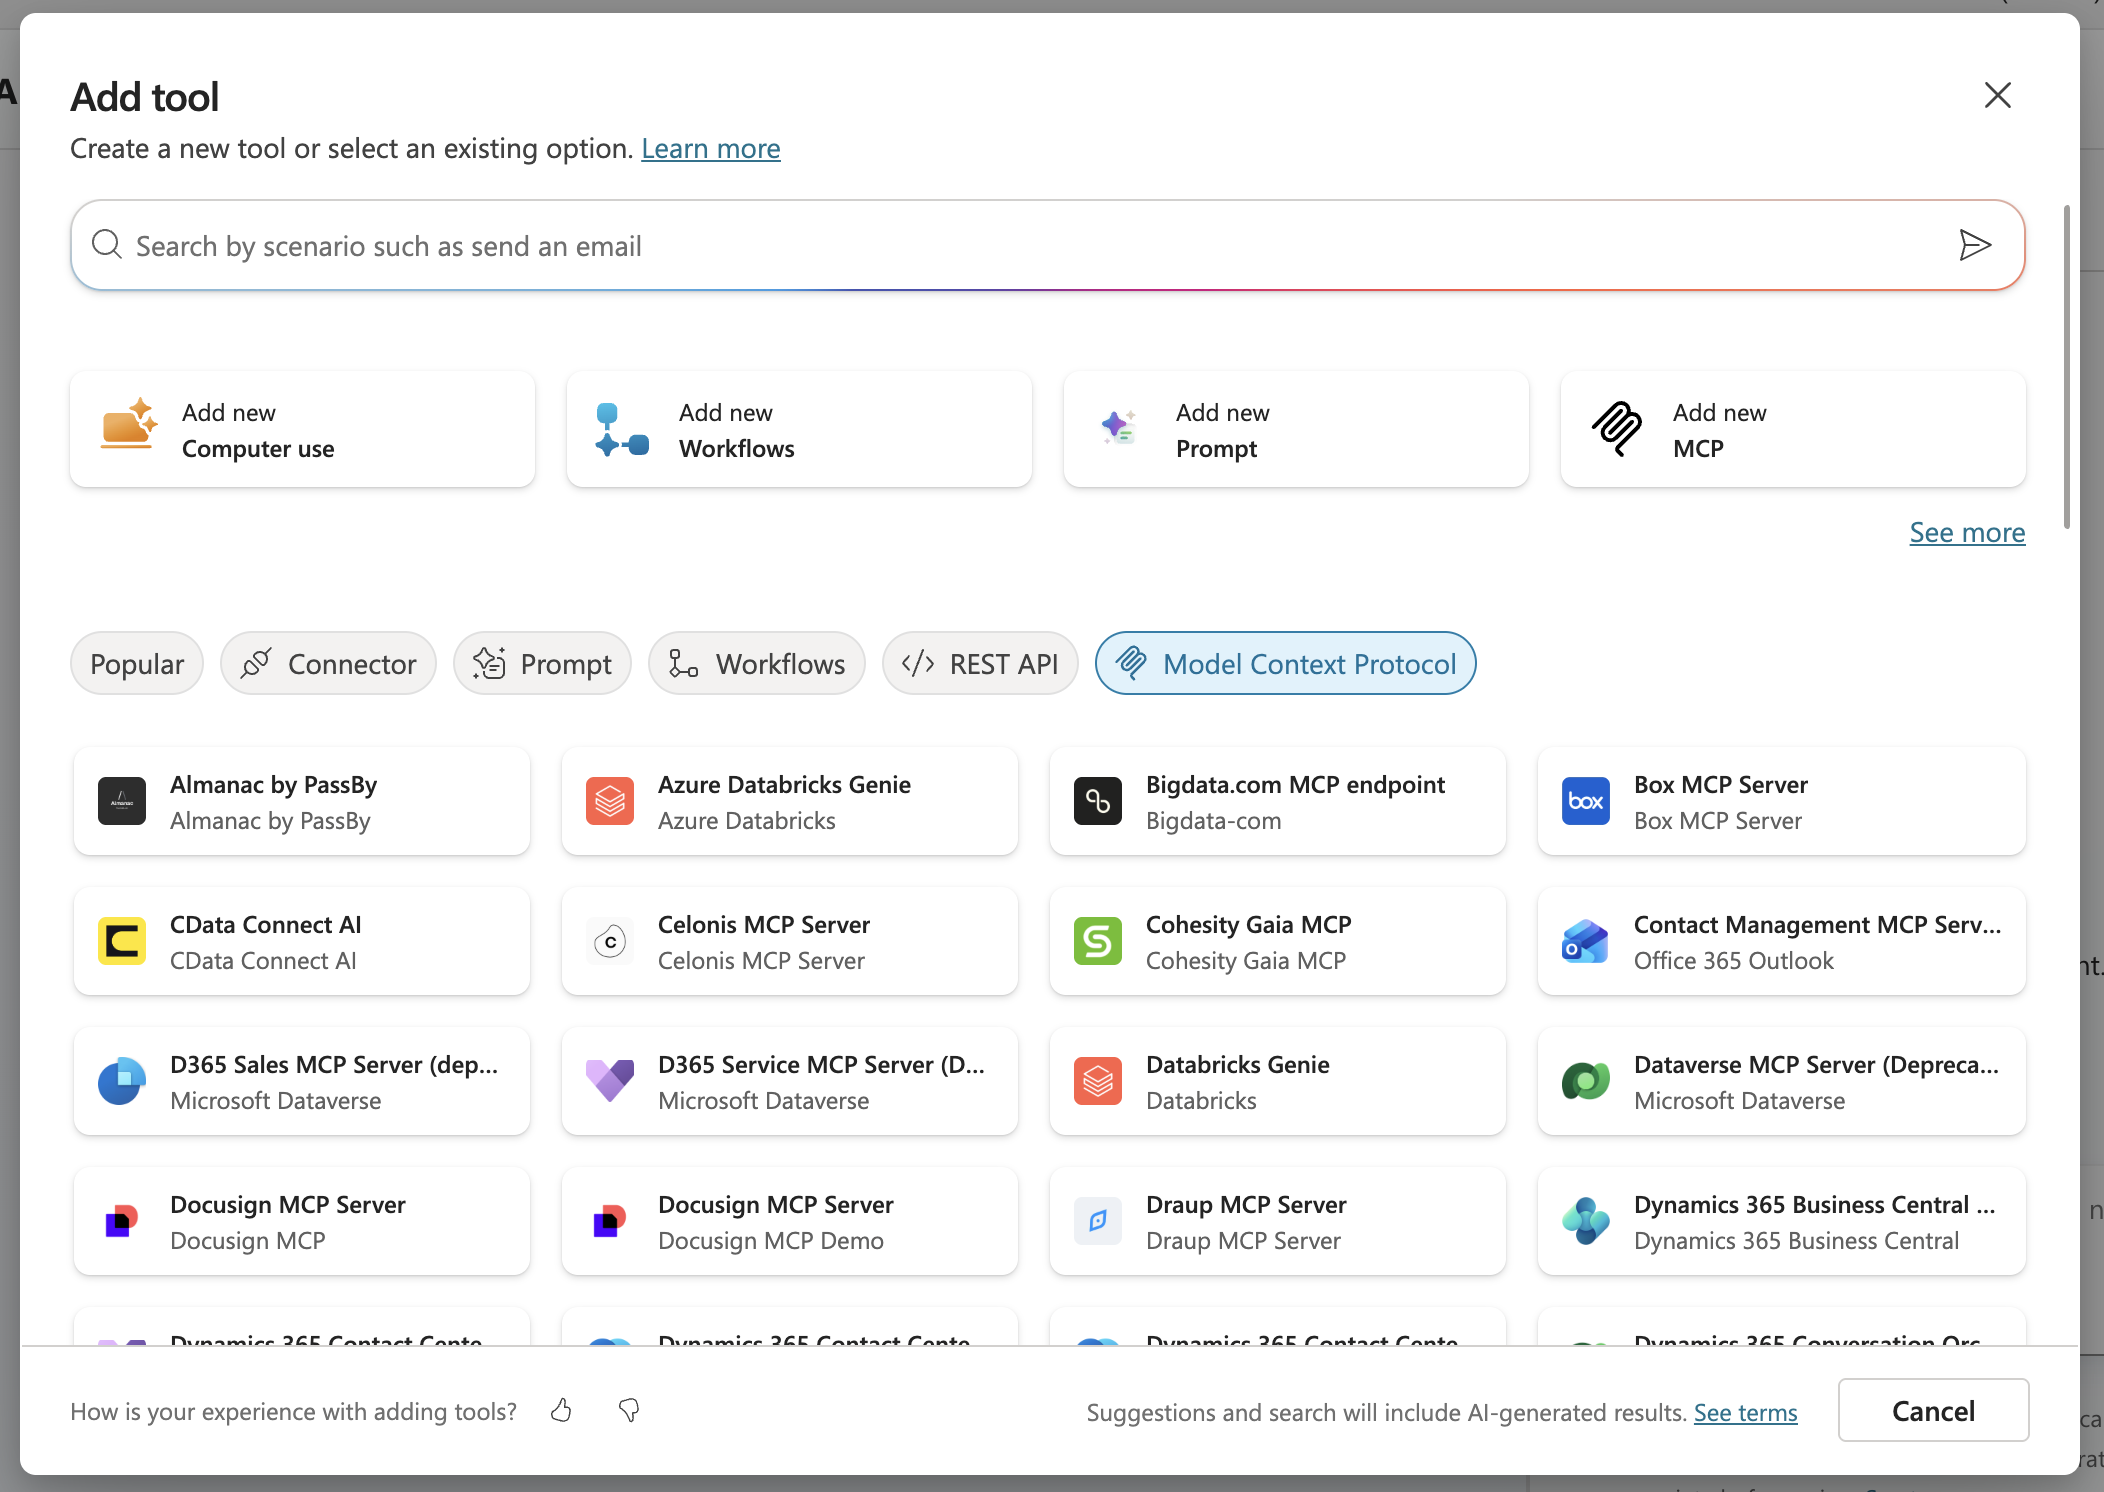
In Copilot Studio, open your agent and go to the Tools page. Select Add a tool → New tool → Model Context Protocol.
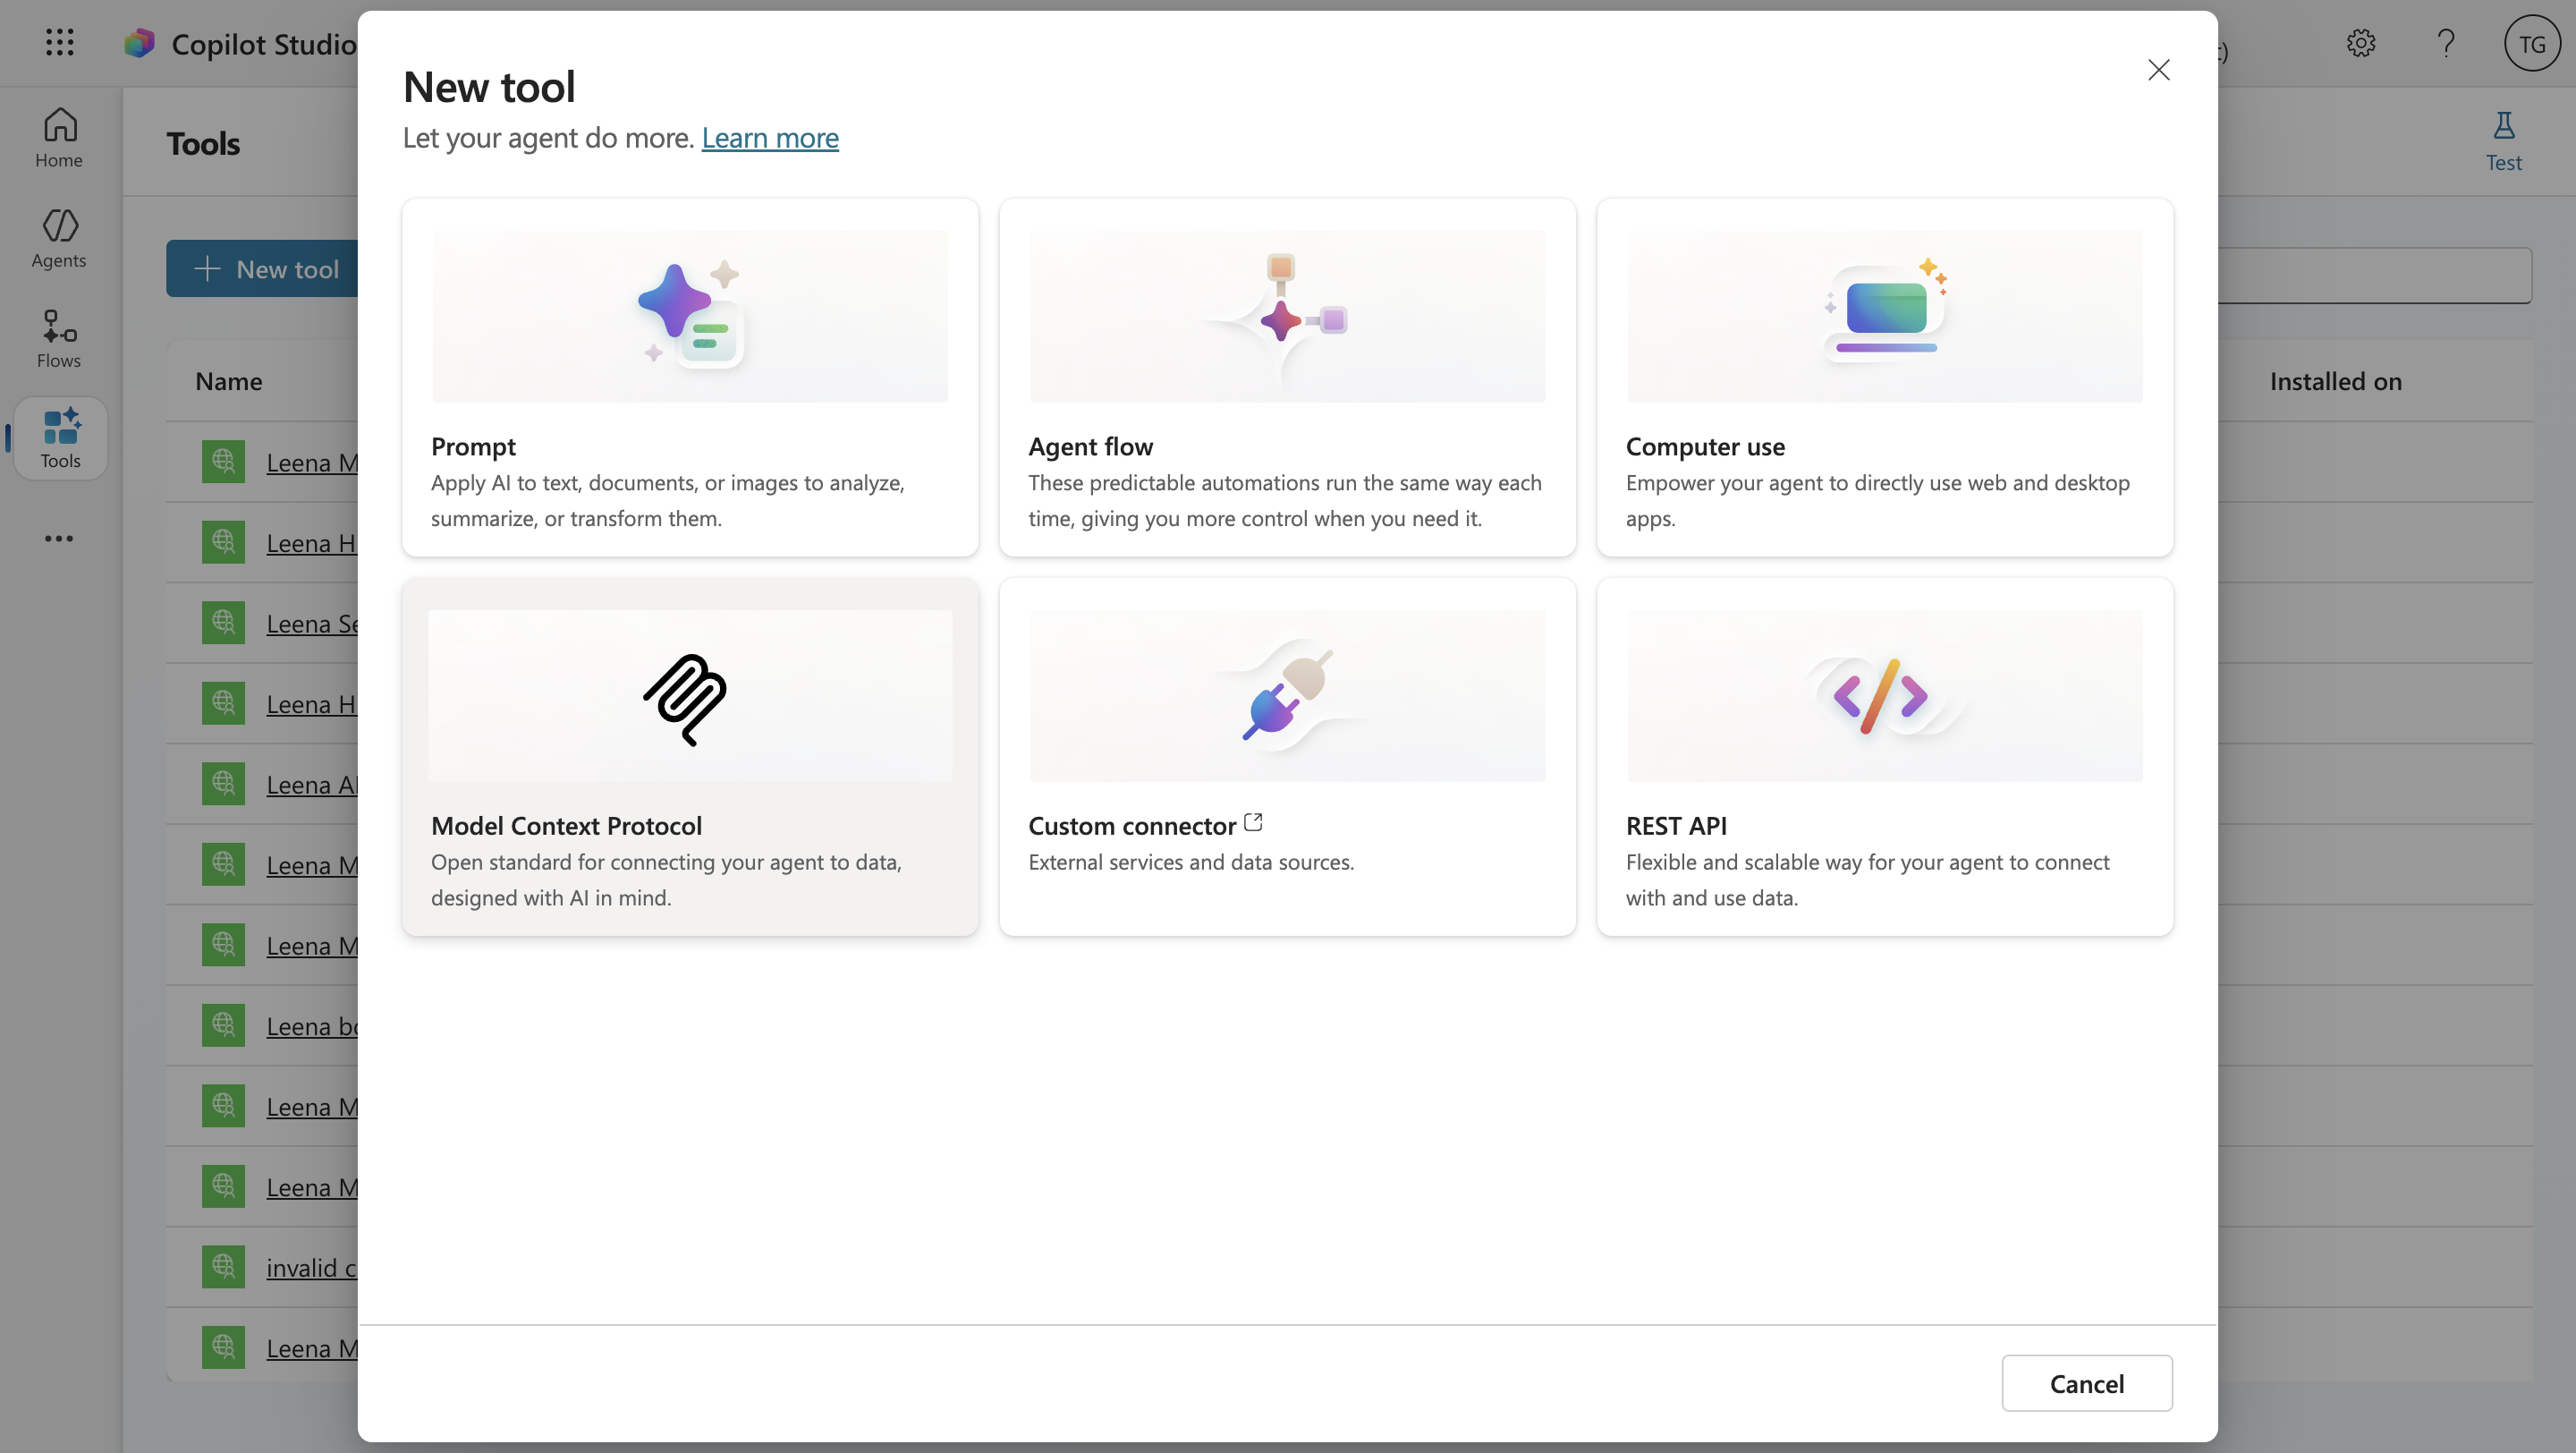
This launches the MCP onboarding wizard — the recommended, no-code way to attach an MCP server. (There's also a Power Apps custom-connector route, covered at the end, but the wizard is simpler and is the right choice for Leena.)
Step 2 — Enter the basic server details
Fill in the three fields the wizard asks for:
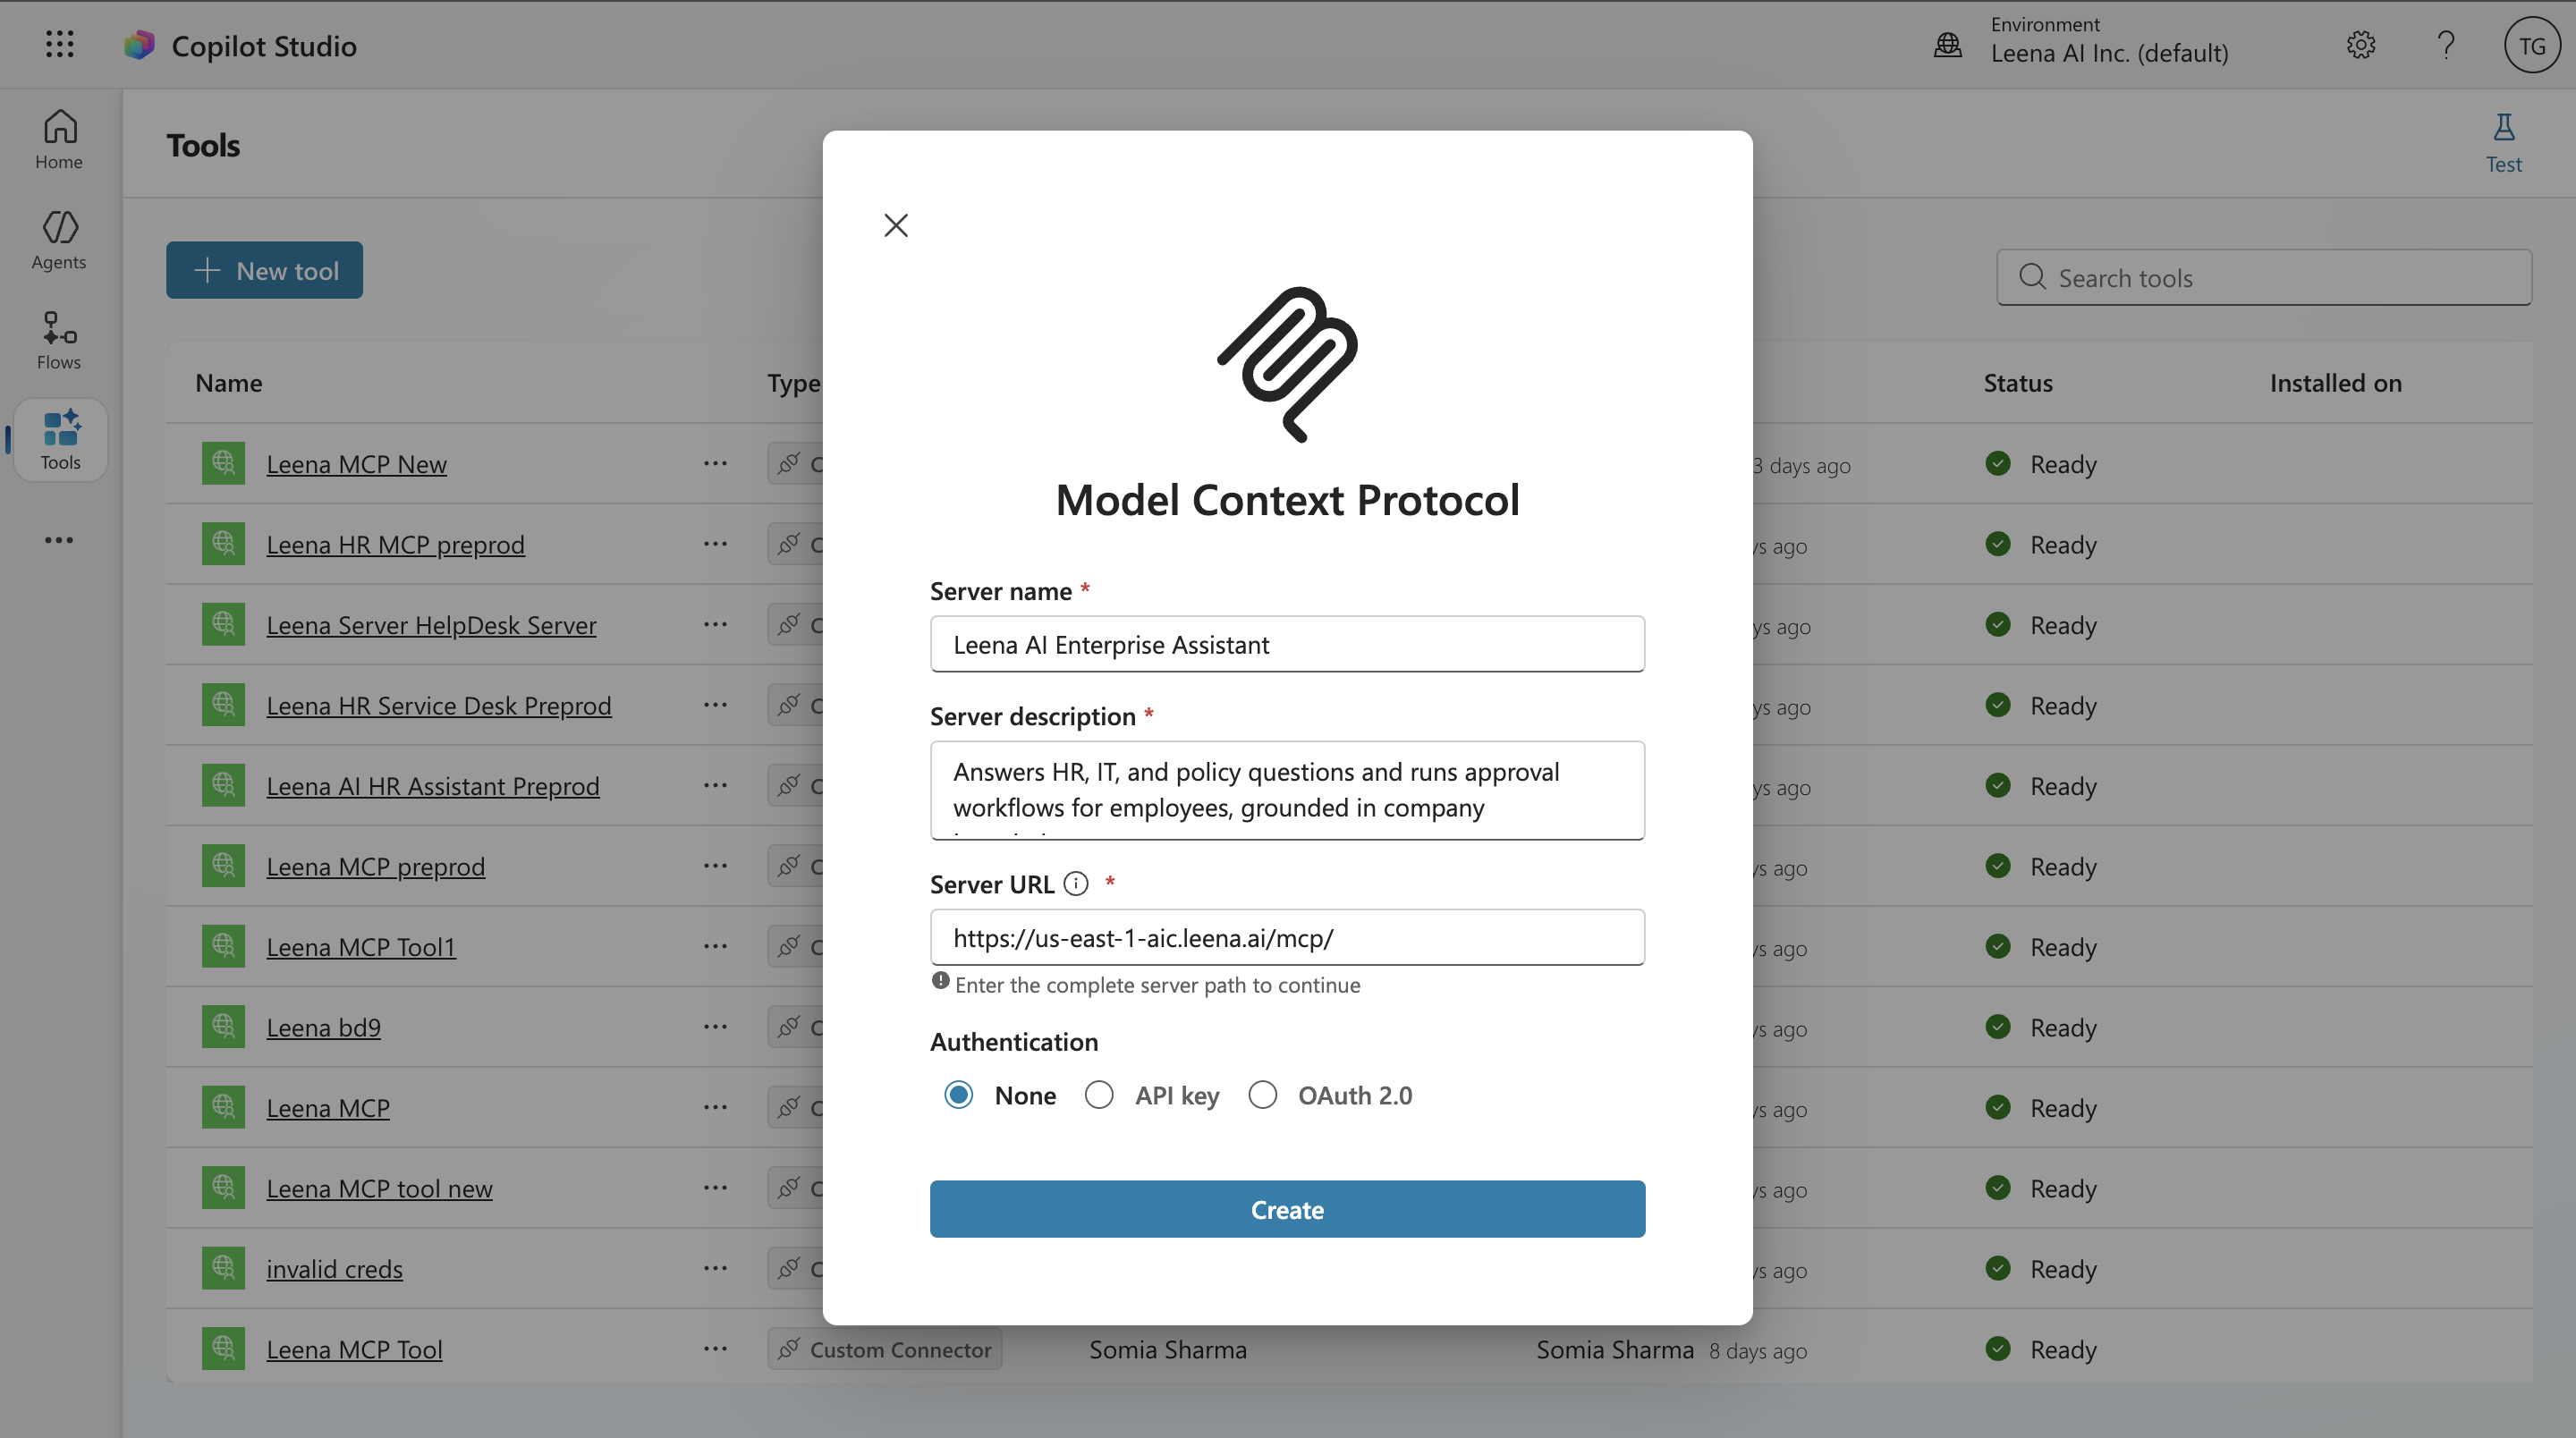
- Server name — a friendly label, e.g.
Leena AI Colleague. - Server description — a short, clear description of what your AI Colleague does, e.g. "Answers HR, IT, and policy questions and runs approval workflows for employees, grounded in company knowledge."
- Server URL — paste the MCP URL from the Leena settings page (the one ending in
/mcp/).
Why the description matters: Copilot Studio's orchestrator reads this description at runtime to decide when to route a user's message to Leena versus other tools. A vague description ("Leena server") makes routing unreliable; describe the kinds of questions and actions Leena handles.
Step 3 — Choose the authentication type: OAuth 2.0 → Manual
For the authentication type, select OAuth 2.0, then choose the sub-type Manual.
Here's why Manual is the correct choice for Leena: Leena issues you a fixed Client ID and Client secret from its dashboard — your admin pre-registers the application. The other two OAuth options (Dynamic discovery and Dynamic) are for servers that let the client register itself automatically at connection time. Leena doesn't work that way, so you supply the credentials manually.
Step 4 — Fill in the OAuth 2.0 fields
Map each value from the Leena settings page into the matching Copilot Studio field:
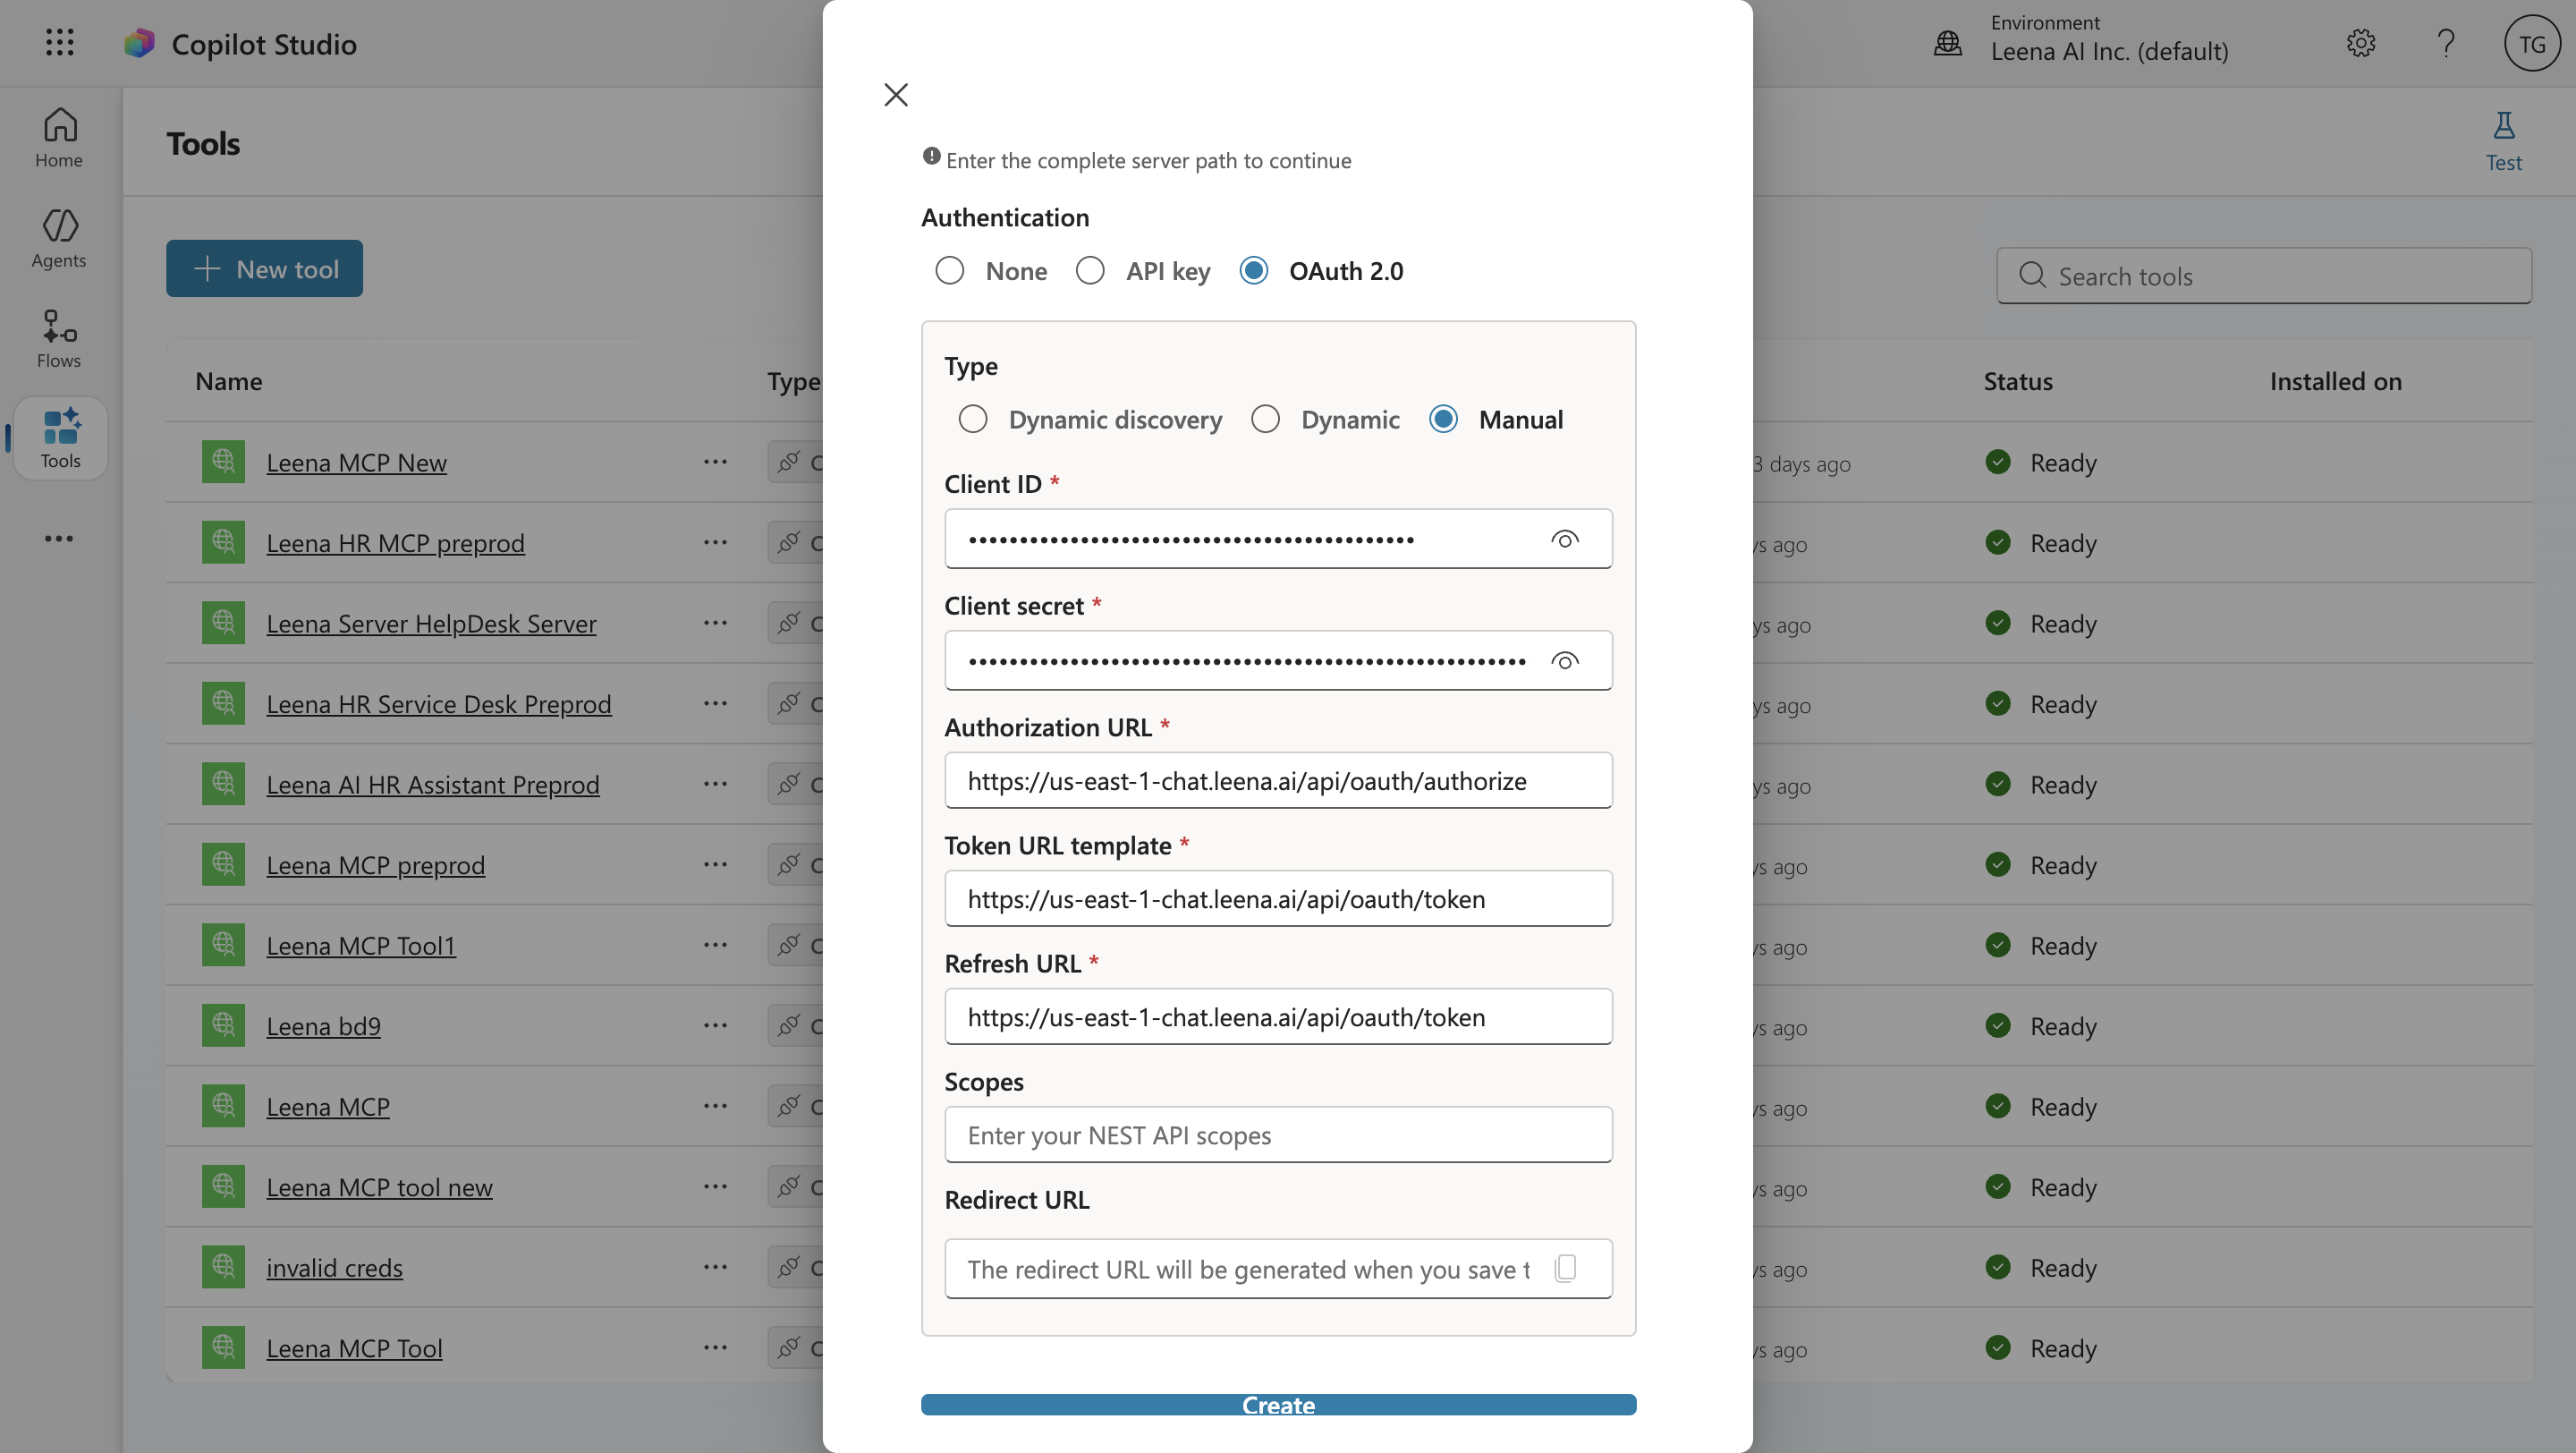
- Client ID → the Leena Client ID. Identifies your registered application to Leena.
- Client secret → the Leena Client secret you generated. Proves the application is authorized to request tokens.
- Authorization URL → the Leena Authorization URL. This is where the user is sent to sign in to Leena and grant consent (they'll see a sign-in/consent card inside the agent chat).
- Token URL template → the Leena Token URL. Where Copilot Studio exchanges the sign-in result for an access token (and a refresh token) so it can call Leena on the user's behalf.
- Refresh URL → the Leena Refresh URL. Used to silently get a fresh access token when the old one expires, so users don't have to sign in again every time.
- Scopes (optional) → leave blank unless your Leena deployment specifies one. Leena's MCP server doesn't require a specific scope.
Step 5 — Create the server and copy the callback URL
Select Create. Copilot Studio registers the server and then displays a callback URL (also called a redirect URL).
This callback URL is the address Leena must send the user back to after they sign in. Copy it now — you'll register it with Leena in the next step. Don't continue past this screen until you've copied it.
The callback URL is generated by Microsoft and is an HTTPS address. It varies by cloud/region, so always copy the exact value Copilot Studio shows rather than assuming it.
Step 6 — Register the callback URL back in Leena
Switch back to the Leena MCP server settings page and add the callback URL you just copied to the Redirect URIs field, then save.

This step is the one most people miss, and it causes sign-in to fail if skipped. Leena will only complete the OAuth login if the callback URL is on its allow-list.
A couple of things to know:
- Redirect URIs in Leena must be HTTPS. The Microsoft callback URL is HTTPS, so it's accepted. (Plain HTTP is only allowed for
localhostloopback addresses, which won't apply here.) - There's a deliberate ordering to Steps 4–6: Copilot Studio only reveals the callback URL after you enter the credentials and click Create, and Leena needs that URL registered before a user can sign in. So the sequence is: enter credentials → Create → copy callback → paste into Leena → save → then continue.
Step 7 — Create the connection and sign in
Back in Copilot Studio, on the Add tool dialog, select Create a new connection for the Leena server.
Because Leena uses OAuth, this triggers a sign-in: the user authenticates against Leena and grants the agent permission to act on their behalf. This is per-user — the connection is bound to whoever signs in, and the AI Colleague will only ever see and do what that user's Leena permissions and audience rules allow. It is not a shared service account.
If you're testing, you sign in as yourself; when published, each end user signs in once via the consent card the first time the agent calls Leena.
Step 8 — Add the server to your agent
Select Add to agent to finish. Copilot Studio performs the MCP handshake with Leena and pulls in the available tools.
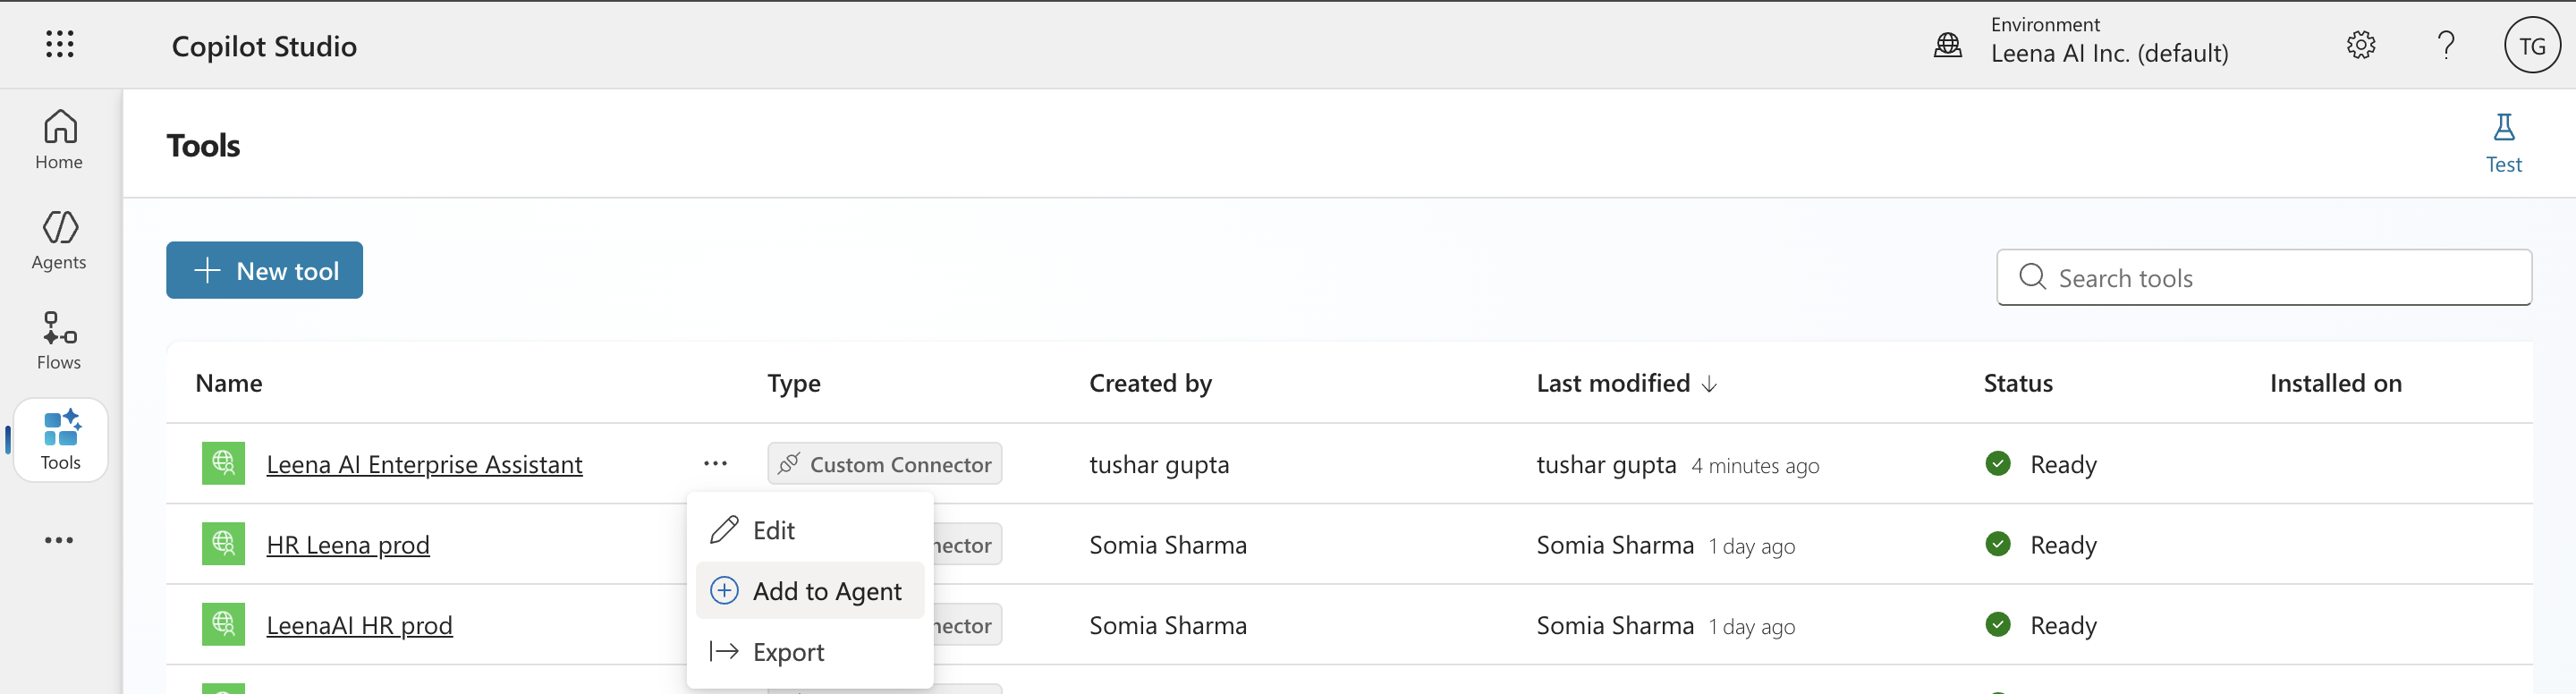
Step 9 — Review the tools that appear
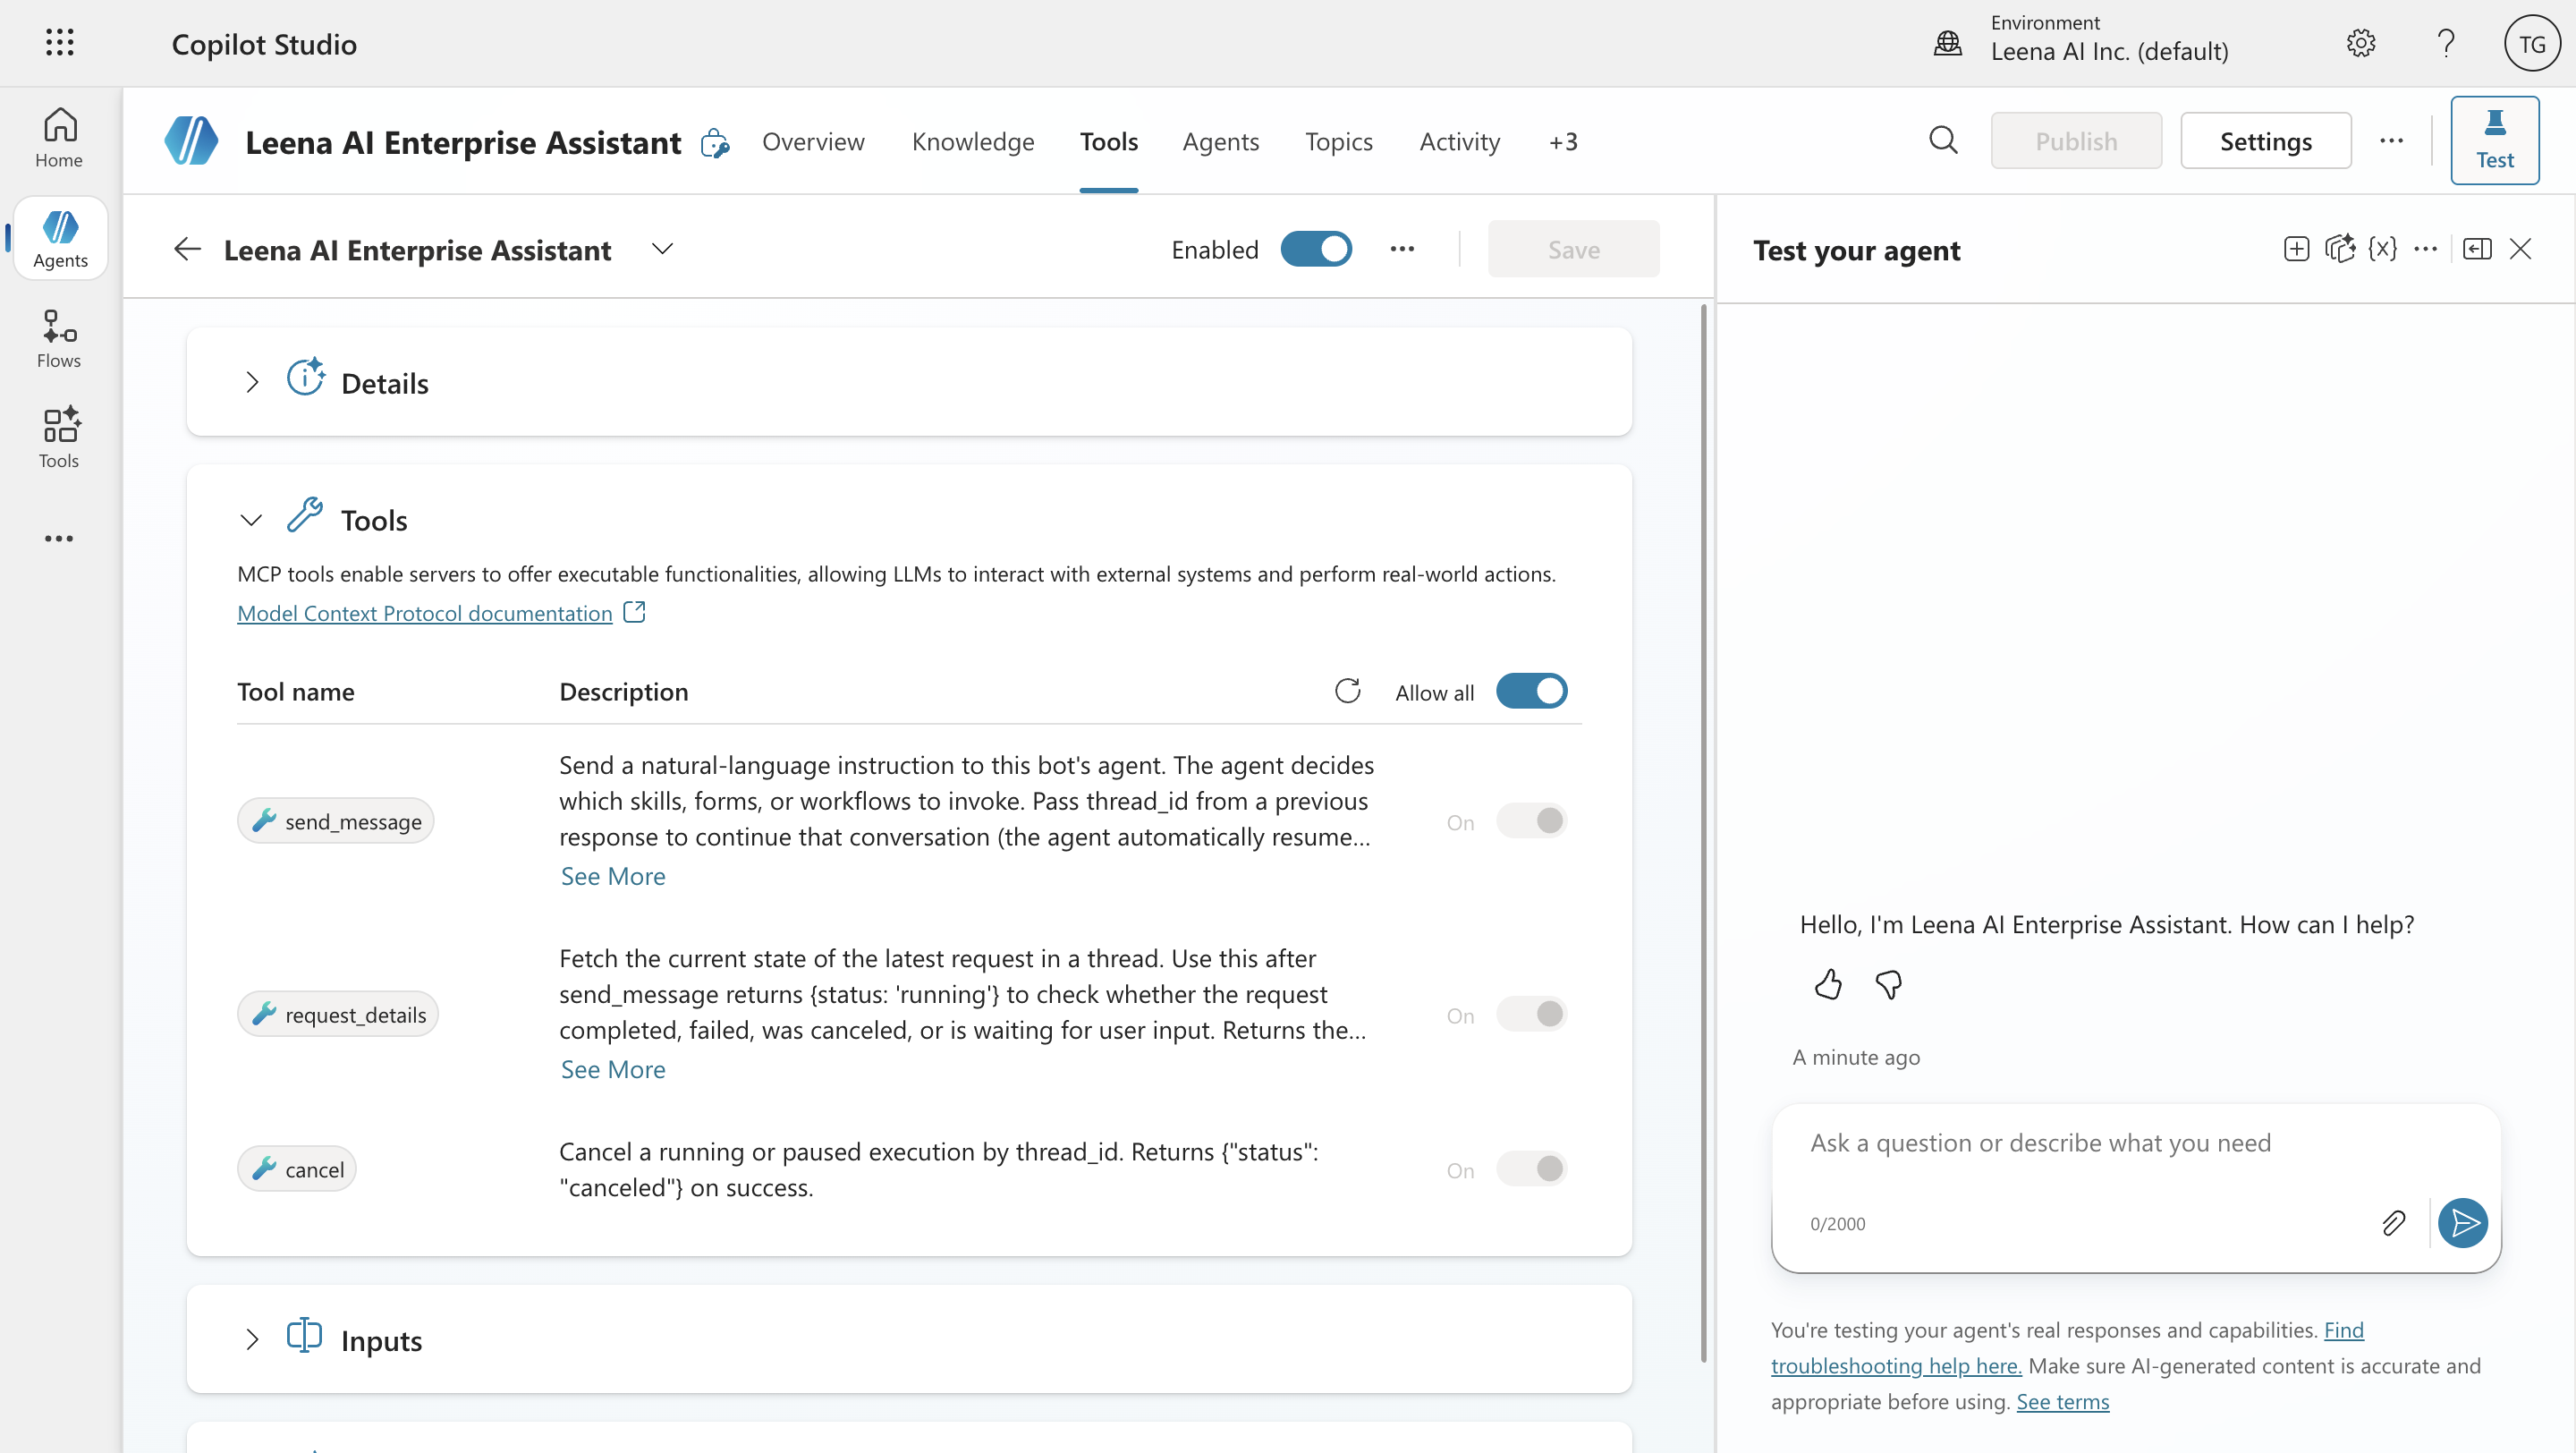
You'll see the Leena MCP server expose its three tools:
send_message— the main one; sends a natural-language instruction to the AI Colleague.request_details— checks the status of an in-progress request.cancel— stops a running or paused request.
You can leave all three enabled. You don't see individual Leena tools here — Leena is a single conversational sub-agent, and send_message is how the Copilot agent talks to it.
Step 10 — Test it
Open the Test pane in Copilot Studio and try a prompt your AI Colleague can answer, for example: "What's our work-from-home policy?" or "Raise an IT ticket — my laptop won't connect to VPN."
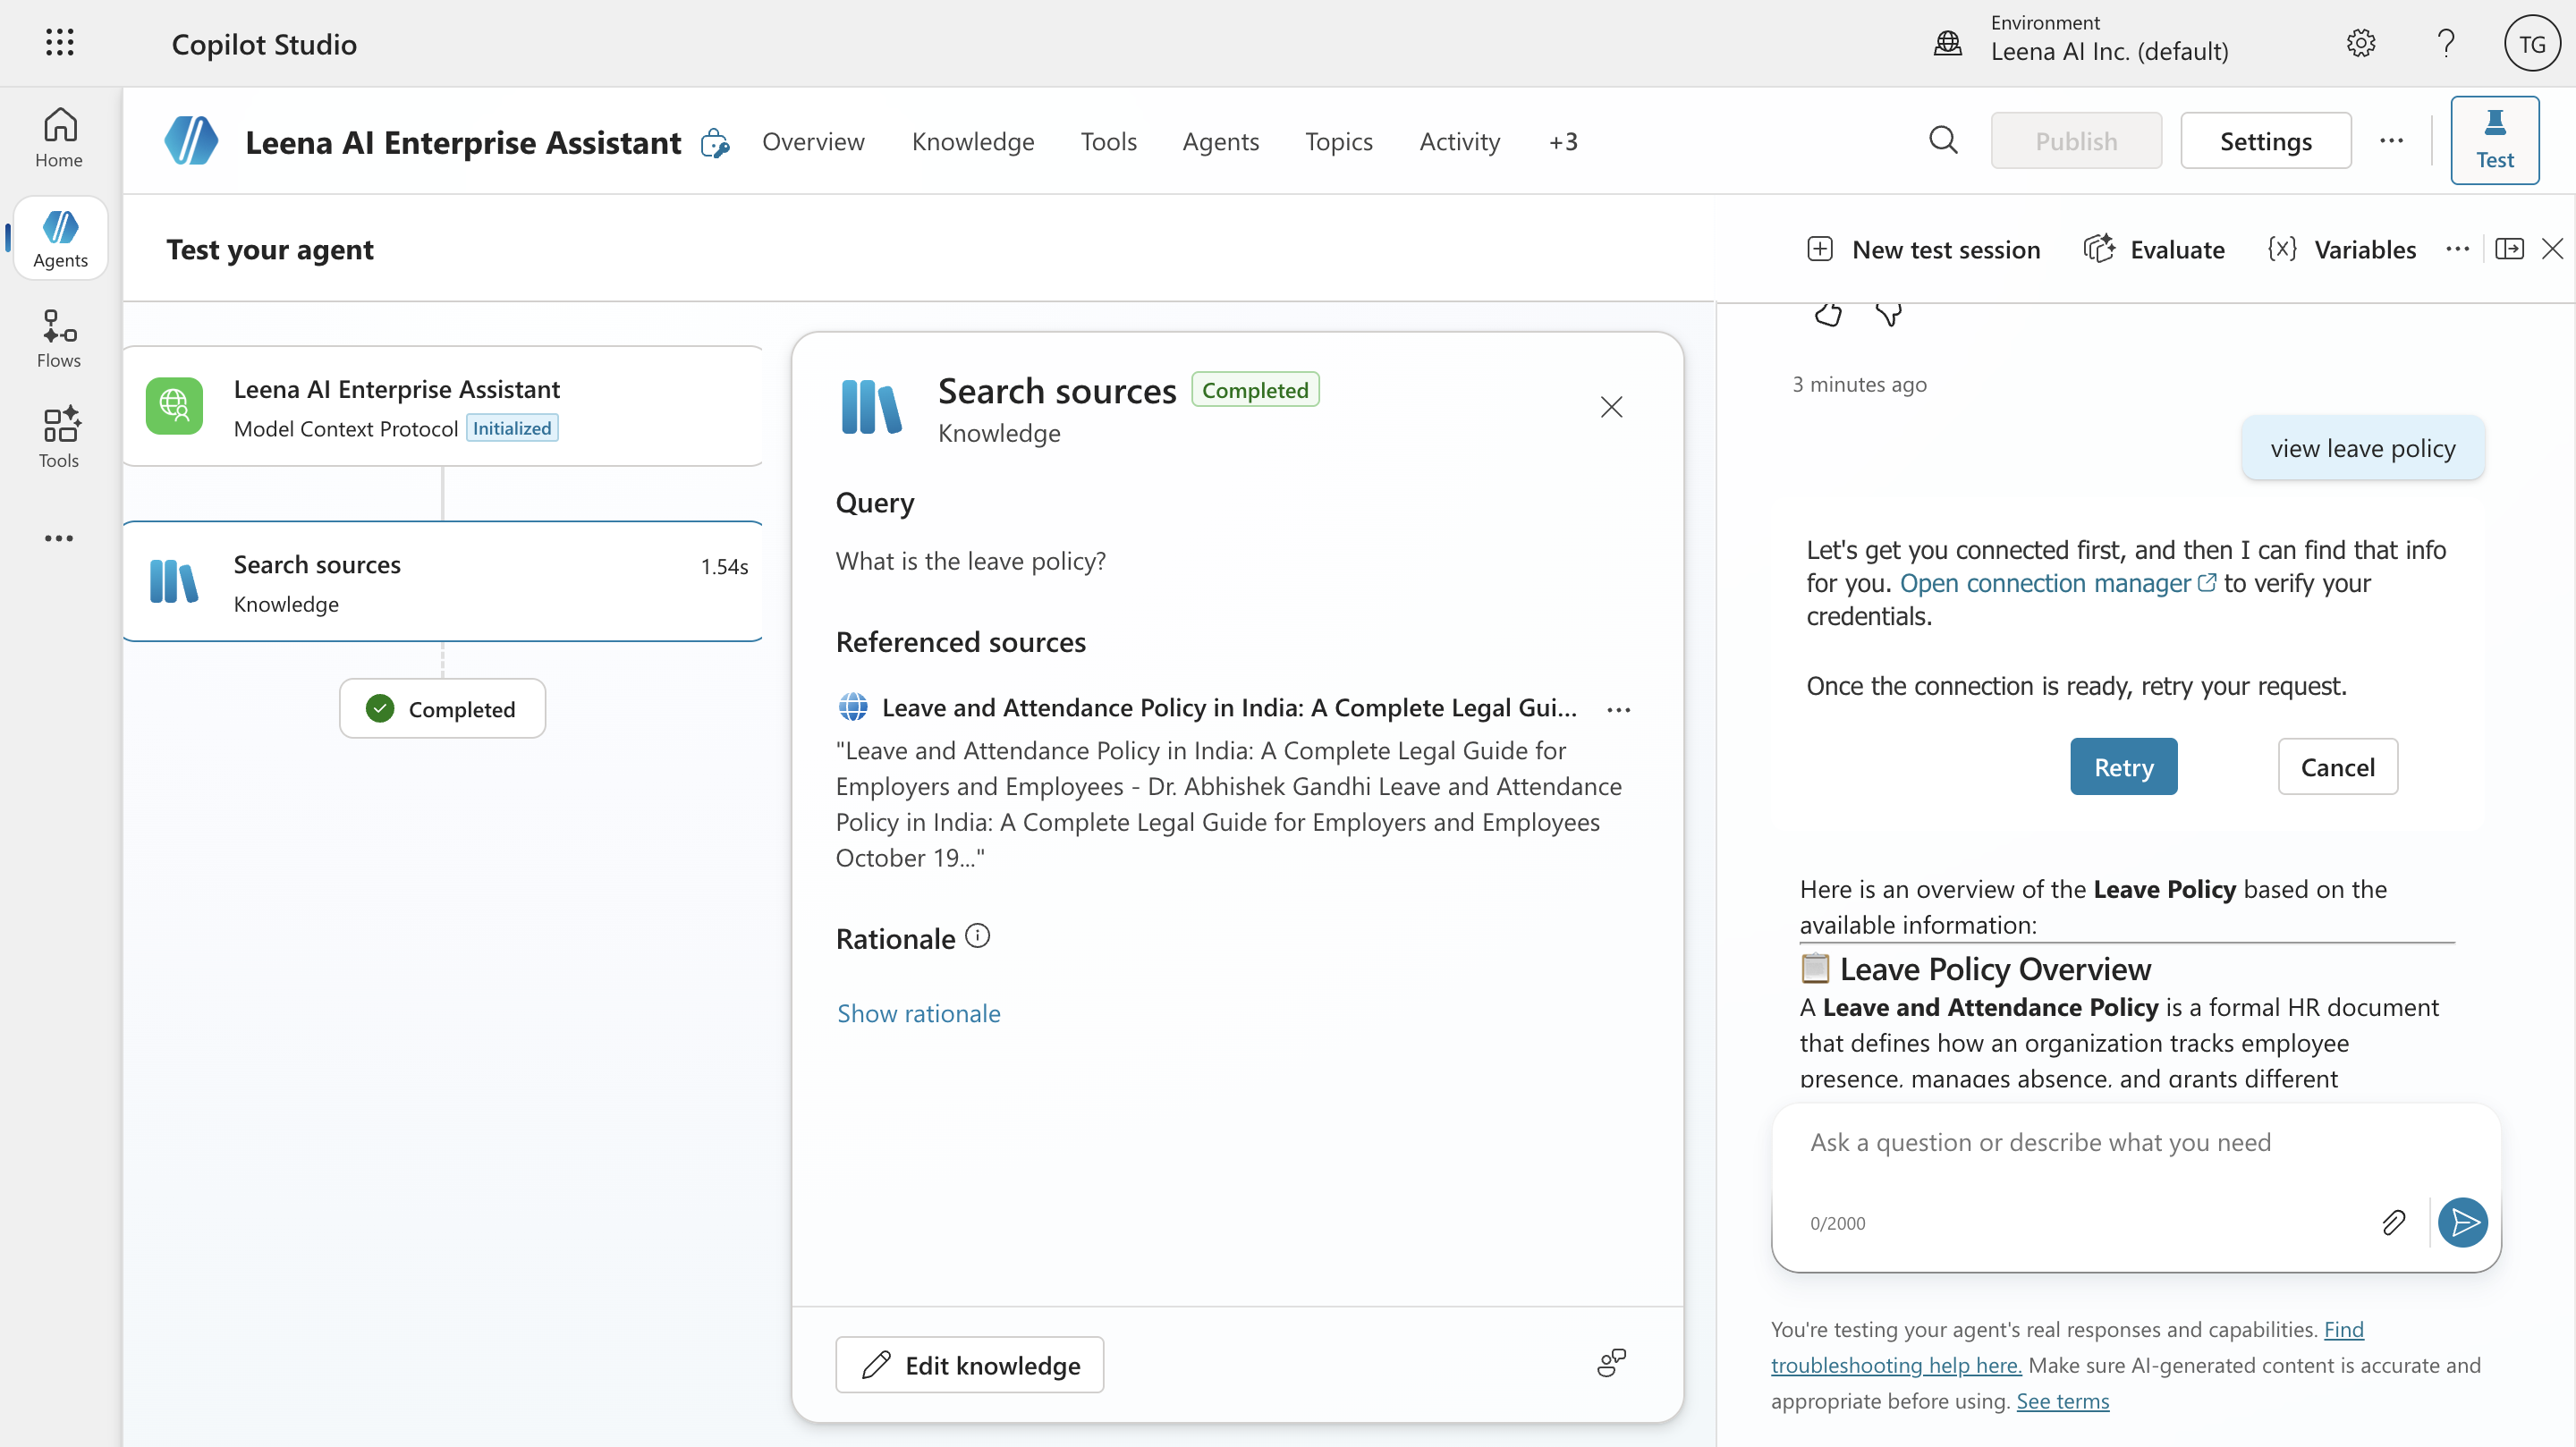
On first use you'll be asked to complete the connection / sign in (if you haven't already). After that, the agent calls send_message, Leena does the work, and the grounded answer comes back into the chat.
How the MCP integration behaves at runtime
A few Leena-specific behaviors are worth understanding so you can set the right expectations and instructions in your agent:
- Conversations are threaded. Leena returns a
thread_id. To keep a multi-turn conversation coherent, the samethread_idshould be reused on follow-up calls. Add a line to your agent's instructions reminding it to continue existing Leena conversations rather than starting fresh each turn. - Follow-up questions (
input_required). Sometimes Leena needs more information and pauses to ask. The Copilot agent should relay that question to the user and send the answer back. This works naturally in conversational use, but it's worth testing flows that ask follow-ups. - Long-running work. Quick questions come back in one call. Longer workflows/AOPs may return a
runningstatus, after which the agent should callrequest_detailsto poll for the result. Very long automations are better suited to asynchronous patterns than a single chat turn. - Source links. When Leena returns a Sources section, those are authenticated links the user can click to open the underlying article. Instruct your agent to include them verbatim and not rewrite them.
- Forms and file uploads. Since Copilot Studio chat has no Leena composer, anything needing a file upload or structured form comes back as a webview link the user opens in a browser to complete.
How users sign in to Leena when using the agent
Authentication is per user, not shared. The steps above connect your identity for setup and testing — but once the agent is published, each person who uses it signs in to Leena themselves the first time the agent needs to call it. Here's what that looks like end to end.
What the user sees
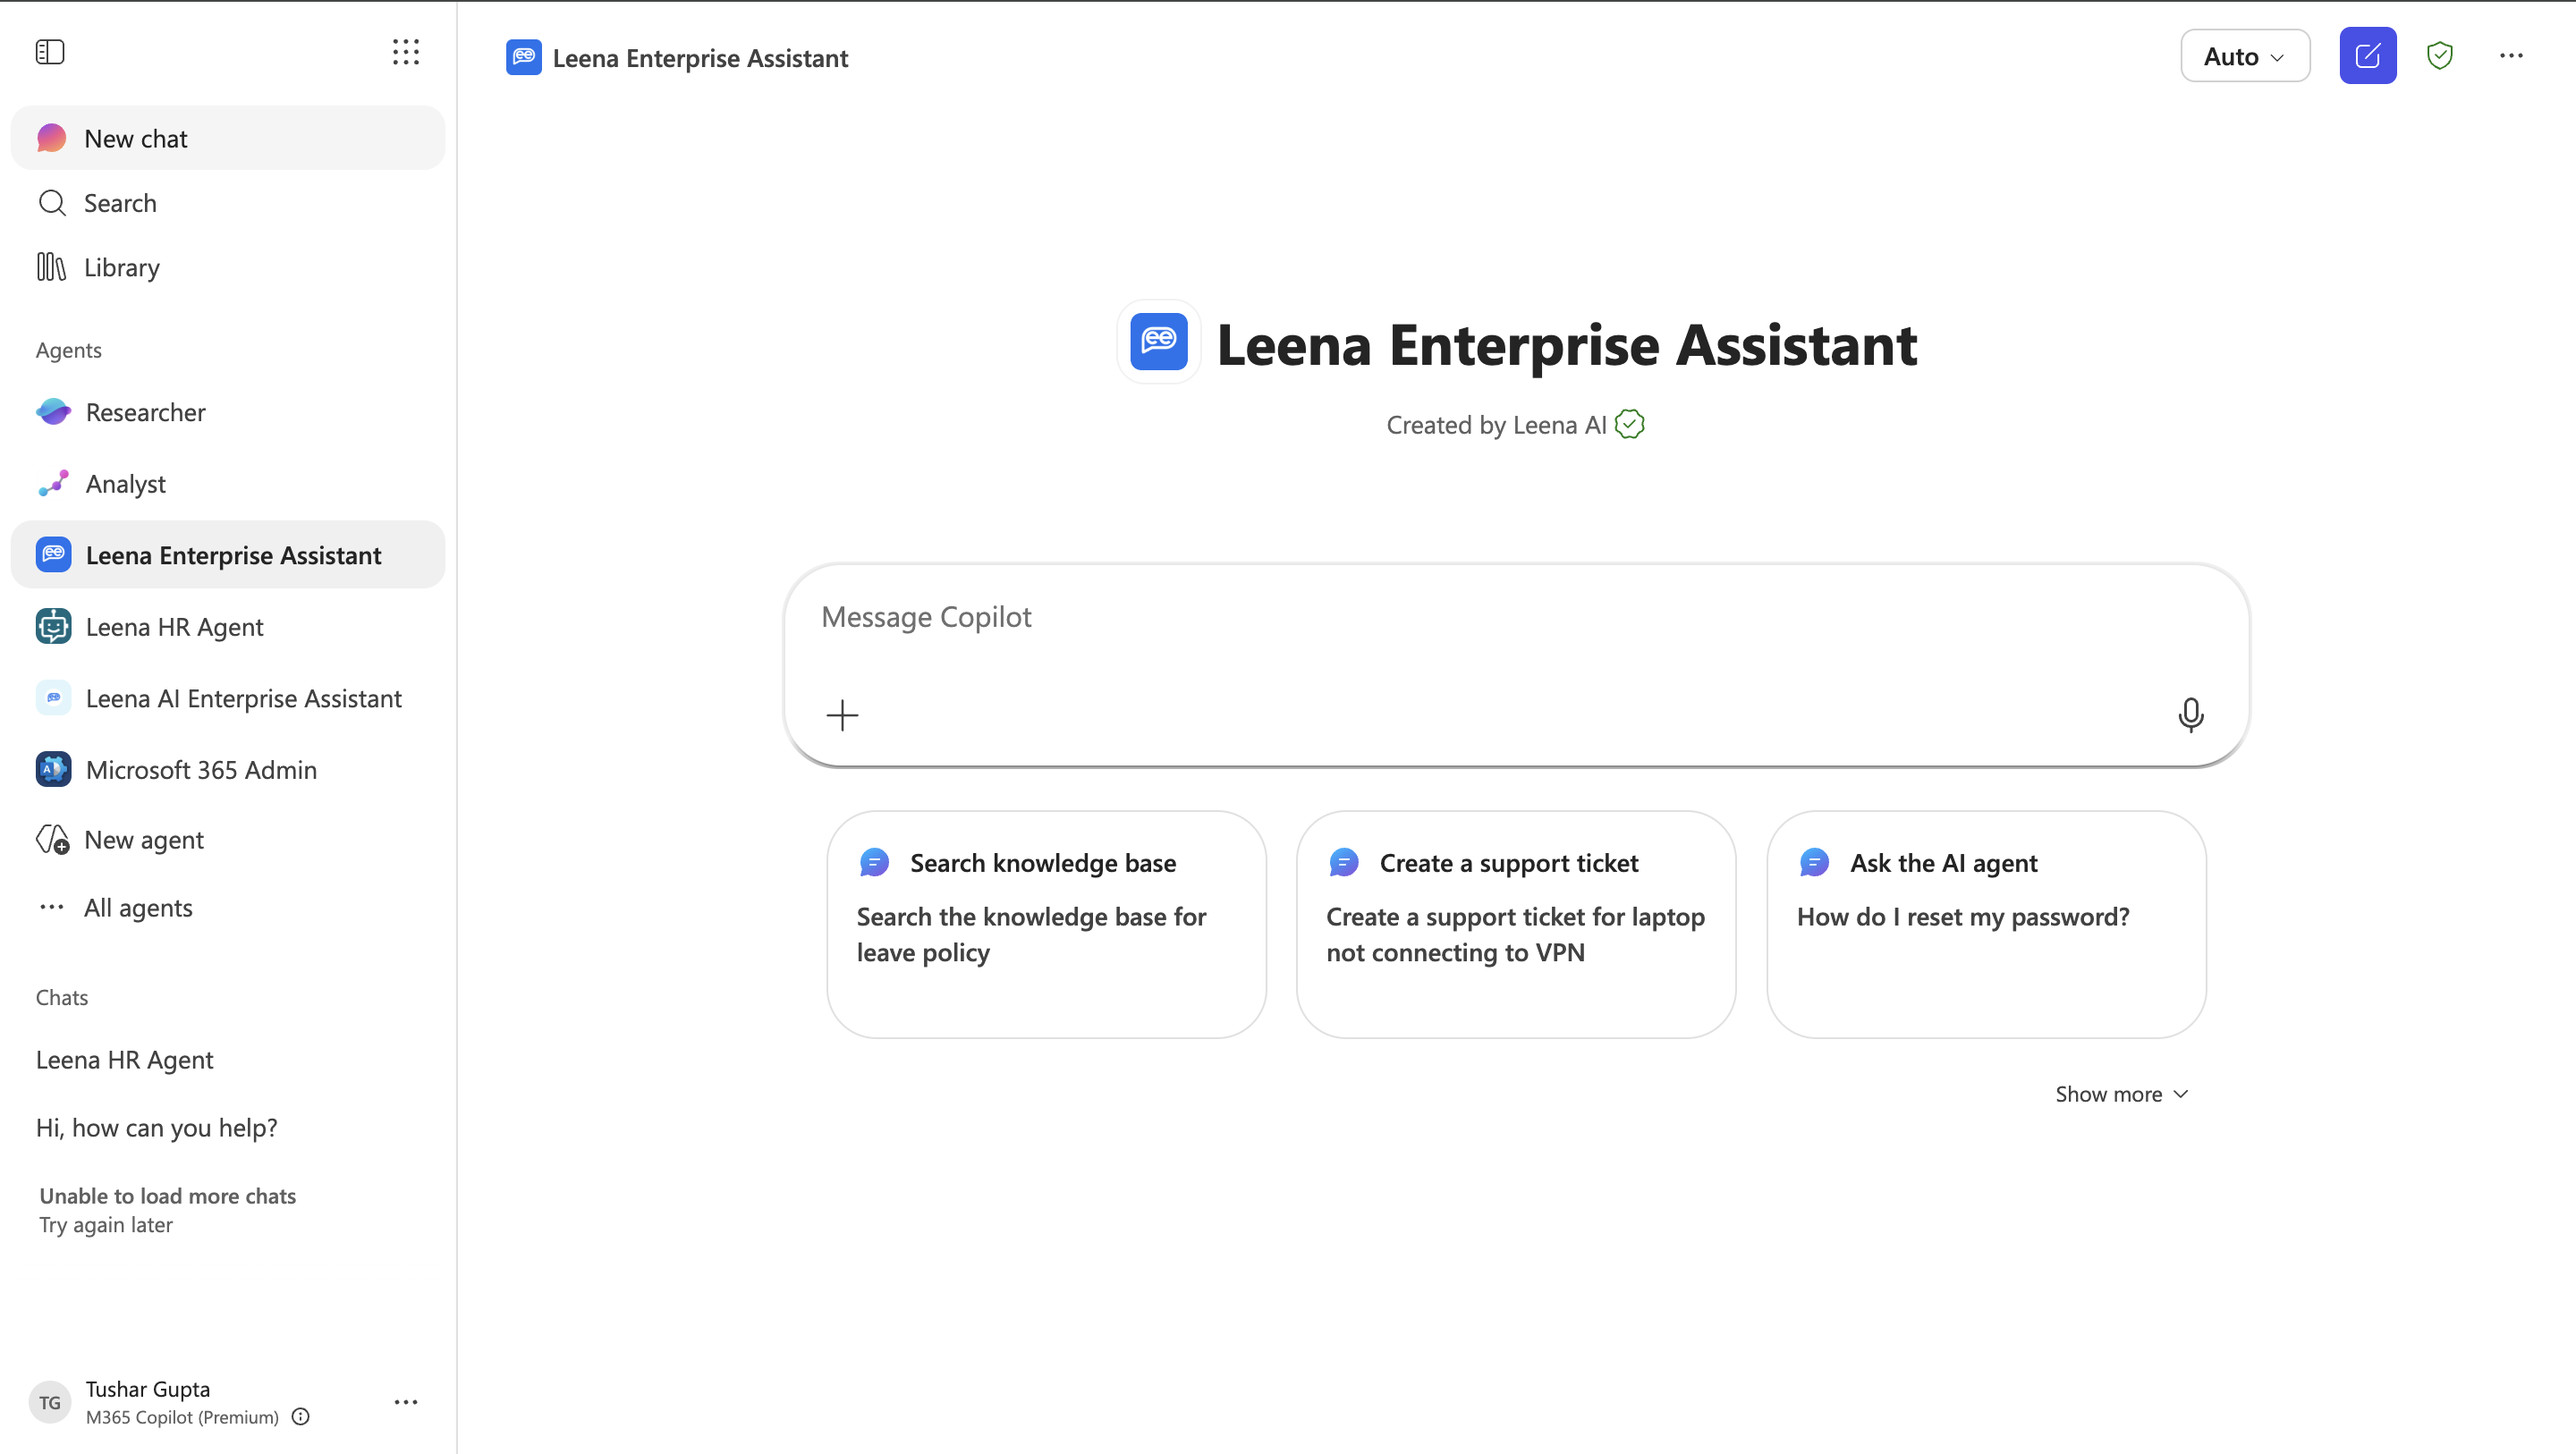
-
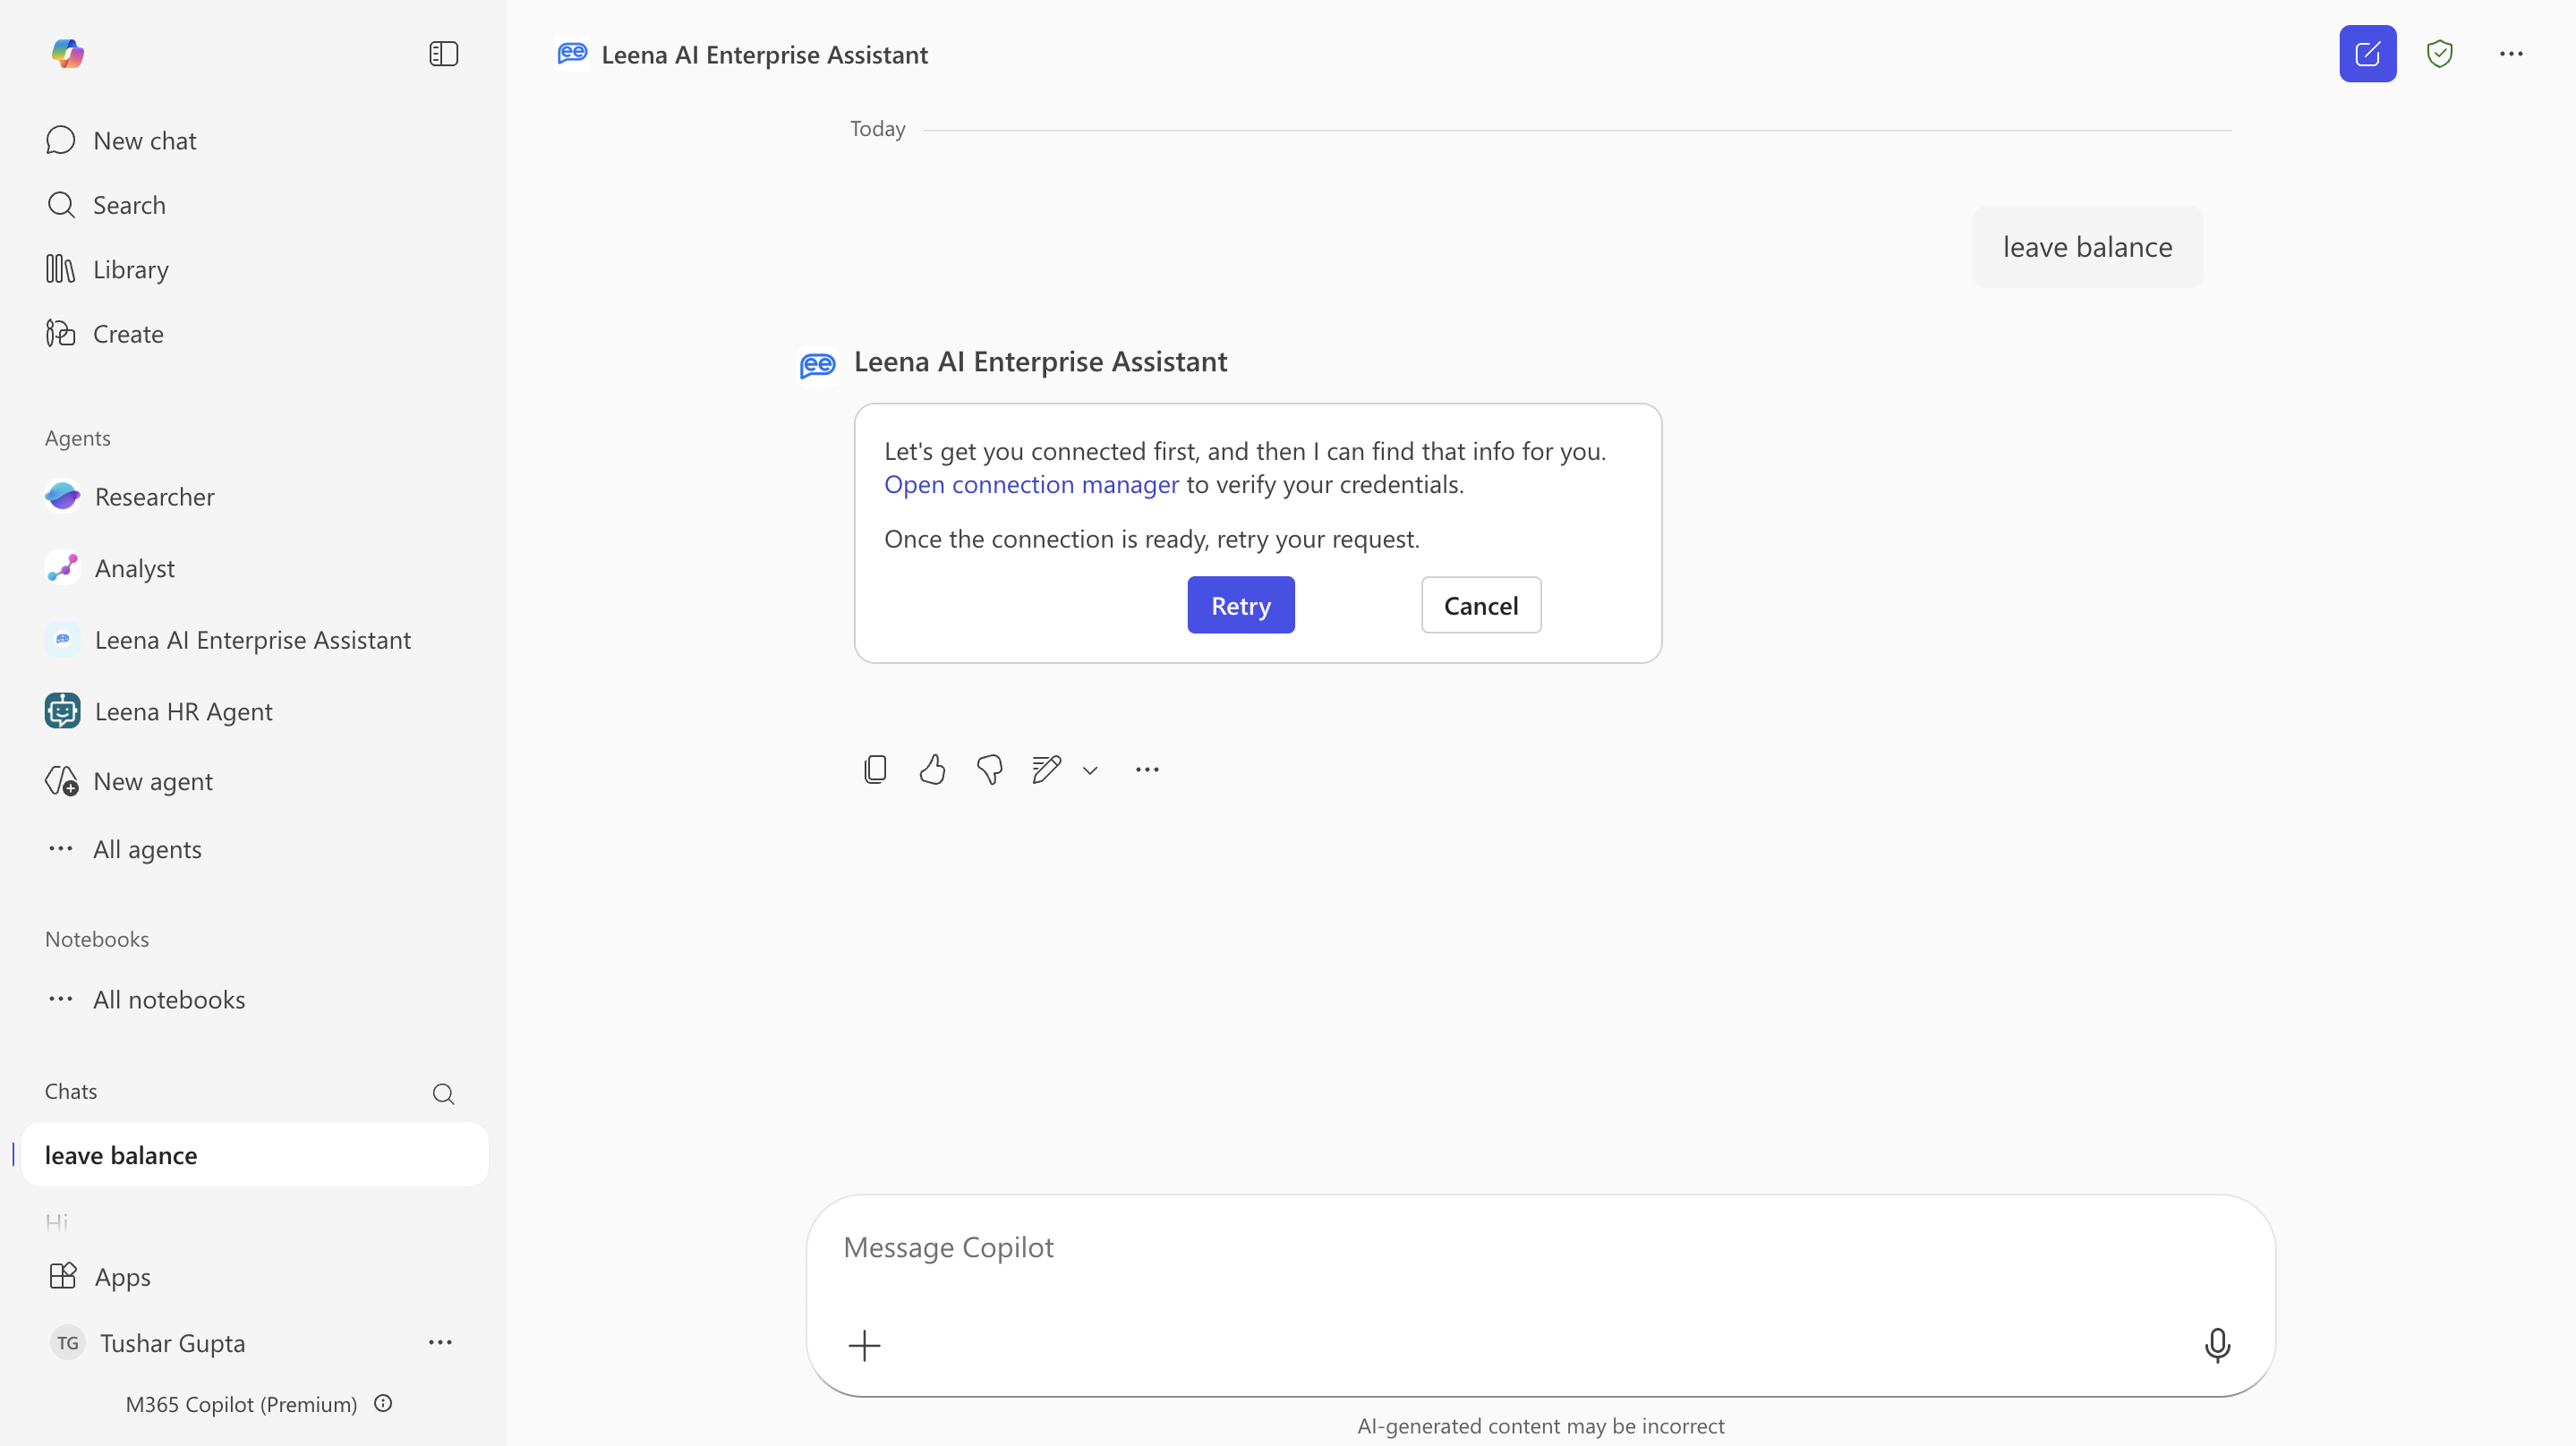
A user chats with your published Copilot Studio agent and asks something that routes to Leena (e.g. "What's my leave balance?").
-
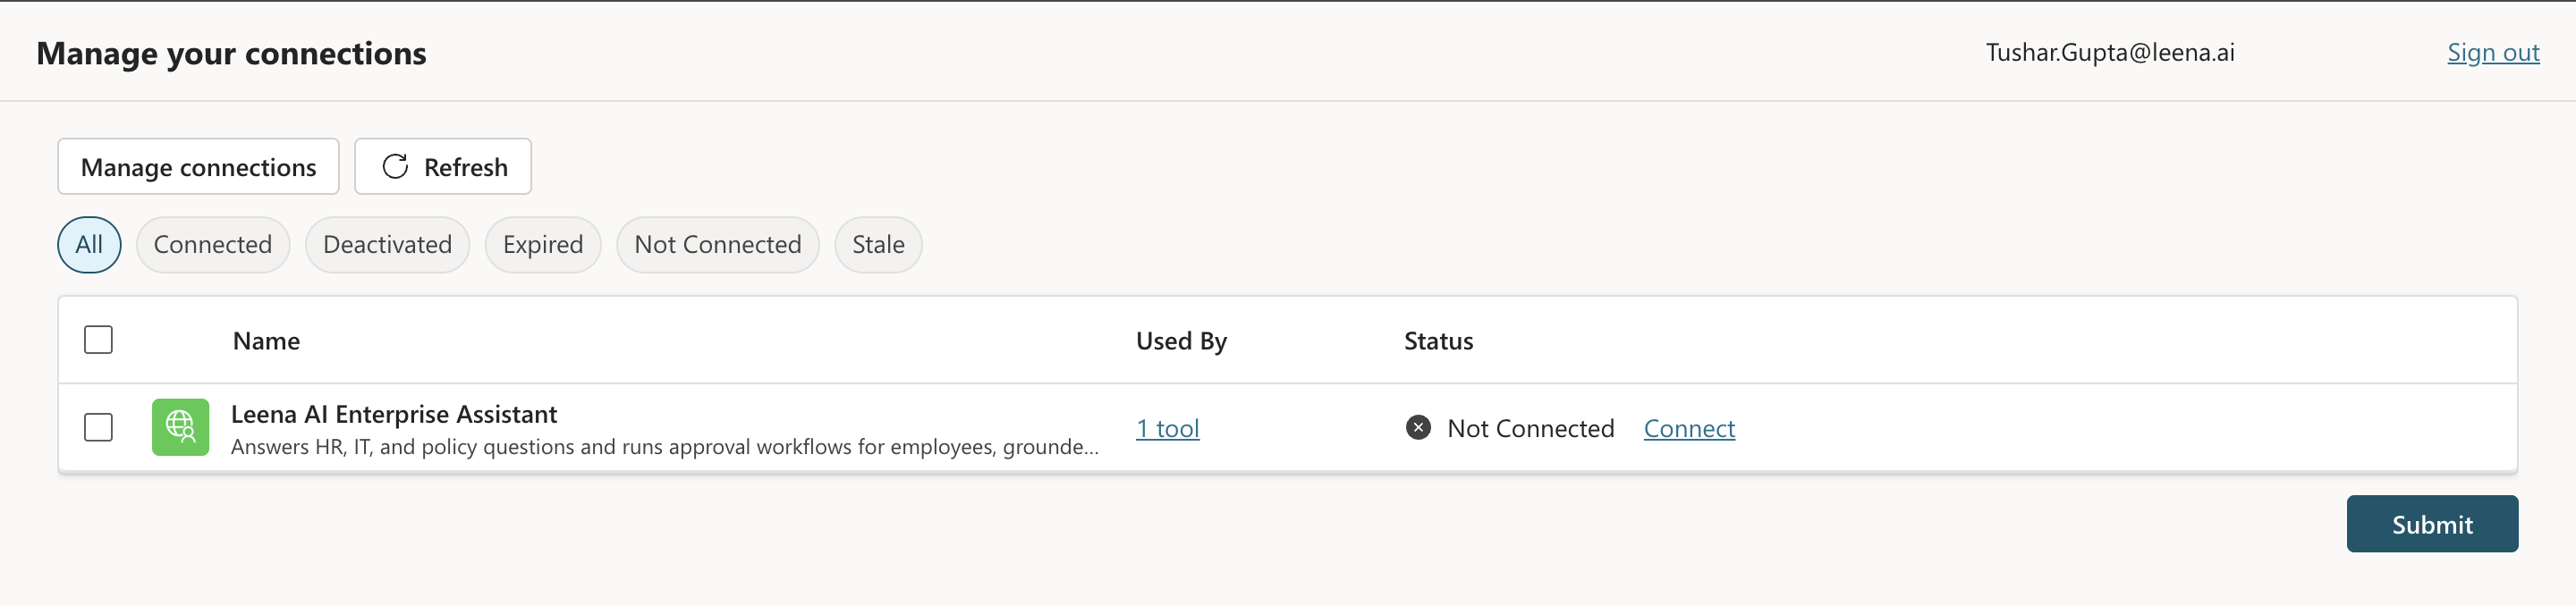
Because the Leena connection uses OAuth and the user hasn't connected yet, Copilot Studio shows a sign-in / connect card in the conversation instead of answering immediately.
-
The user clicks it and is taken to Manage connection, from where user can connect — which is your organisation's normal sign-in (SSO/IdP) for Leena. They authenticate there, exactly as they would when opening the Leena web app.
-
They approve the one-time consent that lets the agent talk to Leena on their behalf.
-
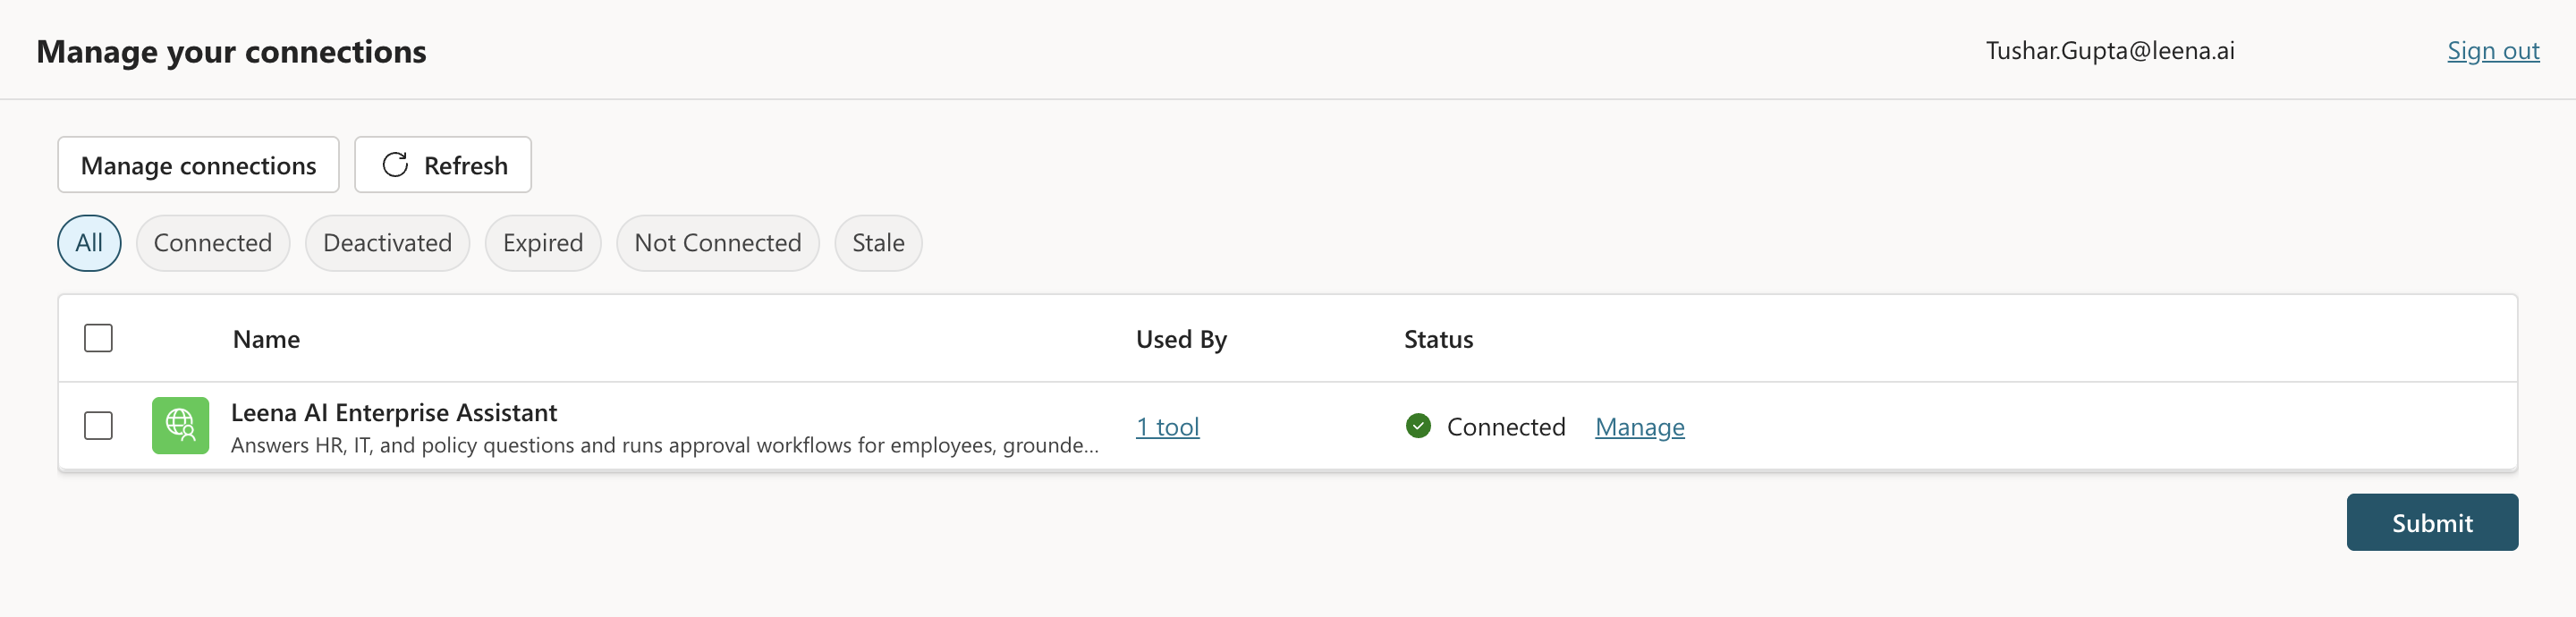
They return to the chat, send their message again (or clicks Retry), and the answer comes back — now scoped to their data and permissions.
After this first time, the user does not sign in on every message. Copilot Studio securely stores their connection and uses the refresh URL to renew access quietly in the background, so it stays seamless until they revoke access or the connection expires.
Why each user signs in individually
The token a user gets represents that person. Leena resolves it on every call and runs the request under their own permissions, audience membership, and data scope. So:
- Two different employees asking the same question can get different, correctly-scoped answers — each only sees what they're entitled to.
- There is no shared/service login that would let one person's connection expose another's data.
- Leena's guardrails and audit logging attribute every action to the real user, just like on the Leena web app.
What you should tell your users (and set up)
- First-use prompt is expected. Let users know the one-time "connect to Leena" card is normal and safe — it's how the agent acts as them.
- They must be a provisioned Leena user. Anyone who isn't a valid user of that AI Colleague won't be able to connect. Sort out access before rollout.
- Same SSO as Leena. Because login goes through your existing Leena sign-in, there's usually no new password — users authenticate with the identity provider they already use for Leena.
- Re-consent is occasional. If a user revokes the connection, switches accounts, or the connection lapses, they'll simply see the connect card again.
Authentication mode matters here. This per-user experience is a direct result of choosing OAuth 2.0 in Step 3. If a connection were configured with no auth or a single shared key, every user would share one identity and Leena couldn't apply per-user permissions — which is why OAuth is the correct and recommended choice for Leena.
Part 2 — Connect Leena as an A2A agent
Copilot Studio also supports connecting external agents over the open Agent2Agent (A2A) protocol. In this model, instead of exposing Leena as a tool, you register your AI Colleague as a connected agent: Copilot Studio's orchestrator evaluates each user request (or trigger) and, when the task falls in Leena's domain, delegates the whole task to your AI Colleague and returns its response.
This is the right shape when you're building a multi-agent system in Copilot Studio — a main agent coordinating several specialist agents (Fabric agents, Foundry agents, SDK agents, external agents) — and you want Leena to be one of those specialists for HR/IT/policy work.
What you'll need before you start
On the Leena side — open your AI Colleague's Settings → Orchestrator Settings page:
- Make sure the A2A toggle is on. (MCP and A2A share one OAuth application, so if you already set up MCP above, the credentials you generated work here too.)
- Have these values ready from the settings page:
| From the Leena settings page | Used in Copilot Studio as |
|---|---|
A2A endpoint URL (per AI Colleague, of the form .../a2a/bots/{bot_id}/rpc) | Endpoint URL |
| Client ID | Client ID |
| Client secret | Client secret |
| Authorization URL | Authorization URL |
| Token URL | Token URL |
| Refresh URL | Refresh URL |
On the Microsoft side: the same as Part 1 — an editable Copilot Studio agent and permission to create connections. (A2A connections use the same custom-connector infrastructure under the hood, so connector DLP policies apply here too.)
Step-by-step
Step 1 — Open the Add an agent flow
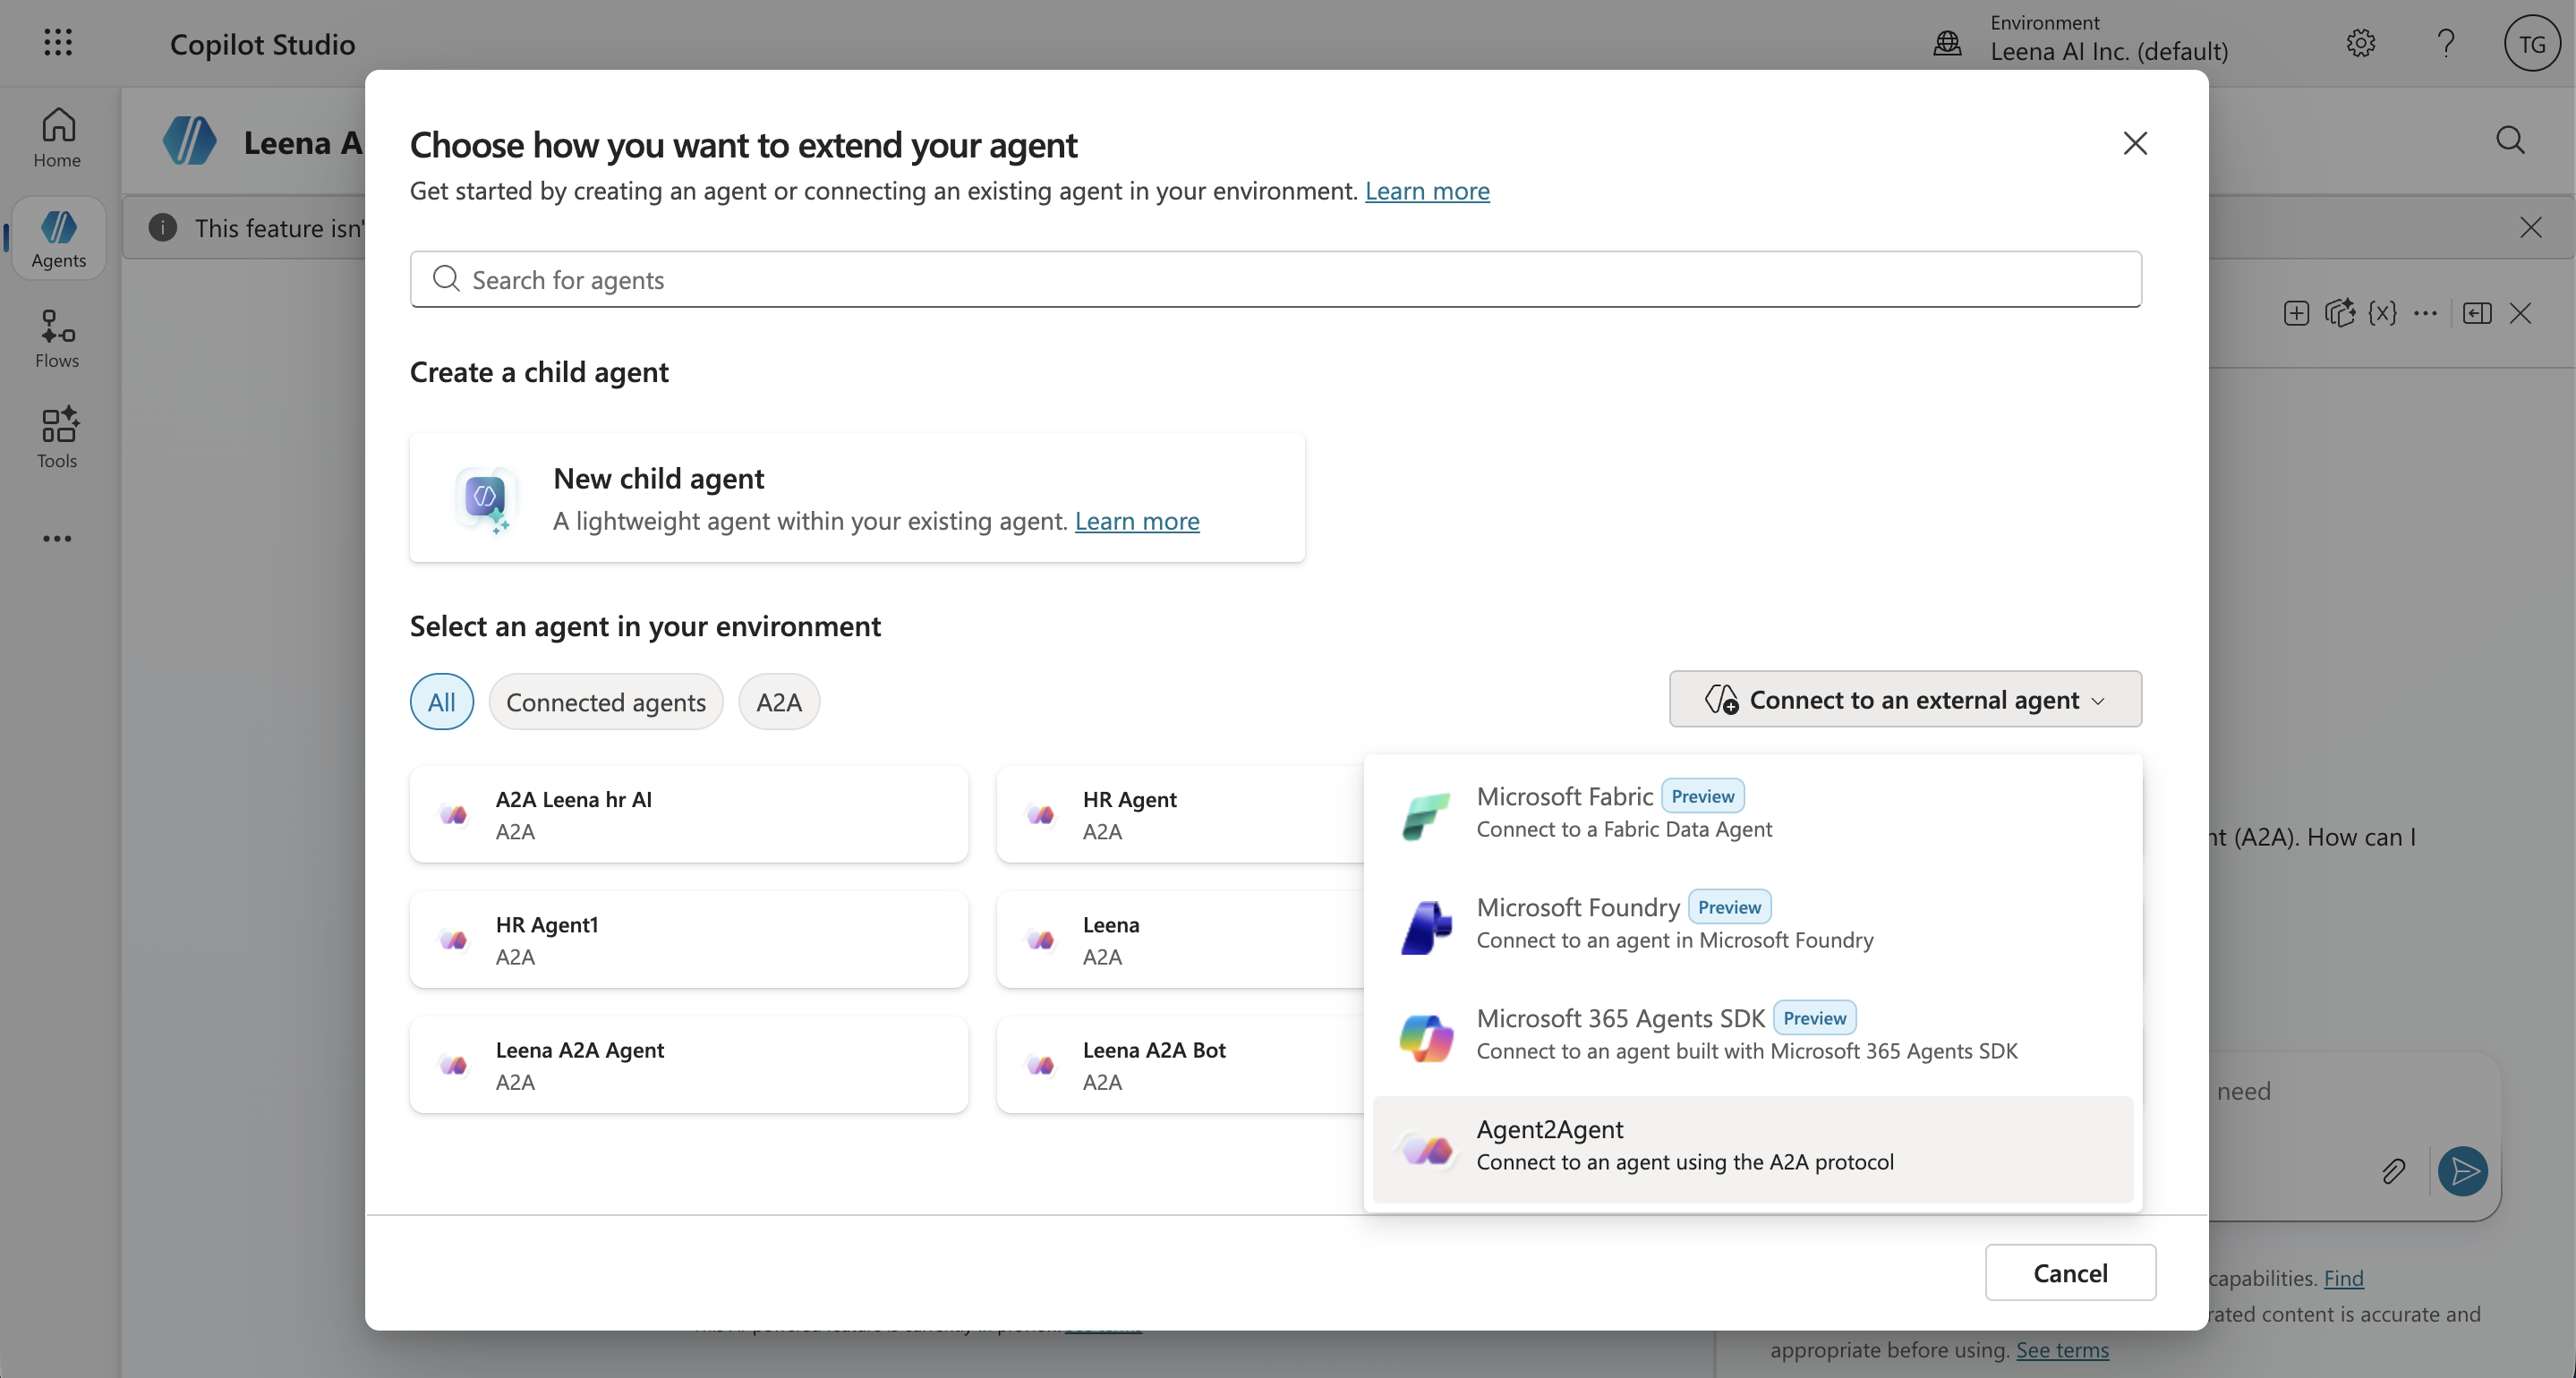
In Copilot Studio, open your main agent and go to the Agents page. Select Add an agent, then Connect to an external agent → Agent2Agent.
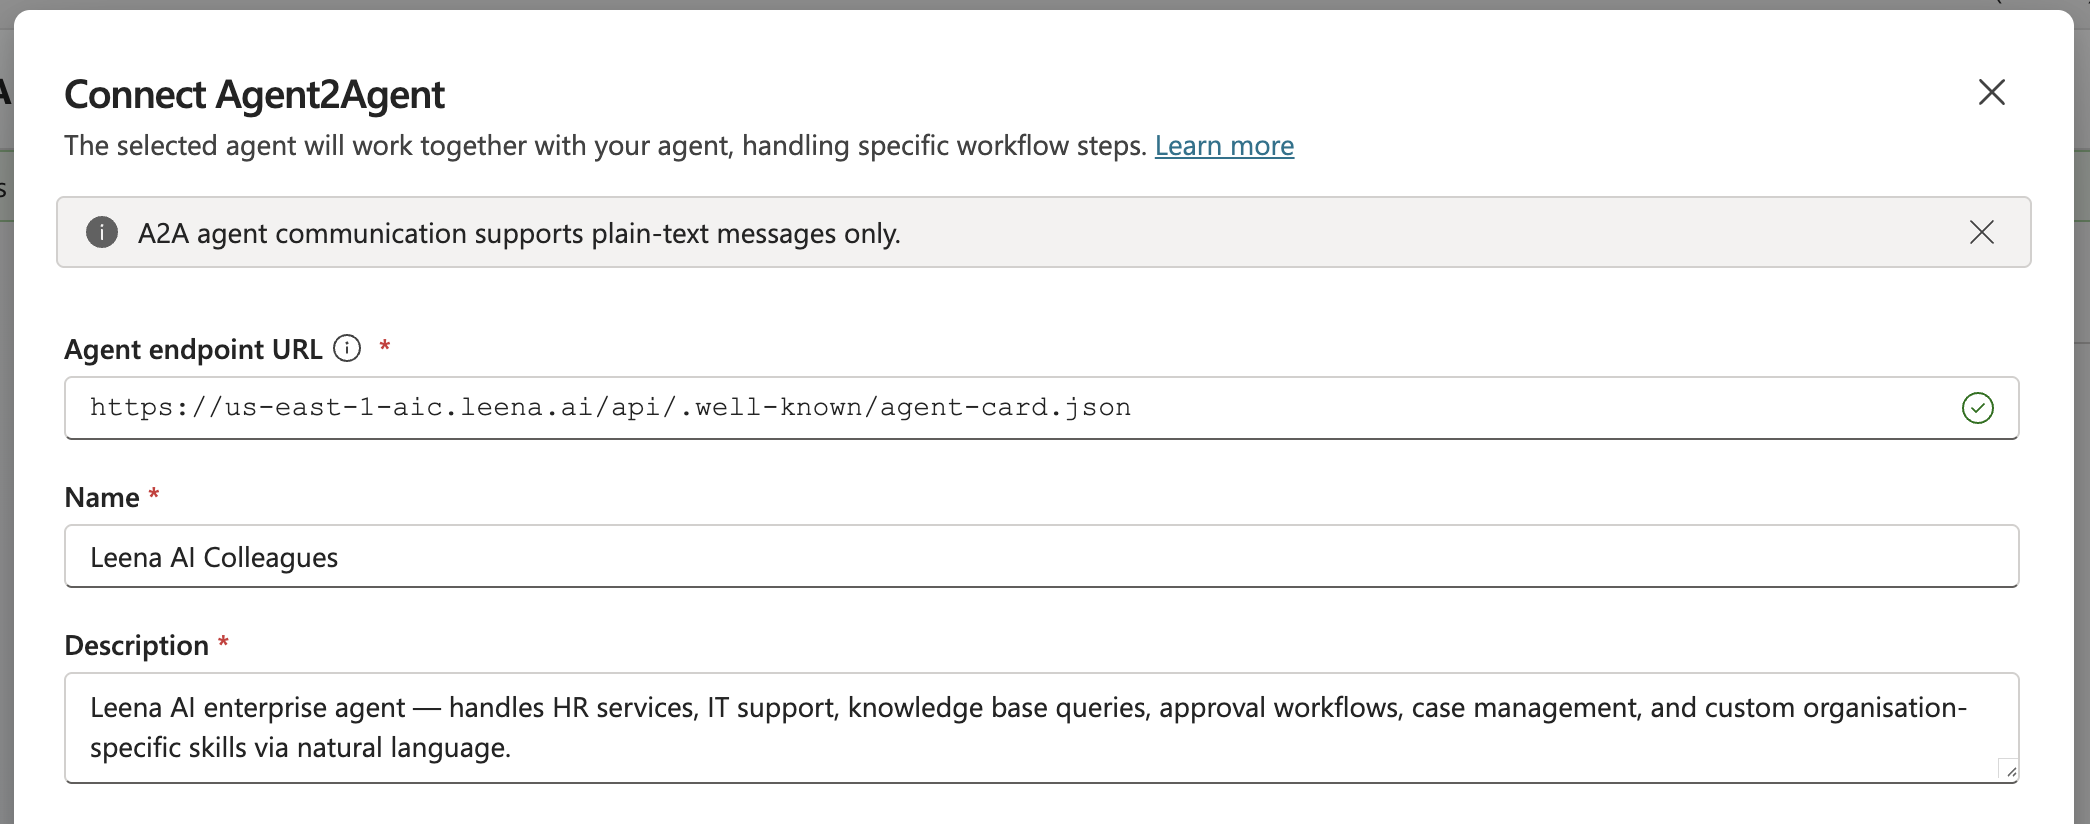
Step 2 — Enter the Leena A2A endpoint URL
Paste the A2A endpoint URL from the Leena settings page.
Two things to get right here:
- Use the endpoint URL exactly as shown in Leena's settings — this is the communication endpoint Copilot Studio needs. Don't point it at an agent-card URL or trim the path.
- The URL is per AI Colleague (it contains the bot ID), so make sure you copy it from the same AI Colleague whose credentials you'll use.
If your AI Colleague publishes a valid agent card at the standard well-known location, Copilot Studio auto-fills the name and description from it. If the fields don't auto-populate, that's fine — enter them manually:
- Name — e.g.
Leena AI Colleague. - Description — describe the tasks Leena should be delegated, e.g. "Handles employee HR, IT, and policy questions and runs approval workflows, grounded in company knowledge."
Just like the MCP tool description, this description is what the main agent's orchestrator uses at runtime to decide when to hand a task to Leena versus another connected agent. Make it specific about the domains Leena owns.
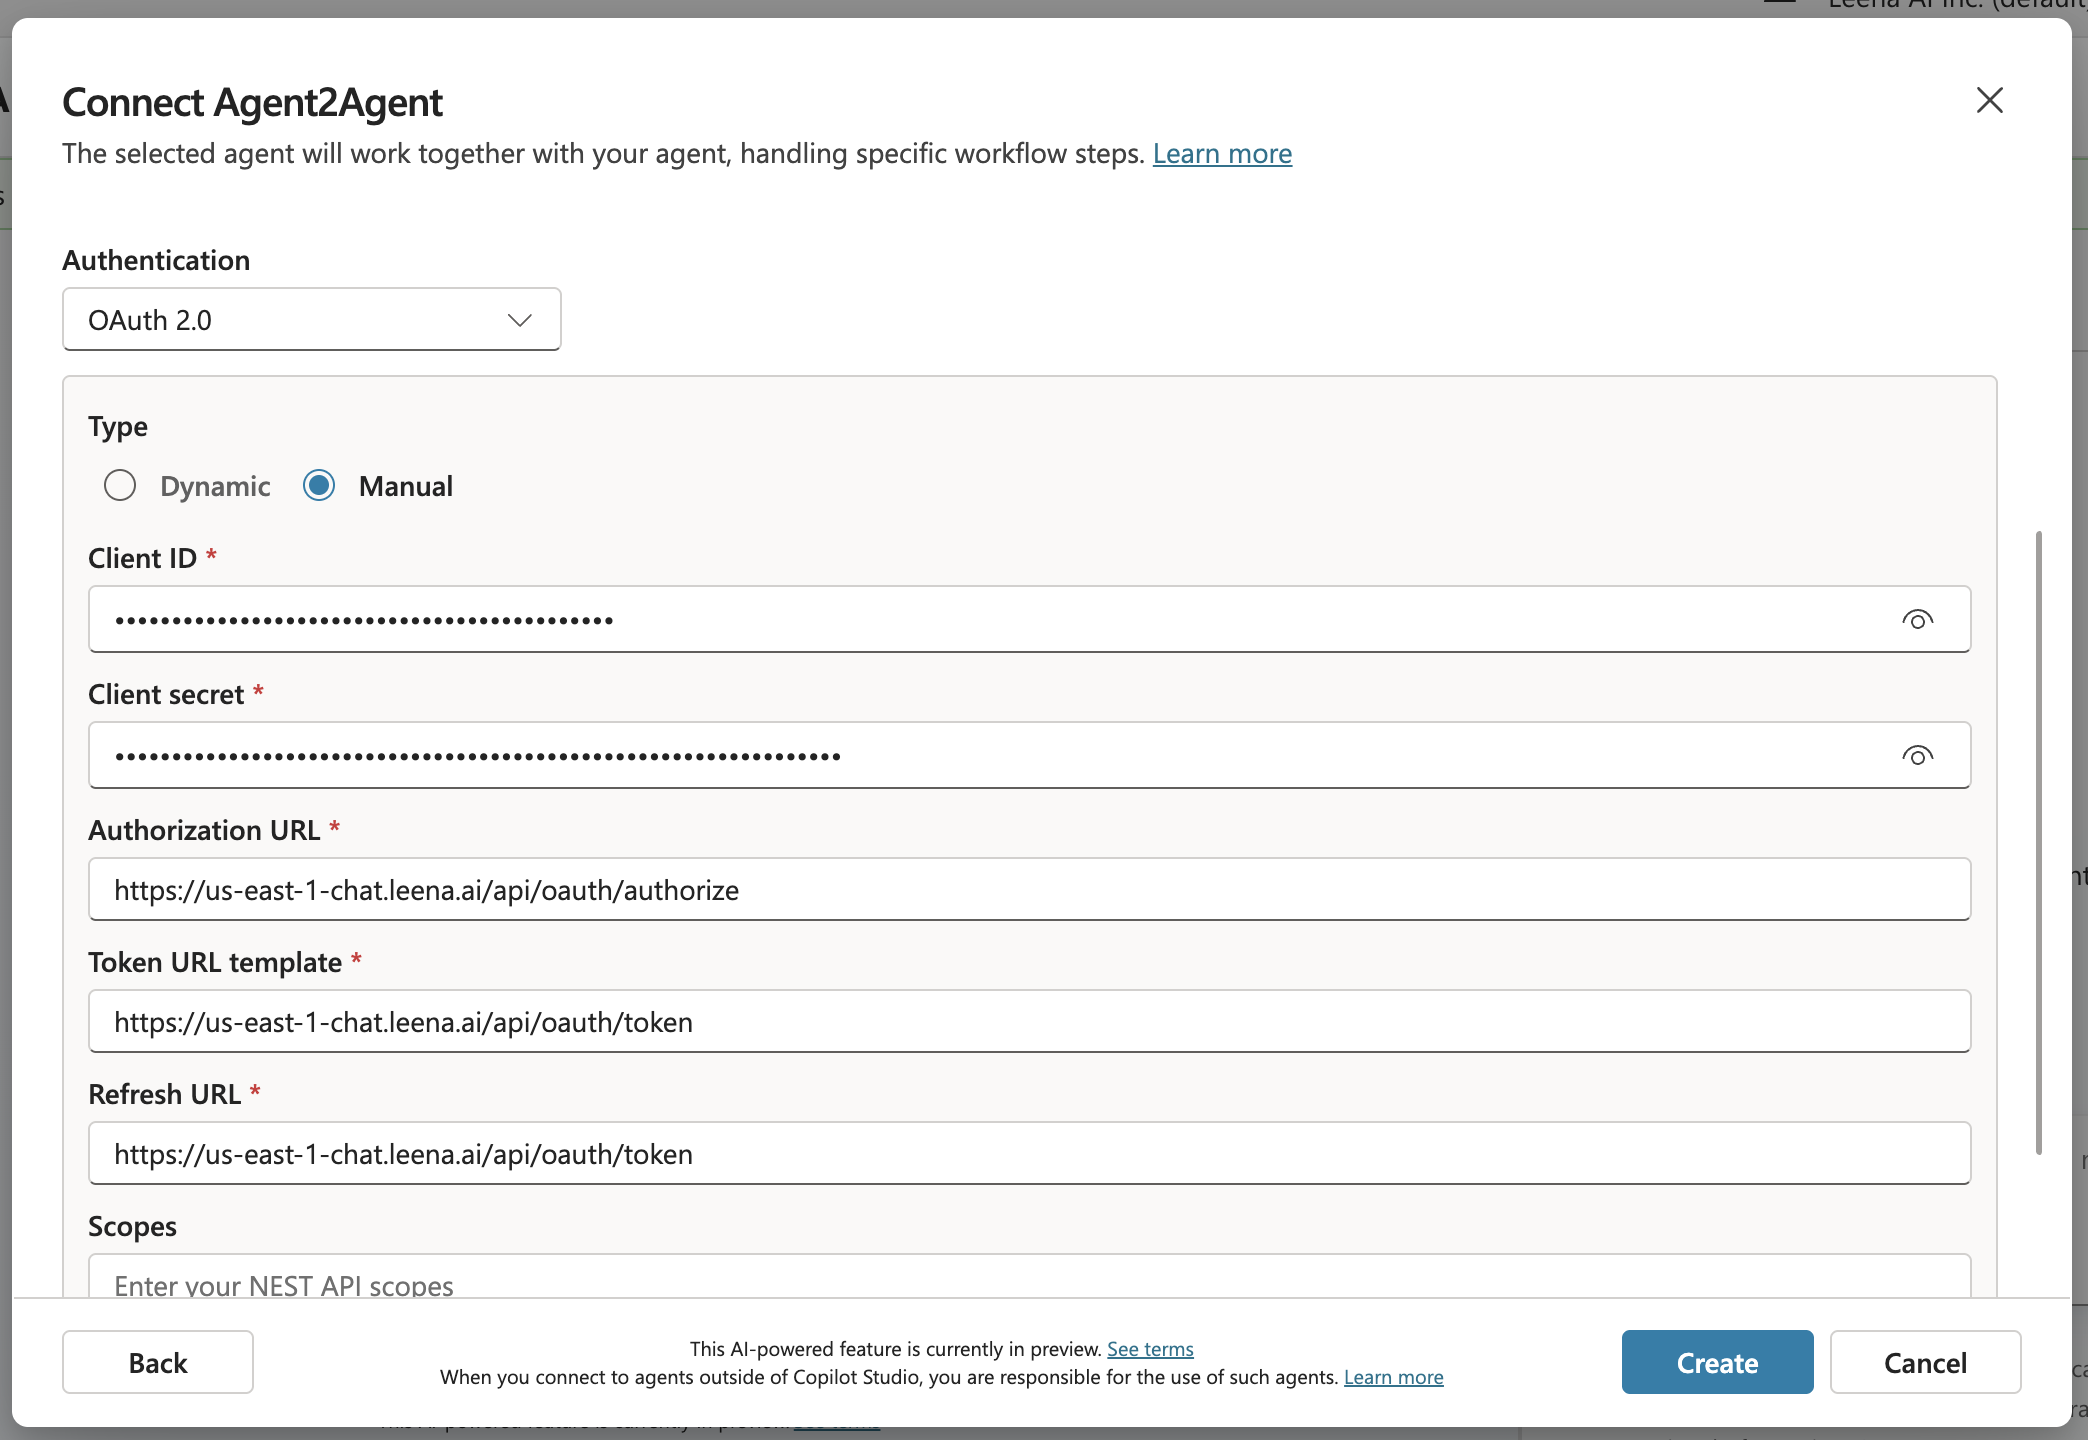
Step 3 — Configure authentication: OAuth 2.0
From the Authentication dropdown, select OAuth 2.0 and fill in the fields with the values from Leena's settings page:
-
Client ID → the Leena Client ID
-
Client secret → the Leena Client secret
-
Authorization URL → the Leena Authorization URL
-
Token URL → the Leena Token URL
-
Refresh URL → the Leena Refresh URL
These are the same credentials as the MCP setup — MCP and A2A share one OAuth application per AI Colleague, so there's nothing new to generate (unless your secret has expired, in which case regenerate it in Leena and use the new value).
Do not choose None or API key. Leena's A2A surface requires OAuth — anonymous and static-key access are rejected.
Step 4 — Create, connect, and register the callback URL
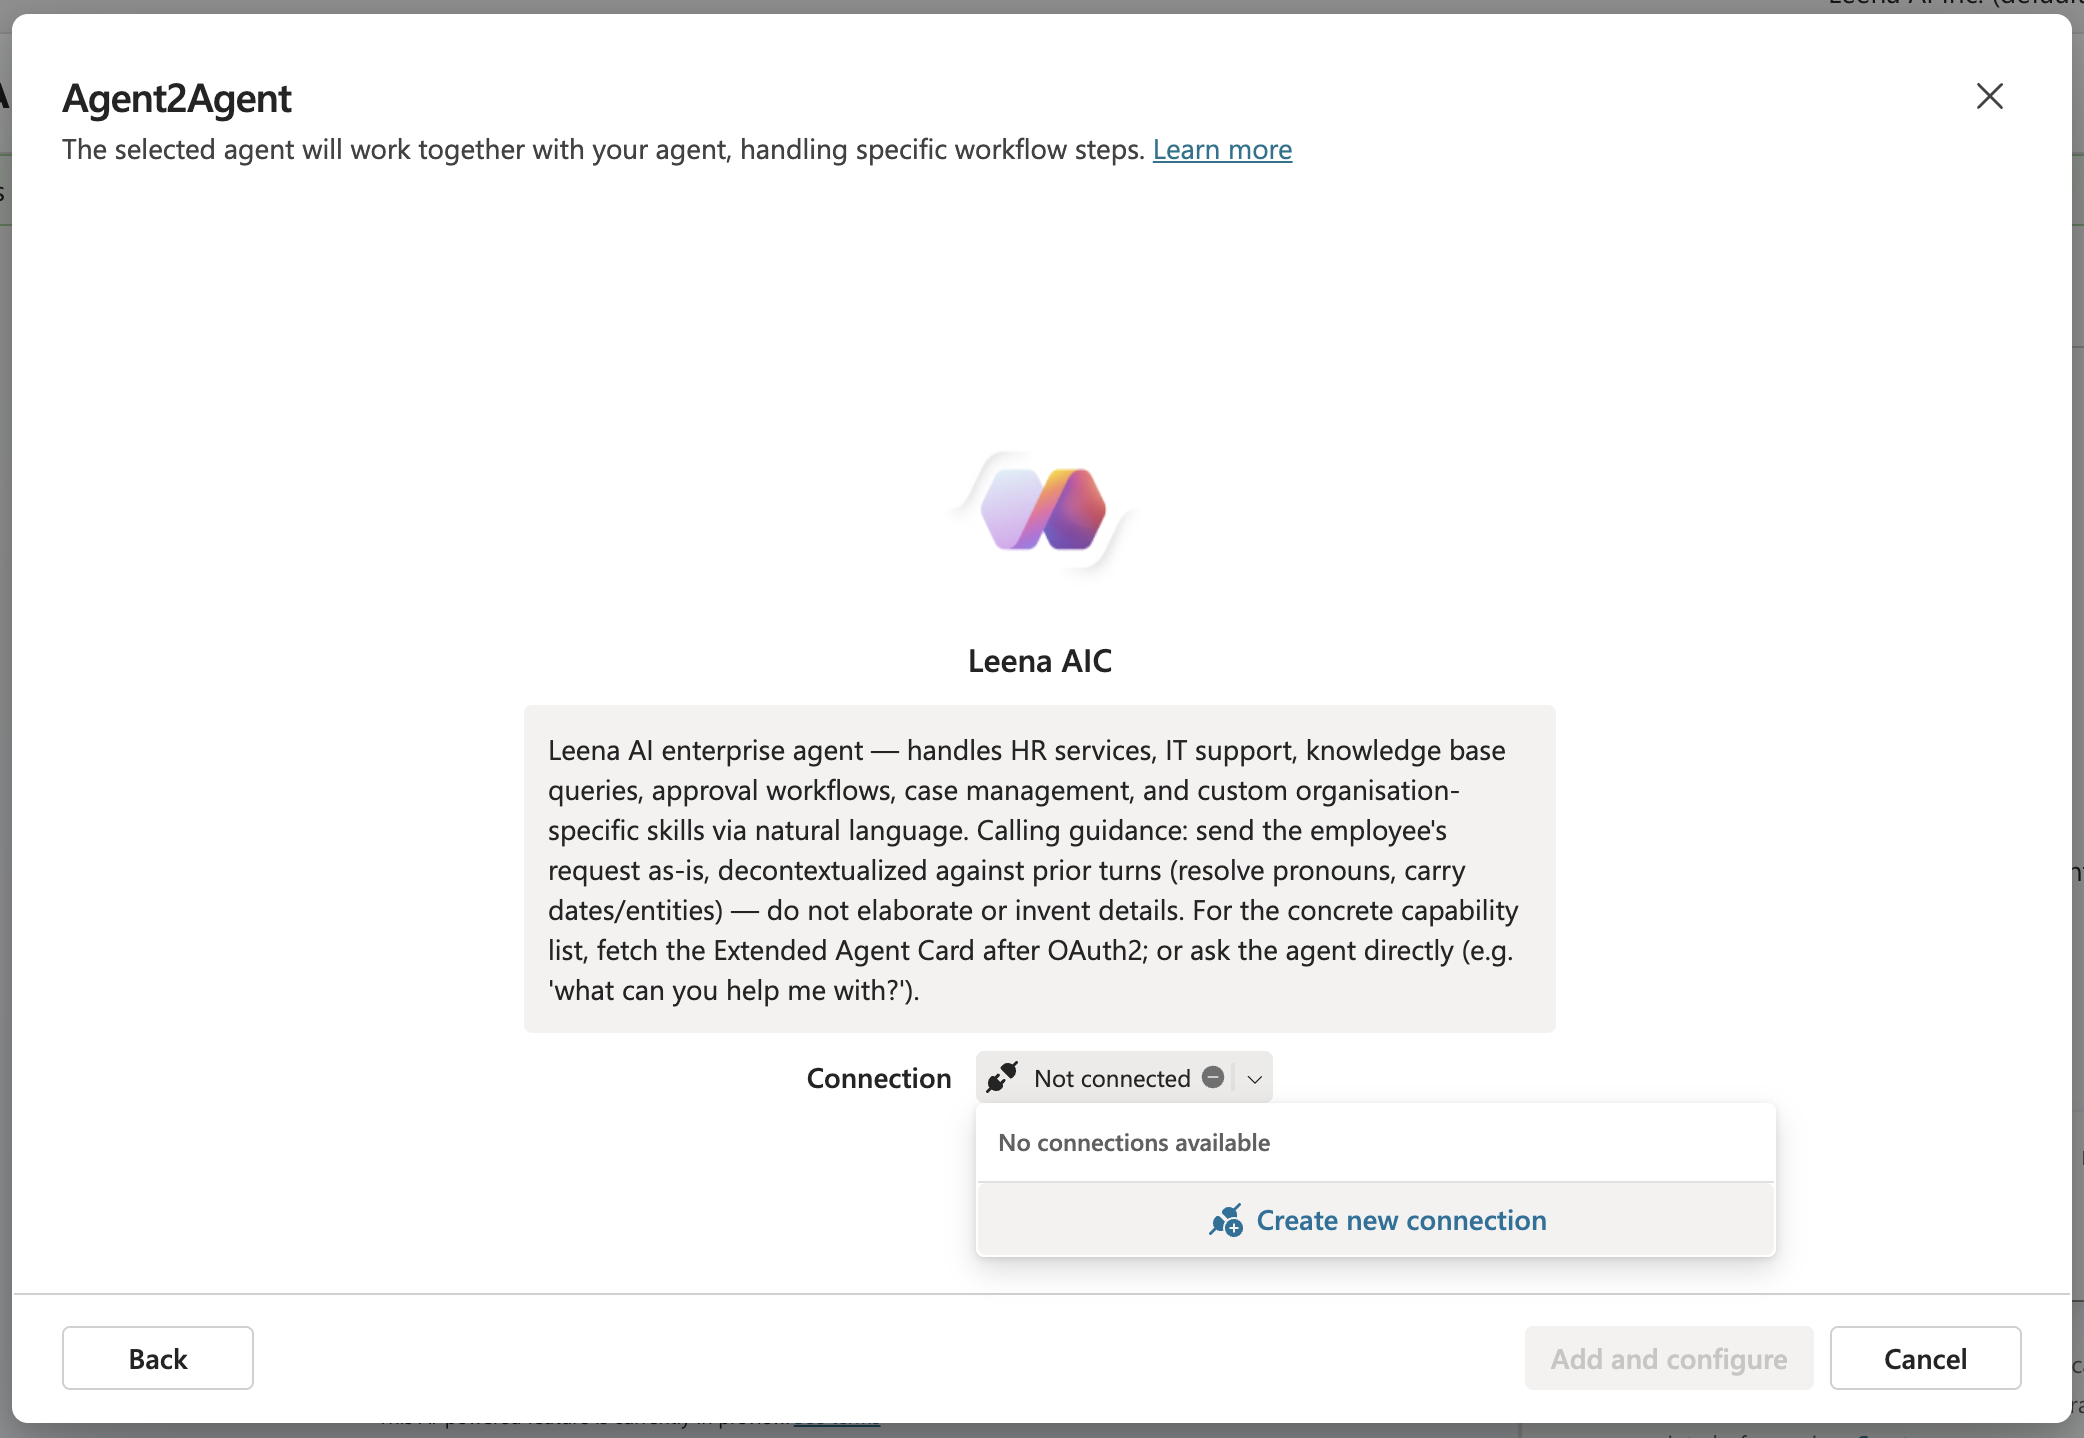
Select Create, then choose an existing connection or create a new one, and finish with Add and configure.
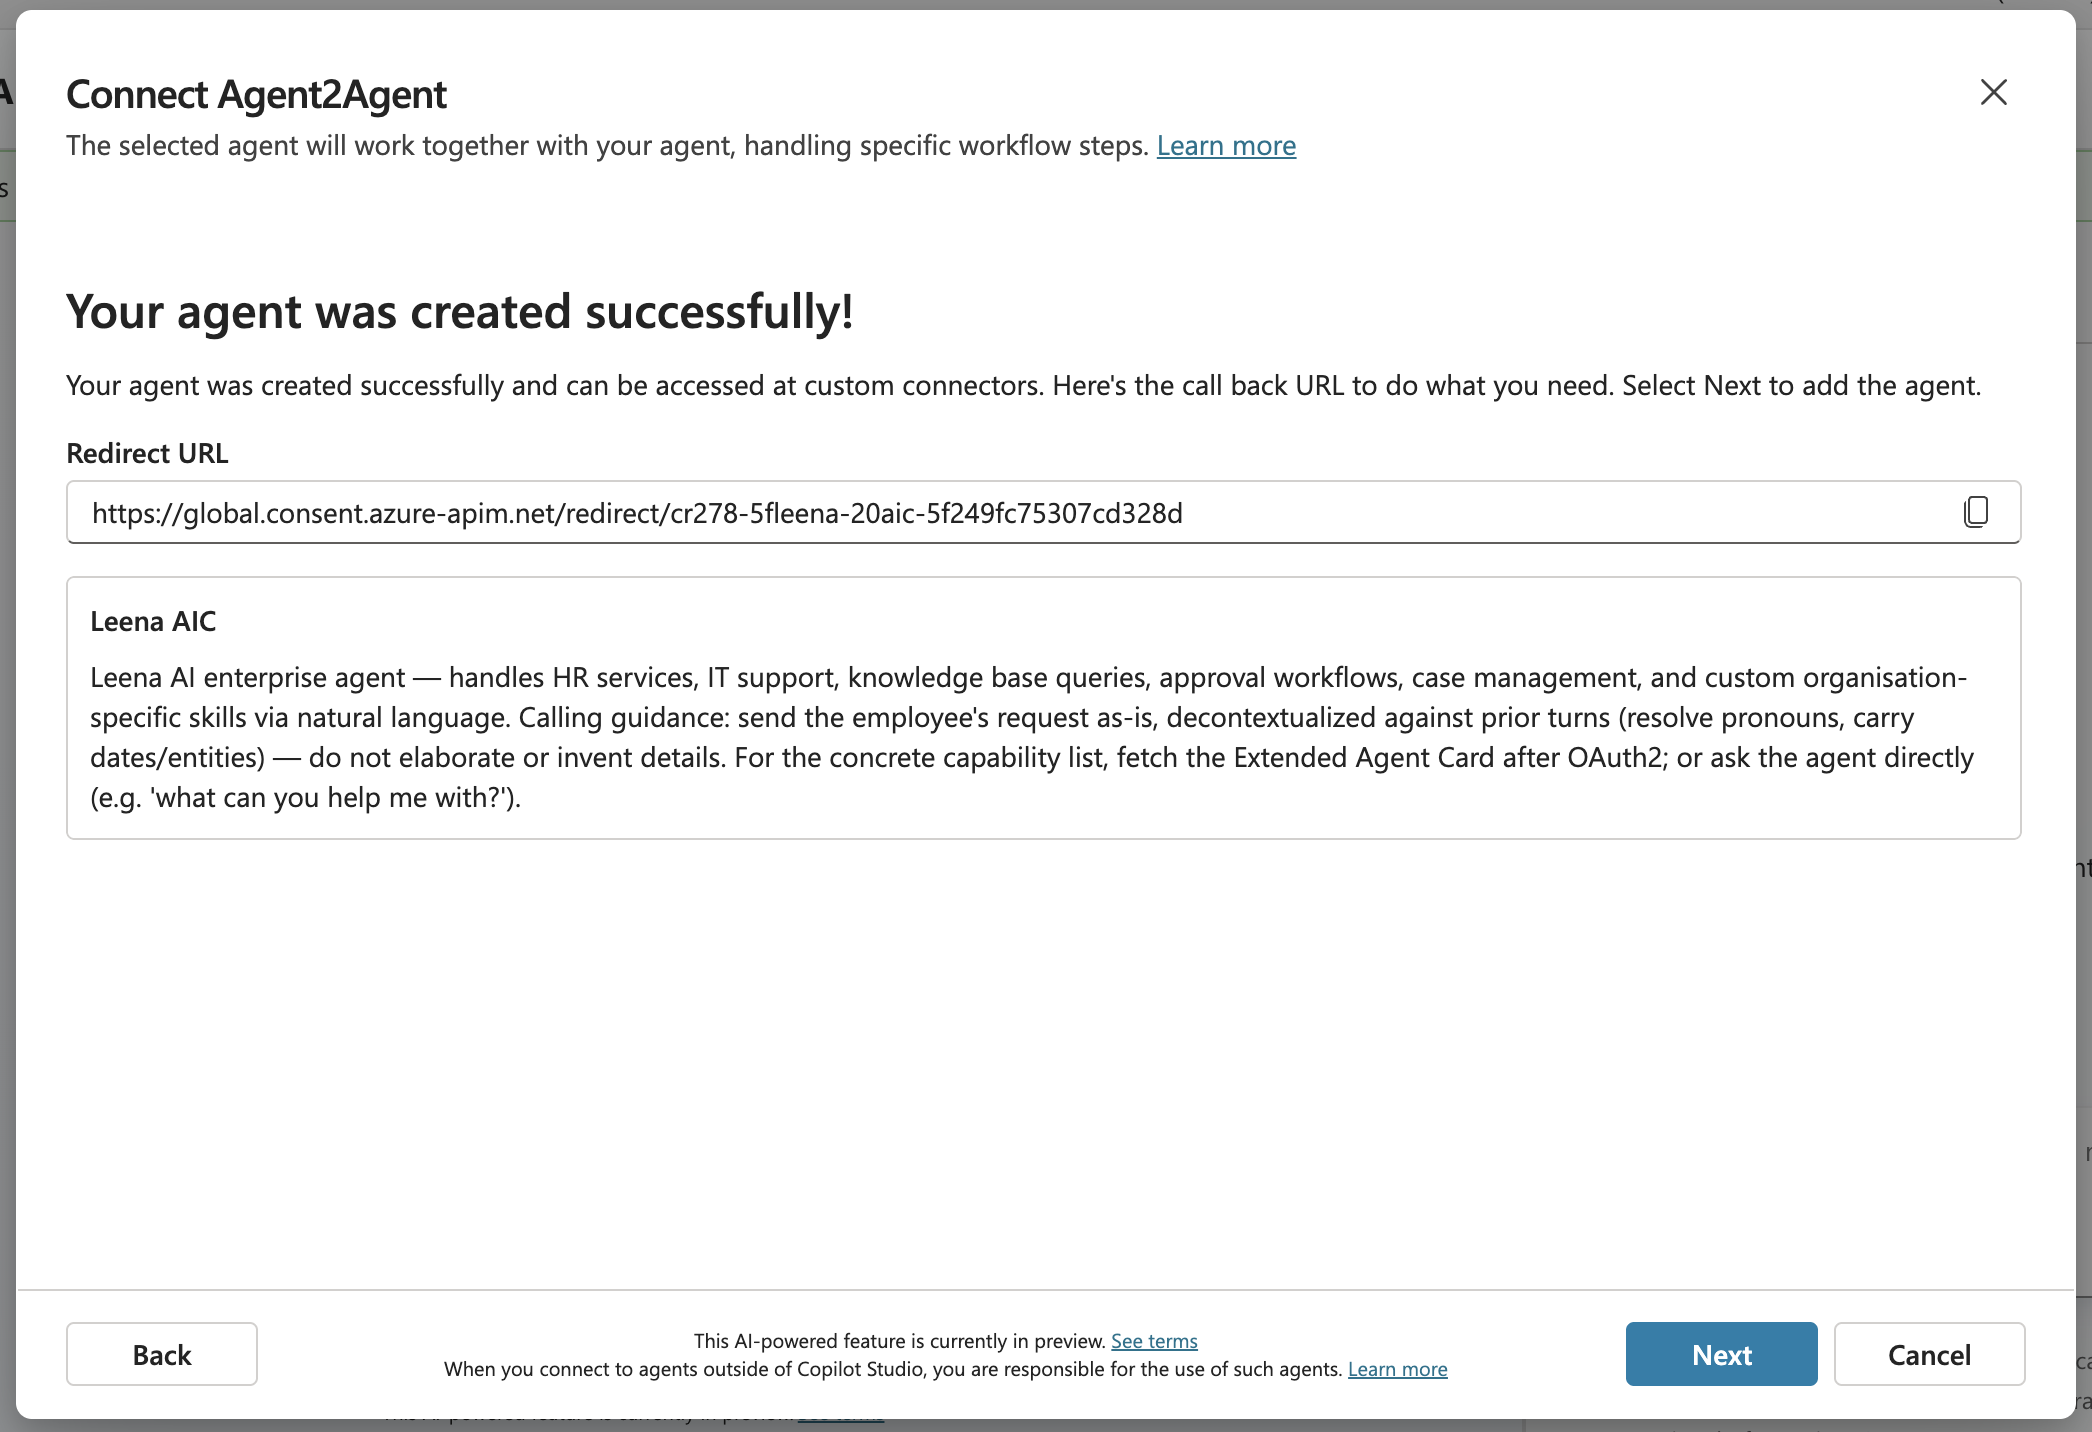
If Copilot Studio presents a callback / redirect URL for the OAuth connection (as it does for MCP), copy it and register it in the Redirect URIs field on the Leena settings page — exactly as in Part 1, Step 6. Leena only completes an OAuth sign-in for callback URLs on its allow-list, and Microsoft's callback URLs are HTTPS, so they're accepted.
Step 5 — Test the delegation
Open the Test canvas on your main agent and enter a prompt that belongs to Leena's domain, e.g. "What's our notice-period policy?"
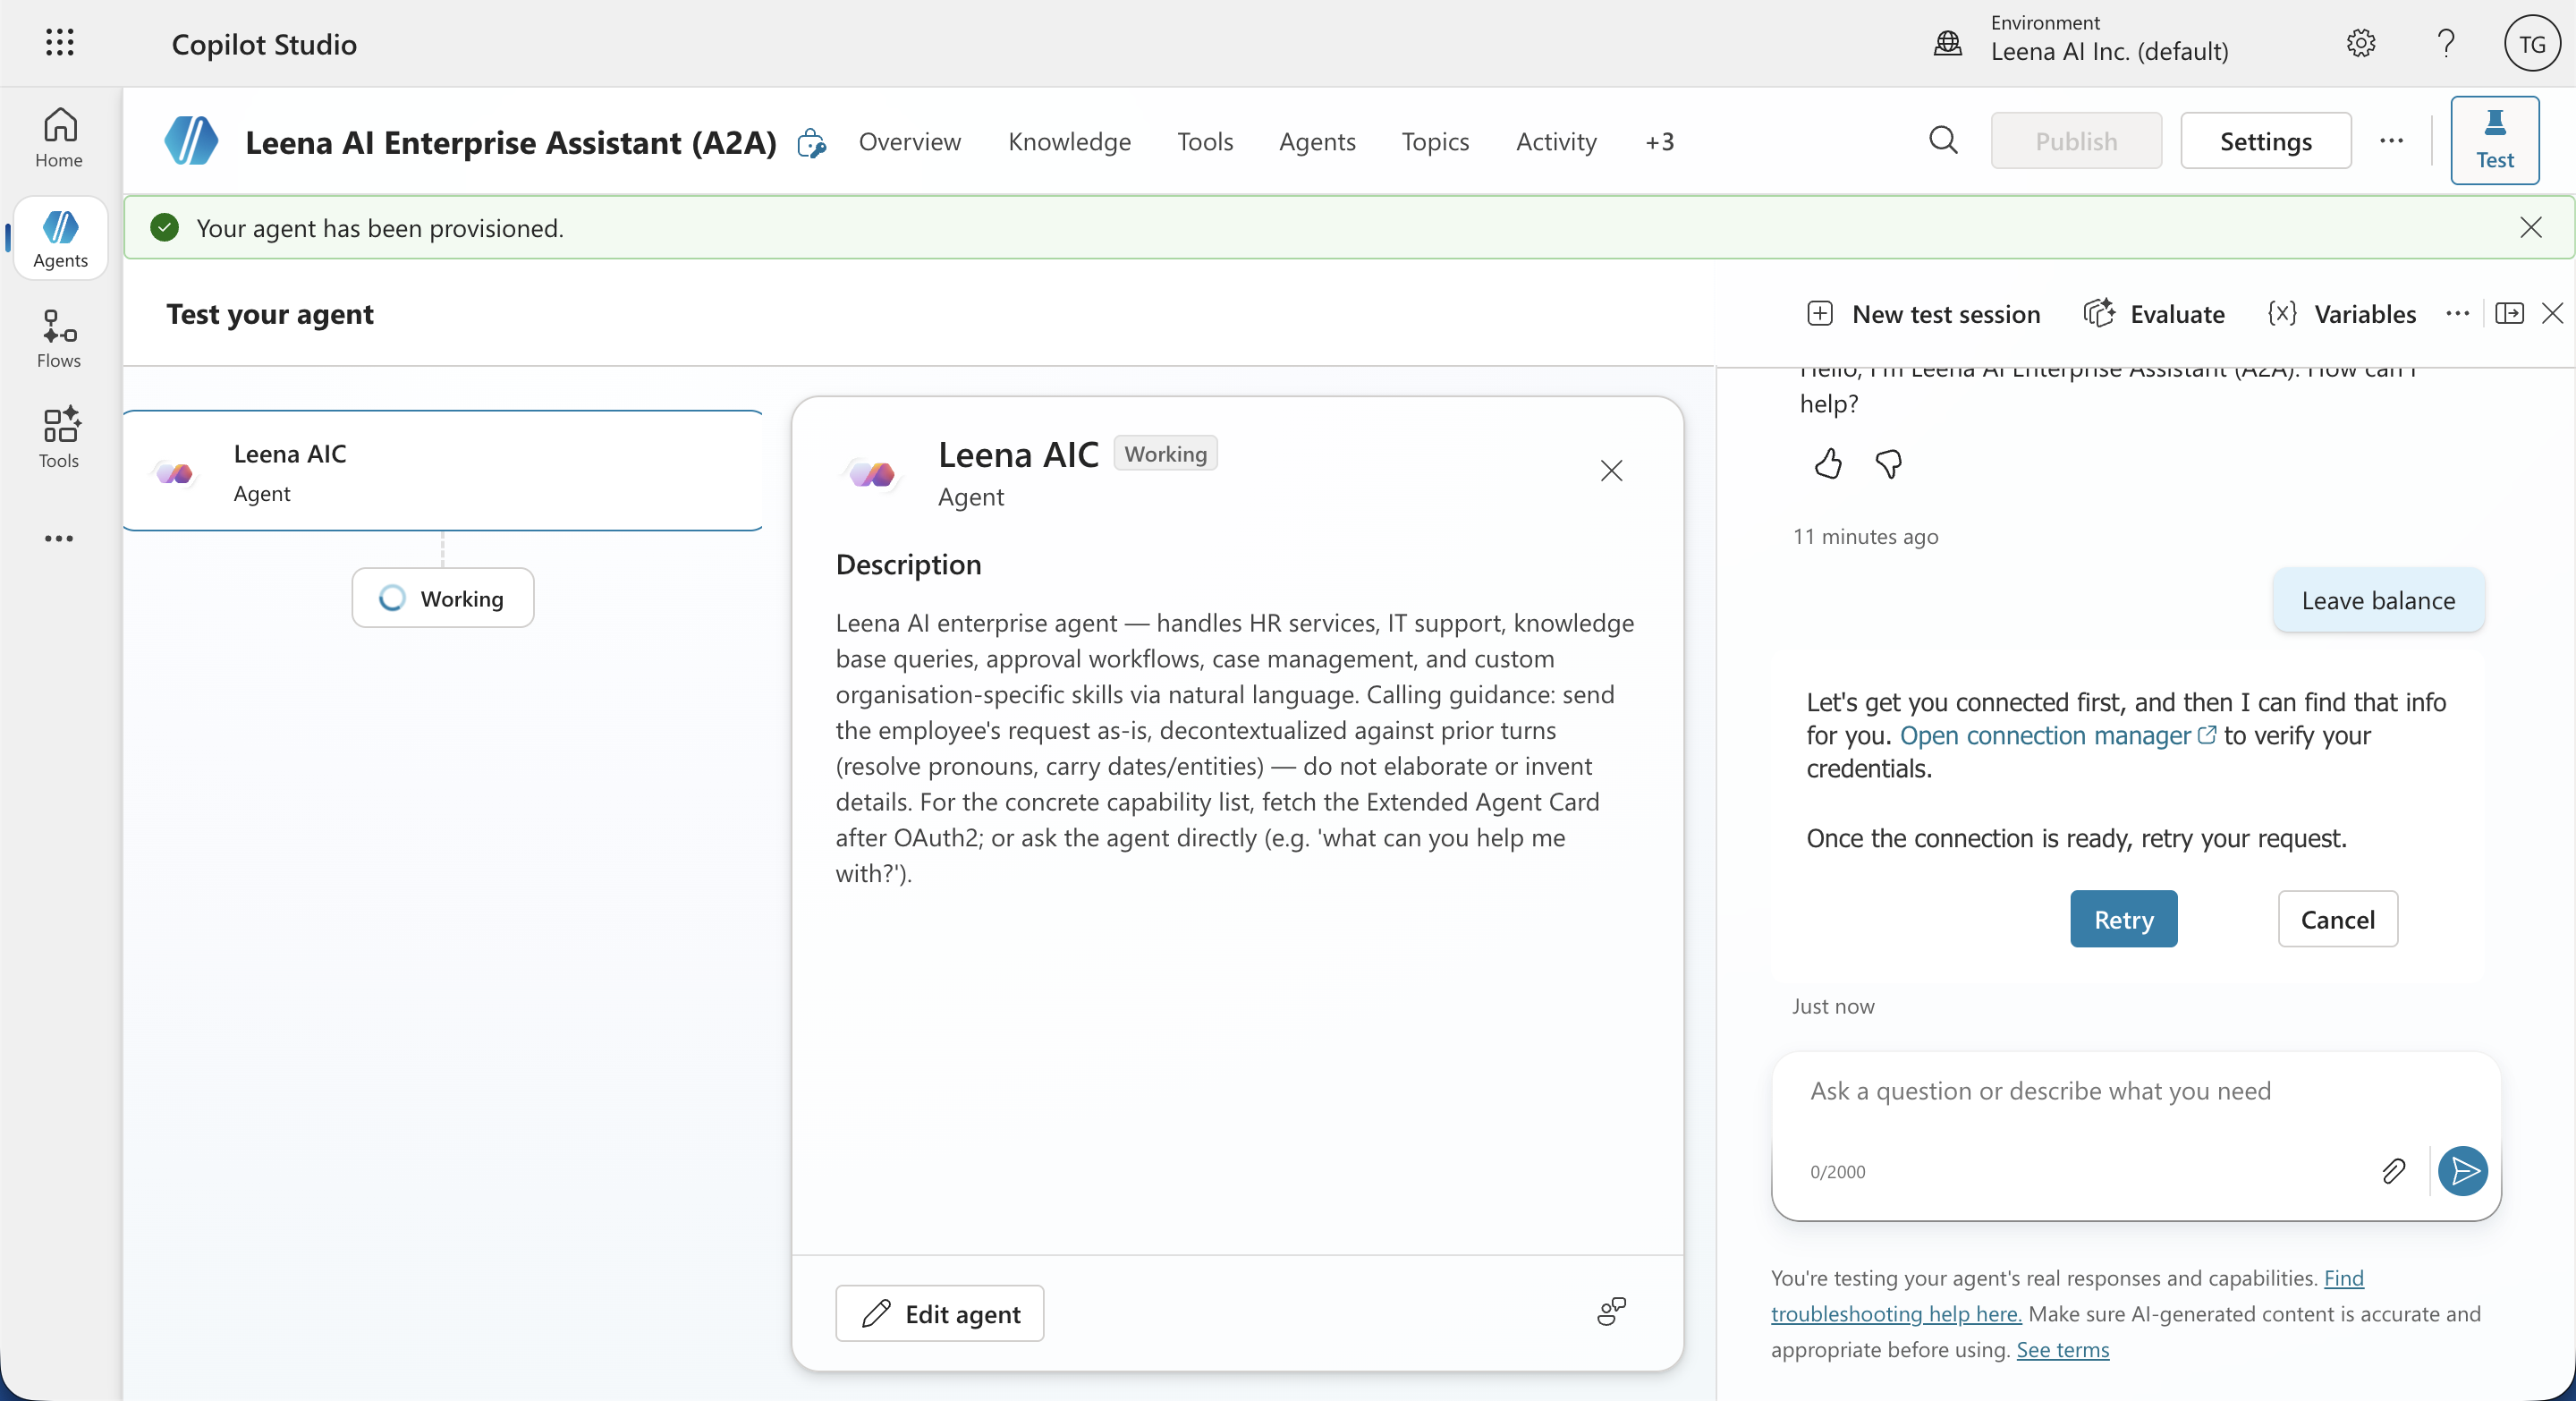
The orchestrator evaluates the request, delegates the task to the Leena A2A connection, and the AI Colleague's response comes back into the chat. If the main agent answers itself instead of delegating, sharpen the connected agent's description (Step 2) so the orchestrator knows which tasks belong to Leena.
How the A2A integration behaves at runtime
- Delegation, not tool calls. Copilot Studio sends Leena an A2A task containing the user's request plus structured metadata — including a context ID and the recent chat history — rather than a raw tool invocation. Leena's orchestrator handles the task with the same engine that powers every other channel.
- Context comes along. Because the A2A payload carries conversation context, Leena can respond coherently to a task that references earlier turns in the Copilot Studio conversation.
- Text in, text out. As with MCP, the A2A surface is programmatic and text-based: answers come back as text/markdown for Copilot Studio to render. Anything that needs a form or file upload falls back to a webview link.
- Identity is the connection's. The A2A connection authenticates with the OAuth connection configured for it. For employee-specific, permission-sensitive queries (leave balances, personal tickets), prefer the MCP tool route from Part 1, which binds every call to the individual signed-in user.
A2A troubleshooting
- Name/description don't auto-populate in Step 2: The endpoint may be wrong, or the agent card isn't reachable at the standard well-known location. First re-check that you pasted the exact A2A endpoint URL from Leena's settings; if the endpoint is right, just enter the name and description manually and continue — the connection doesn't require auto-population.
- Connection or sign-in fails: Confirm the A2A toggle is on for that AI Colleague, the credentials come from the same AI Colleague, and any callback URL Copilot Studio showed is registered in Leena's Redirect URIs.
- 401/403 after it previously worked: The client secret has likely expired. Generate a new one in Leena and update the Copilot Studio connection. Remember the shared secret also serves your MCP connection — update it there too.
- Main agent never delegates to Leena: Improve the connected agent's description; the orchestrator routes based on it. Also verify the connected agent shows as active on the Agents page.
Troubleshooting (MCP)
- Sign-in fails / "redirect URI mismatch": The Microsoft callback URL isn't registered in Leena. Re-copy the exact callback URL from Copilot Studio and add it to Redirect URIs in the Leena MCP settings (Step 6).
- "MCP not enabled" or connection rejected: Confirm the MCP server toggle is on for that AI Colleague, and that you're using credentials from the same AI Colleague.
- Token/secret errors after a while: The Leena client secret has an expiry. If it lapsed, generate a new secret in Leena and update the connection's credentials in Copilot Studio.
- Agent doesn't call Leena when it should: Sharpen the Server description (Step 2) so the orchestrator knows what kinds of requests belong to Leena.
- Tool errors only on long tasks: That's the polling behavior — long requests return
running; make surerequest_detailsis enabled so status can be polled.
Reference
- Microsoft's official procedure for connecting an existing MCP server to a Copilot Studio agent: https://learn.microsoft.com/en-us/microsoft-copilot-studio/mcp-add-existing-server-to-agent
- Microsoft's official procedure for connecting an agent over the A2A protocol: https://learn.microsoft.com/en-us/microsoft-copilot-studio/add-agent-agent-to-agent
- Overview of adding other agents (child, Copilot Studio, and external) to an agent: https://learn.microsoft.com/en-us/microsoft-copilot-studio/authoring-add-other-agents
Updated 15 days ago