
Workday
Watch the tutorial
Workday Connector for Leena AI
The Workday connector for Leena AI allows you to index and search knowledge articles from your Workday tenant. This integration makes published help content easily discoverable across the organization, improving access to policies and internal guidance.
The connector focuses on ingesting knowledge articles and provides configuration options to ensure only relevant content is made searchable.
Prerequisites
Ensure the following details are available before proceeding:
- Integration System User (ISU) Credentials (Username & Password).
- Properly configured Integration System Security Group (ISSG).
- Necessary Domain Security Policies activated in Workday.
Workday Setup Guide
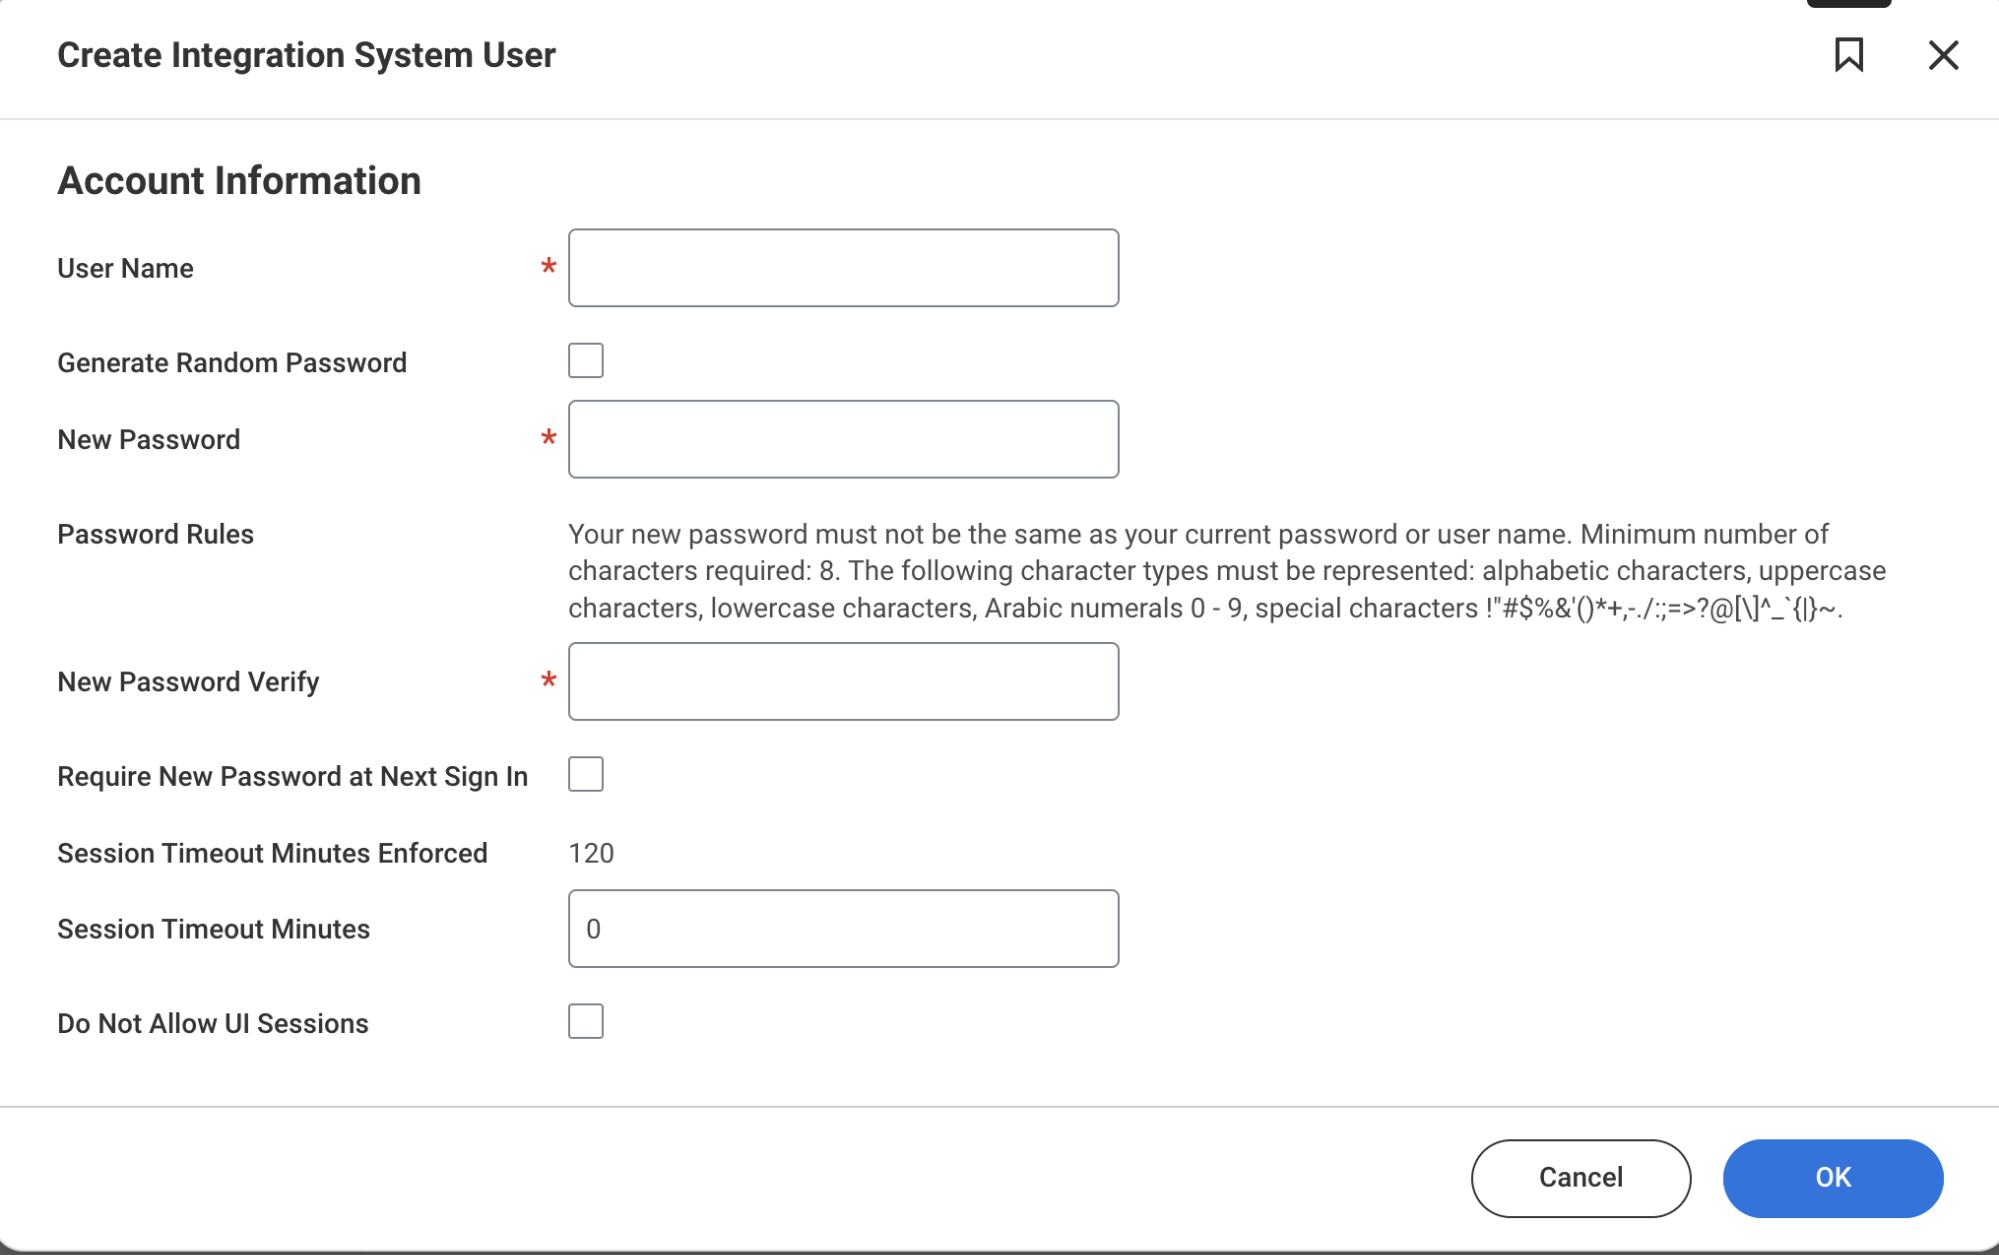
1. Create the Integration System User (ISU)
-
Search for the Create Integration System User (ISU) task.

-
Create a new ISU and securely record the Username and Password.
-
Confirm the ISU has default permissions assigned.
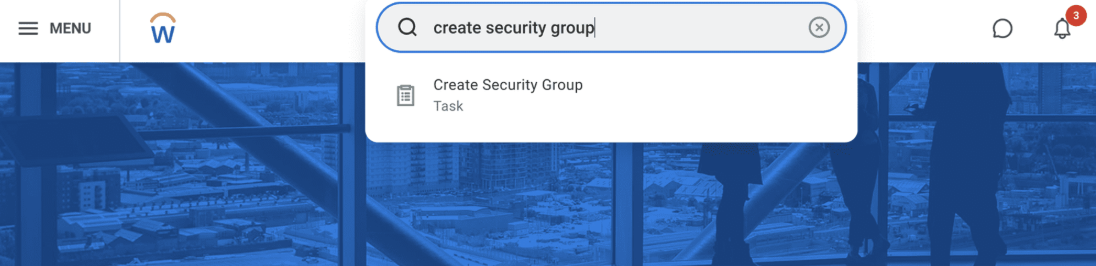
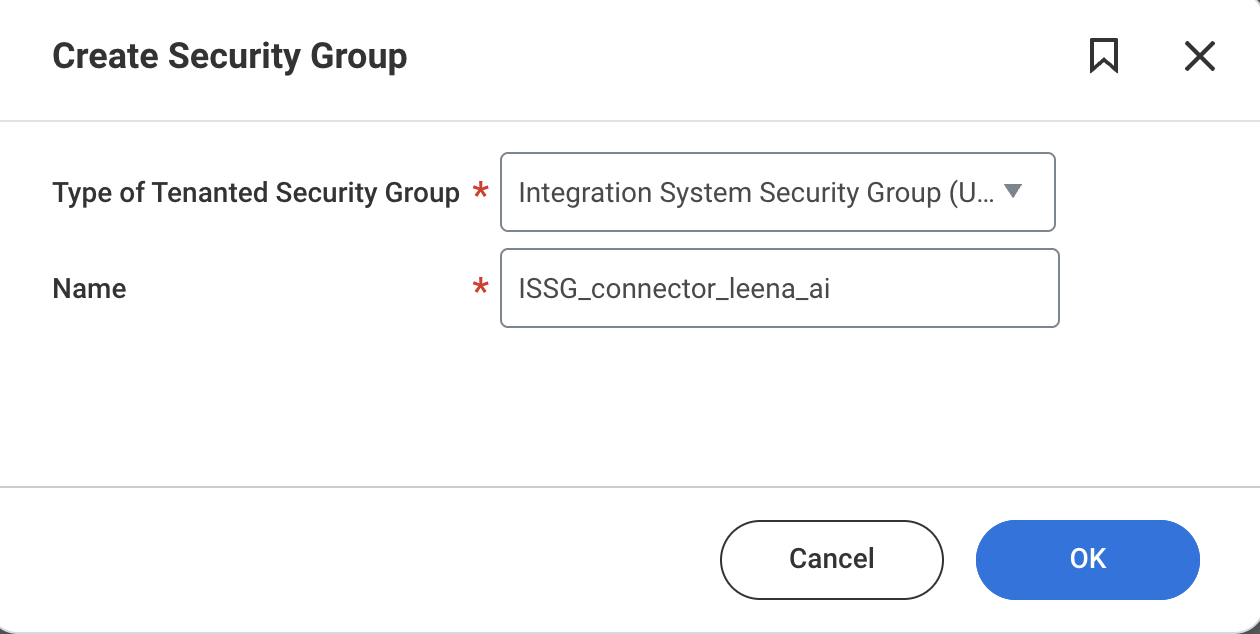
2. Create an Integration System Security Group (ISSG)
-
Search for Create Security Group.
-
Select Integration System Security Group (Unconstrained).
-
Name:
ISSG_connector_leena_ai(or follow company naming conventions).
Add the below security domains to the created ISSG:
Add these functional areas and security domains to the ISSG for the API client that we are going to create in upcoming steps to configure the REST API for accessing the article web URL link.
| Operation | Functional Areas | Access Level |
|---|---|---|
| Domain Security Policy | — | View Only |
| Generate: Benefit Plan Help Articles | Benefits | View Only |
| View: Confidential Help Cases | Help | View Only |
| Help Case Data | Help | View Only |
| Set Up: Help Knowledge Management | Help, People Experience | View Only |
| Help Case Internal Notes | Help | View Only |
| Help Intelligent Answers Access | People Experience | View Only |
| Help Case Messages | Help | View Only |
| Reports: Help Knowledge Management | Help, People Experience | View Only |
| Set Up: Help Case Management | Help | View Only |
| Manage: Help Articles | Help, People Experience | View Only |
| Process: Help Cases / Help Case External Contacts | Help | View Only |
| View: Help Articles | Help, People Experience | Get Only |
| Generate: Benefit Plan Help Articles | Benefits | Get Only |
| Set Up: Help Knowledge Management | Help, People Experience | Get Only |
| Help Case Internal Notes | Help | Get Only |
| Help Intelligent Answers Access | People Experience | Get Only |
| Help Case Messages | Help | Get Only |
| Reports: Help Knowledge Management | Help, People Experience | Get Only |
| Set Up: Help Case Management | Help | Get Only |
| Process: Help Cases / Help Case External Contacts | Help | Get Only |
| View: Confidential Help Cases | Help | Get Only |
| Help Case Data | Help | Get Only |
| Reports: Help Engagement Metrics | Help | Get Only |
| Reports: Help Case Management | Help | Get Only |
| Manage: Help Articles | Help, People Experience | Get Only |
| View: Help Articles | Help, People Experience | View Only |
| Help Article REST API | Help | Get Only |
| Help Article REST API | Help | View Only |
3. Add ISU to ISSG
-
Run the All Workday Accounts report to find your ISU.
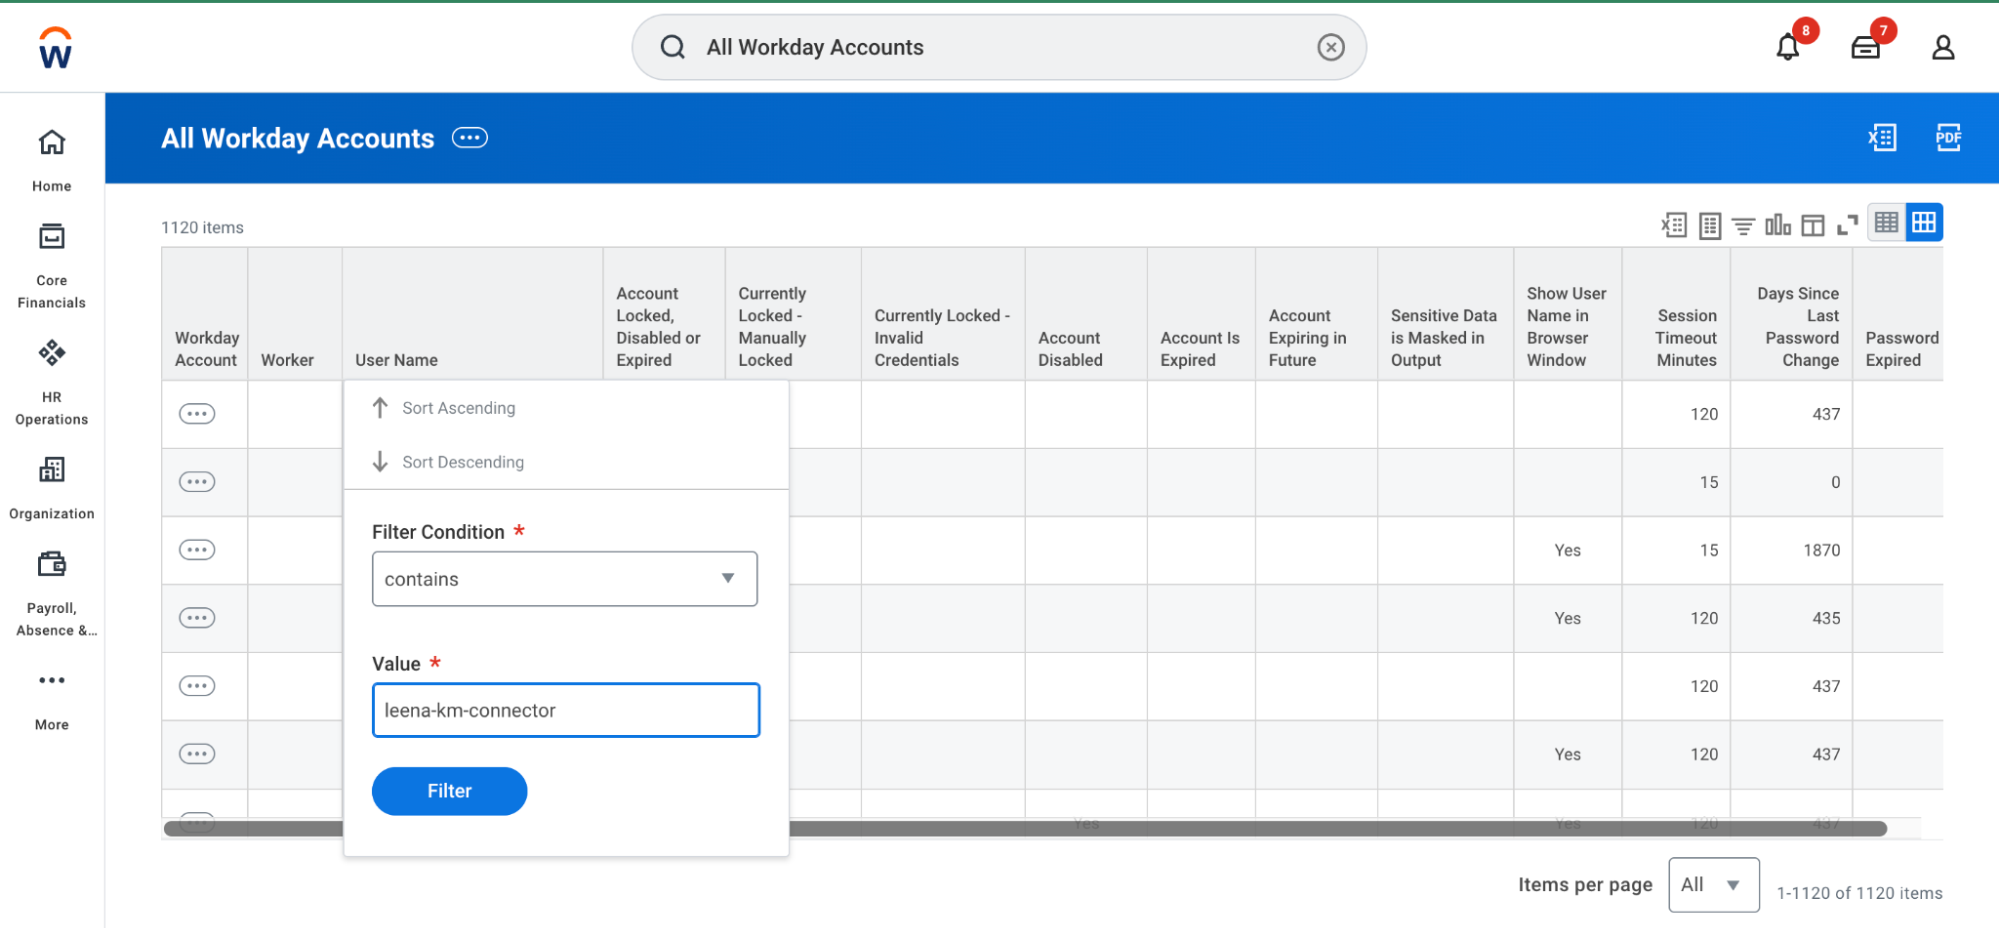
-
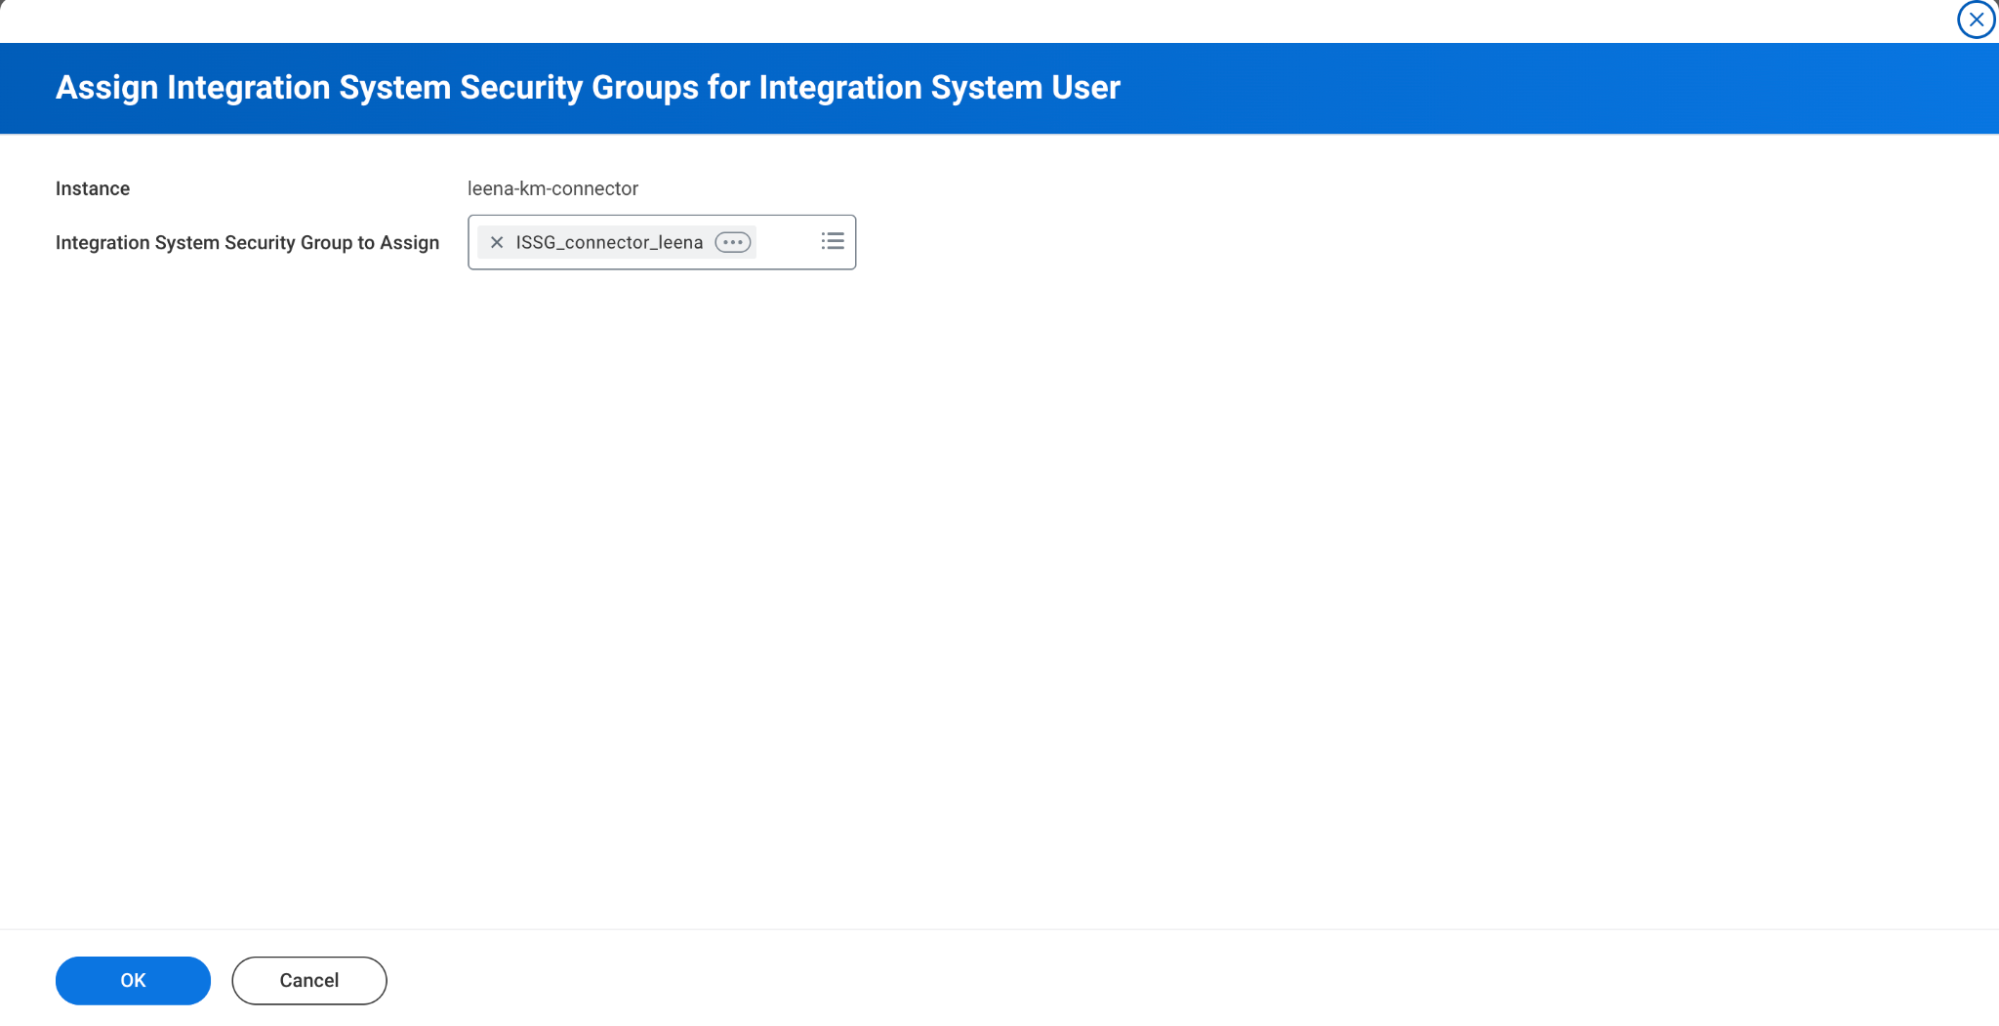
Select Assign Integration System Security Groups from the action menu.
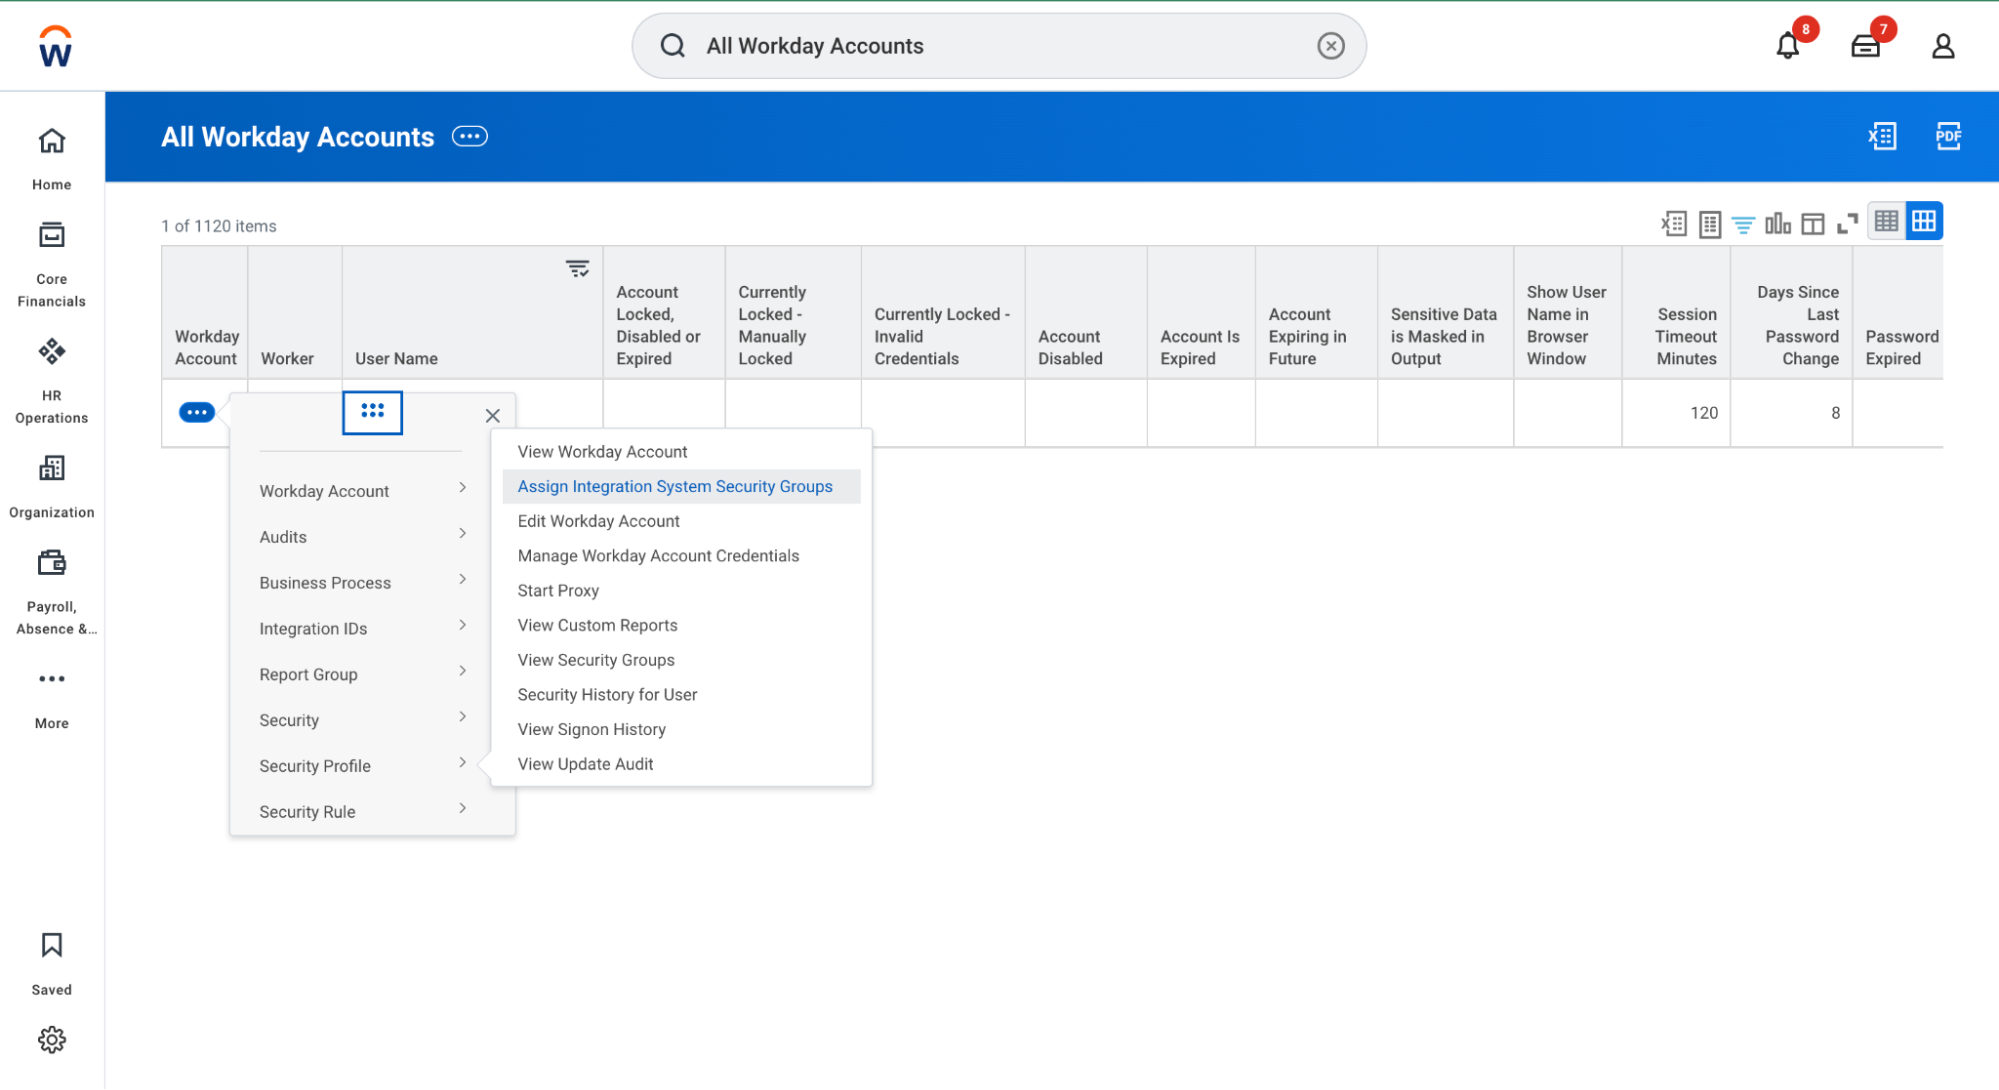
-
Add the ISU to your newly created ISSG.
4. Configure Domain Security Policies
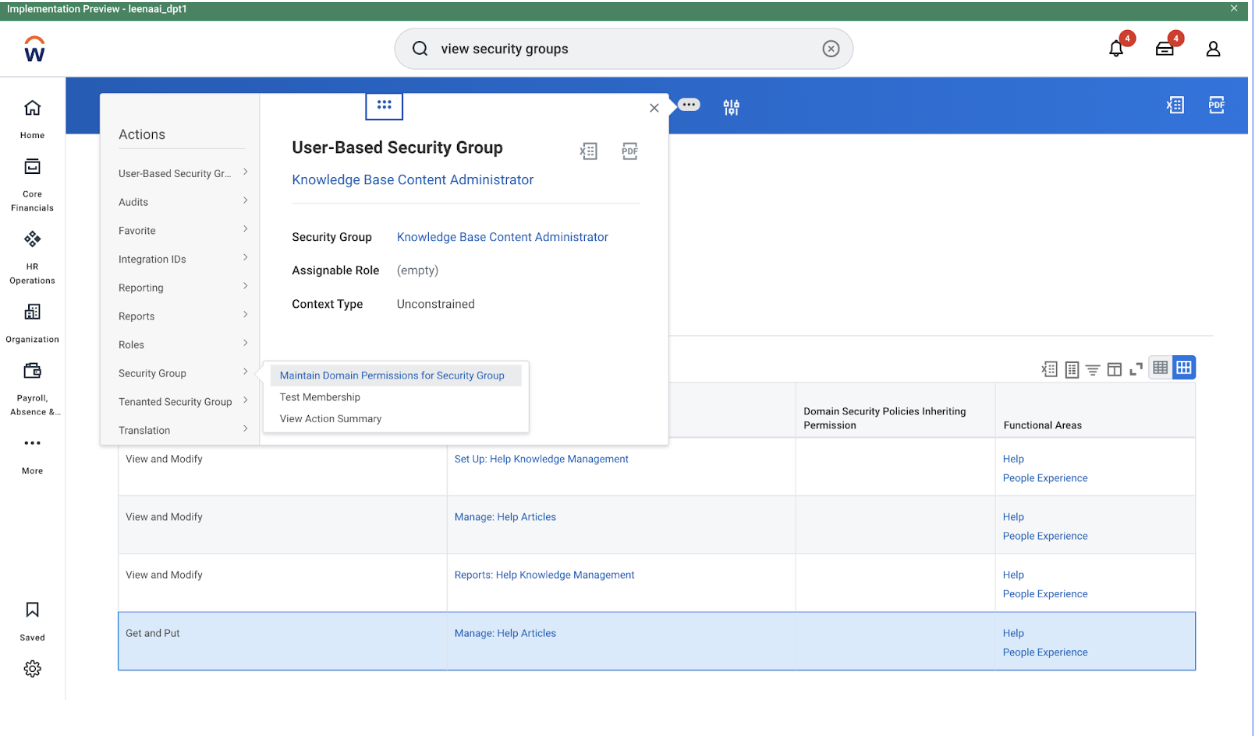
Access the ISSG via View Security Group and perform the following:
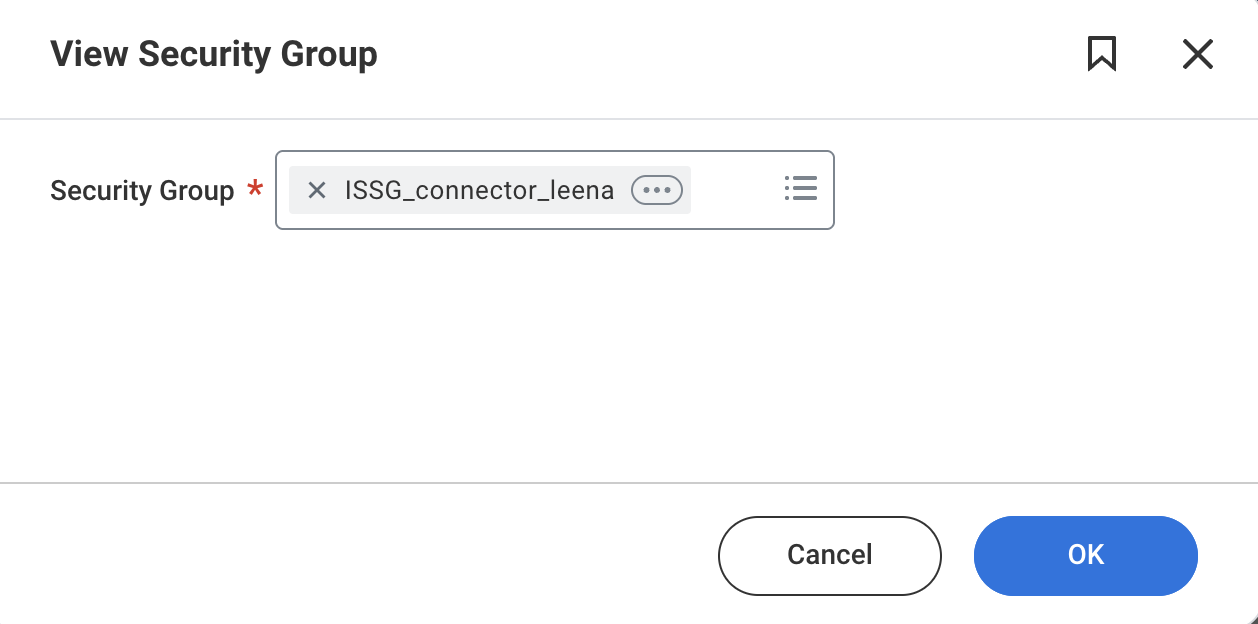
- Select Maintain Domain Permissions for Security Group from the related actions menu.
- Add the “Workday Accounts” permission to that ISSG.
Creating User-Based Security Group
- Search for the Create Security Group task.
- Type of Tenanted Security Group" is "User-Based Security Group" and enter your name of your security group.

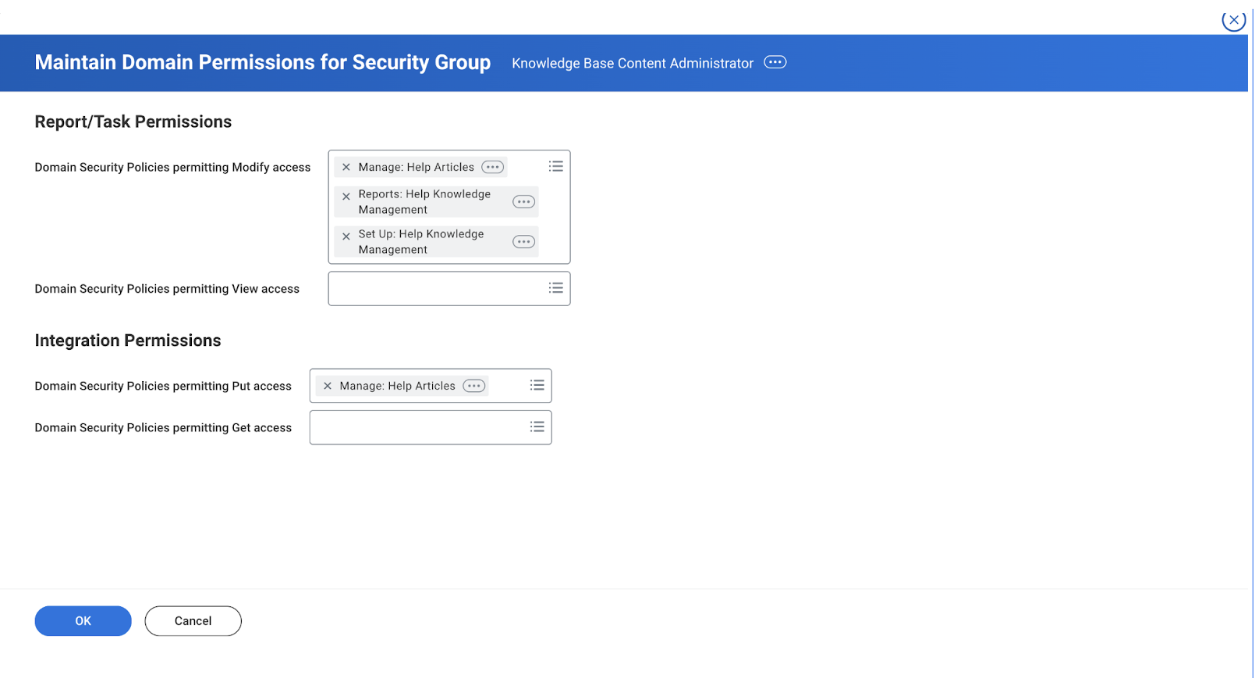
- Go to related actions(3 dots) > Security Group > Maintain Domain Permissions for Security Group.
- Add below permissions.
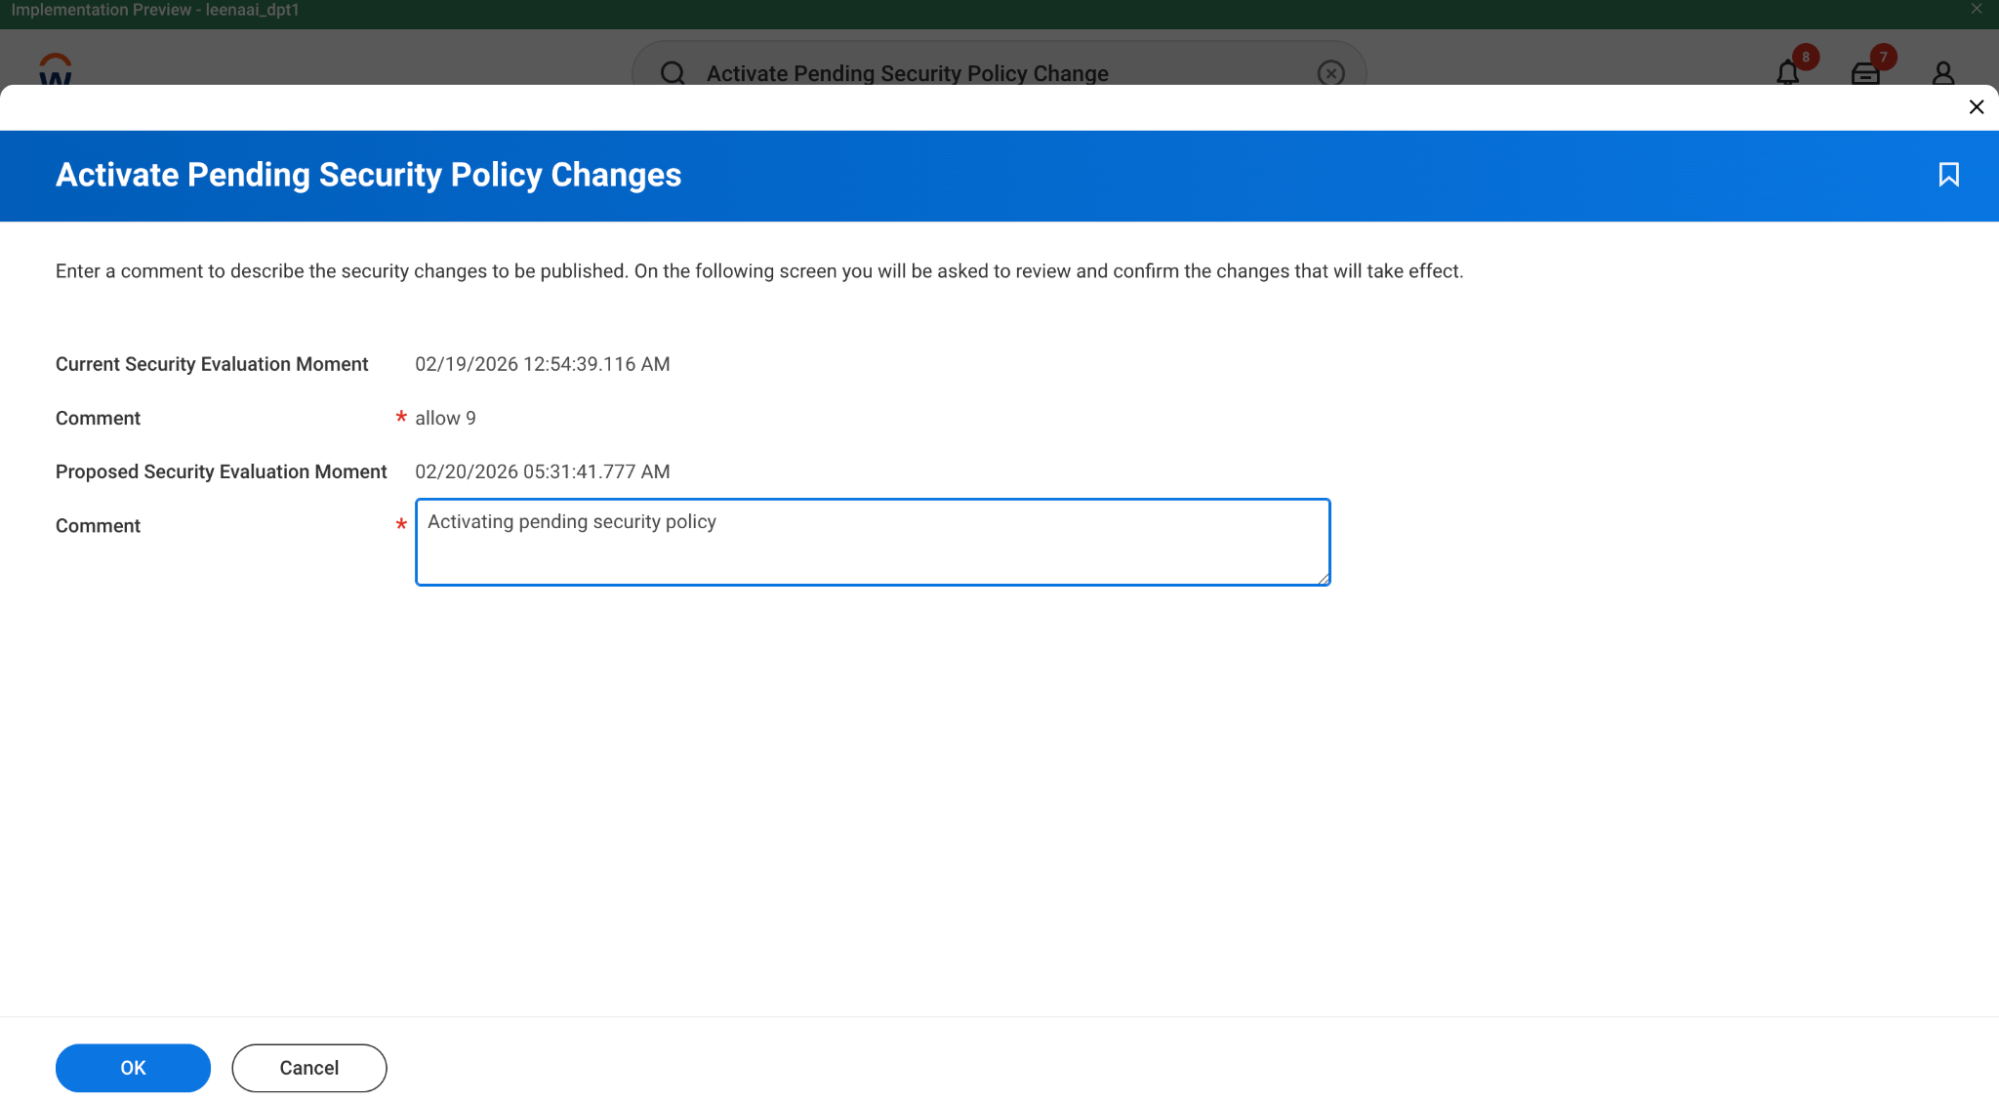
- Run the Activate Pending Security Policy Changes task to apply the updates.
-
Knowledge Access: Search for Assign Users to User-Based Security Group, enter "User based security group"(which we created above)
-
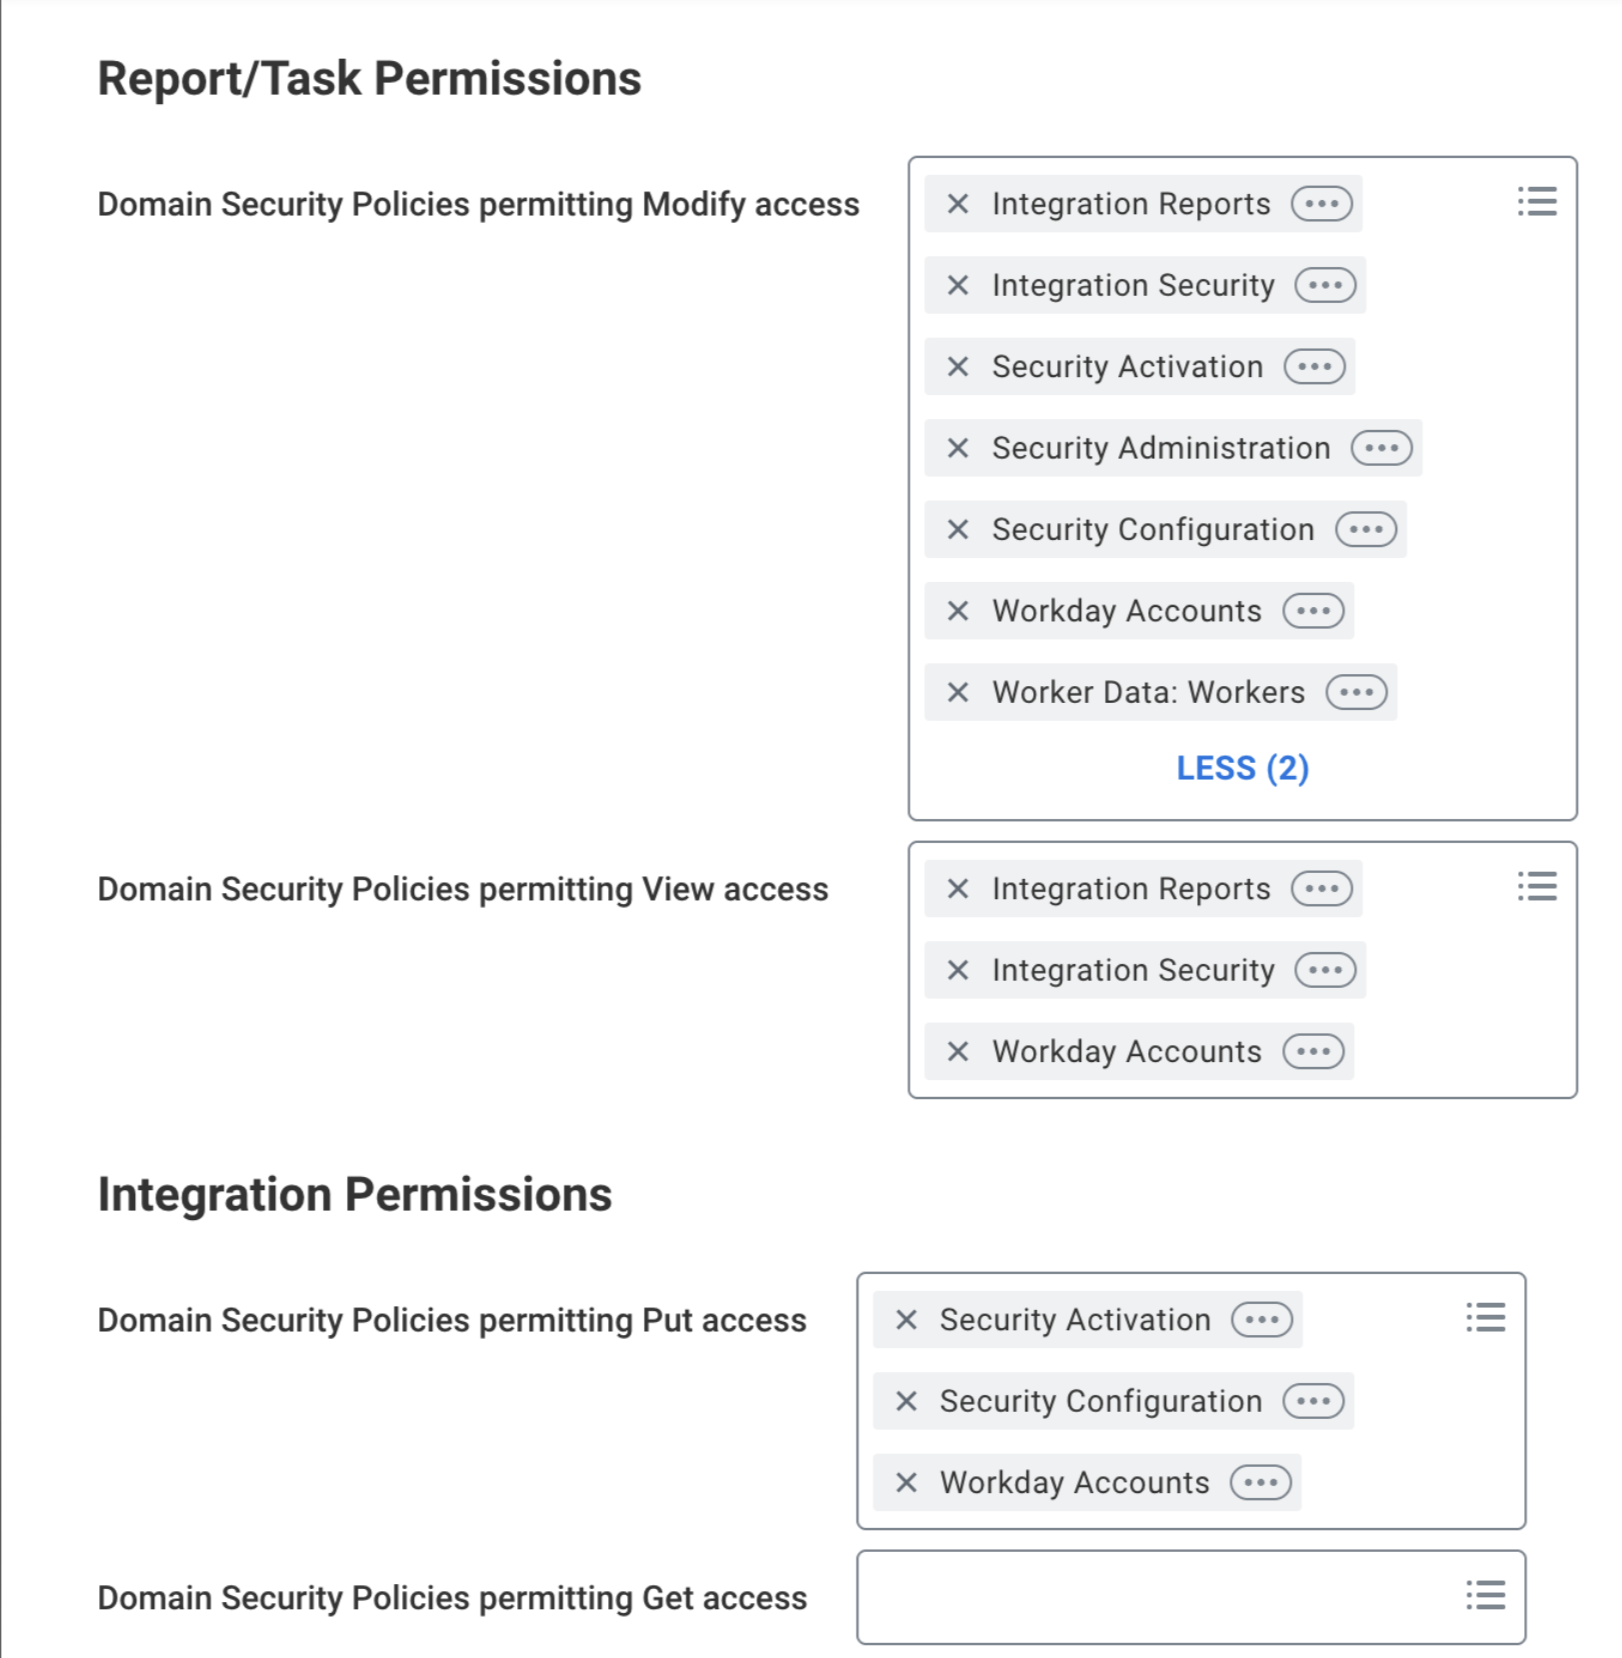
Security Configuration: Add "Security Configuration" and "Security Activation" domains to your ISSG. Add the ISSG to both Report/Task Permissions and Integration Permissions.
-
Activation: Run the Activate Pending Security Policy Changes task to apply updates.
Register API Client for Leena AI Integration (Workday)
- In the Workday app, search for and select the Register API Client for Integrations task.
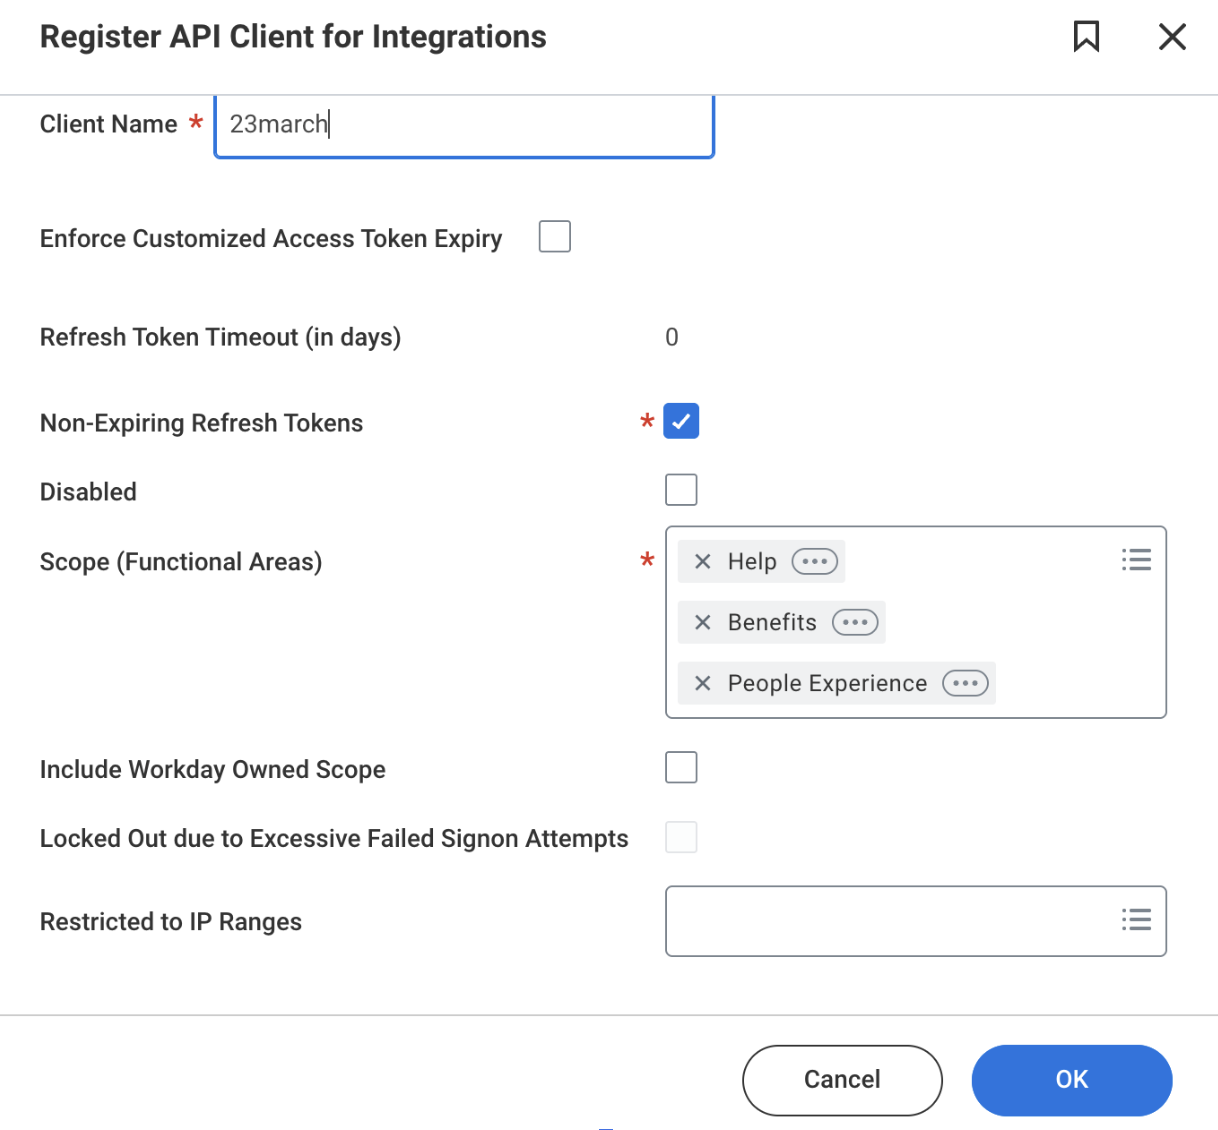
- Enter Leena AI API Client in the Client Name field.
- Under Scopes (Functional Areas), select:
- Benefits
- Help
- People Experience
- Click OK
- Copy and securely store the following credentials:
- Client ID
- Client Secret
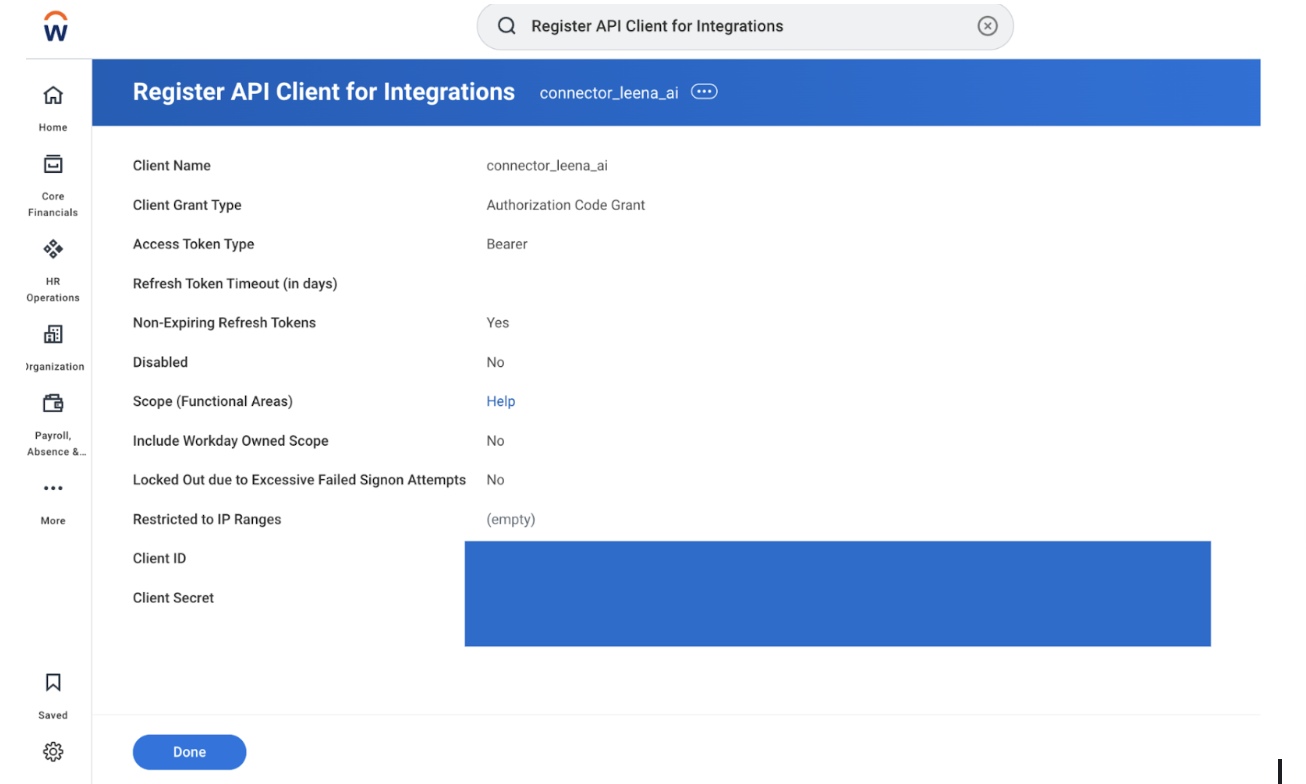
- These will be required while configuring the integration in the Leena AI Admin Console.
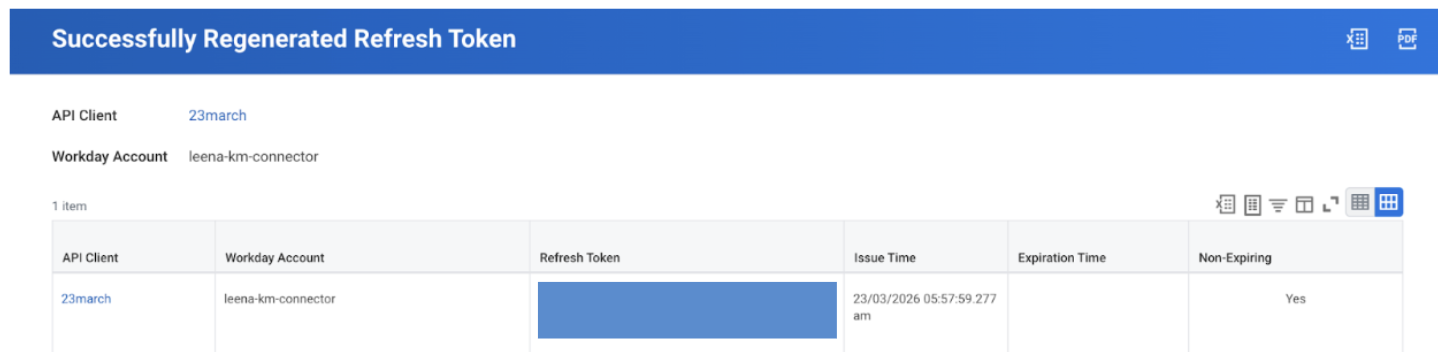
Generate Refresh Token for Leena AI
- Click the three dots (… ) next to the newly created API client.
- Select:
- View API Client → Manage Refresh Tokens for Integration
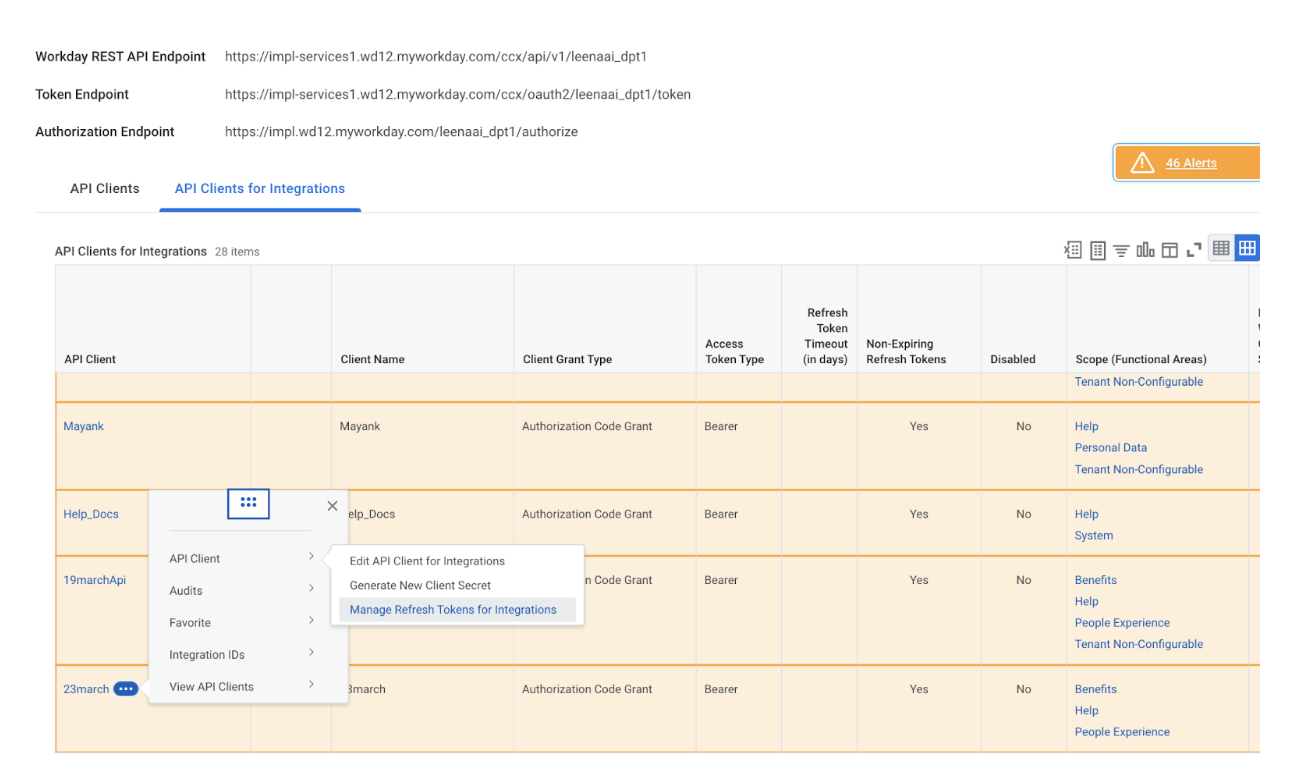
- In the Integration System User (ISU) field:
- Select the ISU created in Step 1 of the setup.
- Click Generate New Refresh Token.
- Copy and securely store the Refresh Token.
Custom Report Configurations (RaaS)
You must create several reports. Ensure Enable as Web Service is checked for all.
Report 1: All Articles
-
Follow these steps to initialize the attachment-specific report required for the connector:
- Task: Navigate to the Create Custom Report task.
- Report Configuration: Enter the following header details:
Field Value Report Name All ArticlesReport Type AdvancedData Source Knowledge Base Article Versions🔍 VerificationEnsure the following settings are correctly applied before proceeding to the columns:
- Data Source Type:
Indexed - Primary Business Object:
Article Version
In the columns tab map the following table in your report.
| Business Object | Field | Column Heading Override XML Alias |
|---|---|---|
| Article Version | Article | articleVersionArticle |
| Article Version | Article Version Content Plain Text | Article_Version_Content_Plain_Text |
| Article Version | Article Version Created By | articleVersionCreatedBy |
| Article Version | Article Version Created Date | articleVersionCreatedDate |
| Article Version | Article Version Audiences | articleVersionAudience |
| Article Version | Article Version Language | articleVersionLanguage |
| Article | Workday ID | workdayID |
| Article Version | Article Version Attachments | articleVersionAttachments |
| Article Version | Article Version | Article_Version |
| Article Version Attachments | Attachment | Attachment |
| Article Version Attachments | File Name | fileName |
| Article Version | Article Status (REST) | ArticleStatusREST |
| Article Version | Article Version Category | articleVersionCategory |
| Article Version | Article Version Title | articleVersionTitle |
| Article Version | Article Version Effective Expiration Date | Article_Version_Effective_Expiration_Date |
| Article Version | Article Version Last Updated Date | articleUpdateDate |
| Article Version | Article Version Last Updated Date | articleVersionLastUpdateDate |
| Article | Last Functionally Upated | Last_Functionally_Updated |
| Article Version | Article Version Effective Expiration Date | Article_Version_Effective_Expiration_Date_21626295 |
| Article Version | Workday ID | workdayID_version |
- Group Column Headings: Add the following info under group column heading.

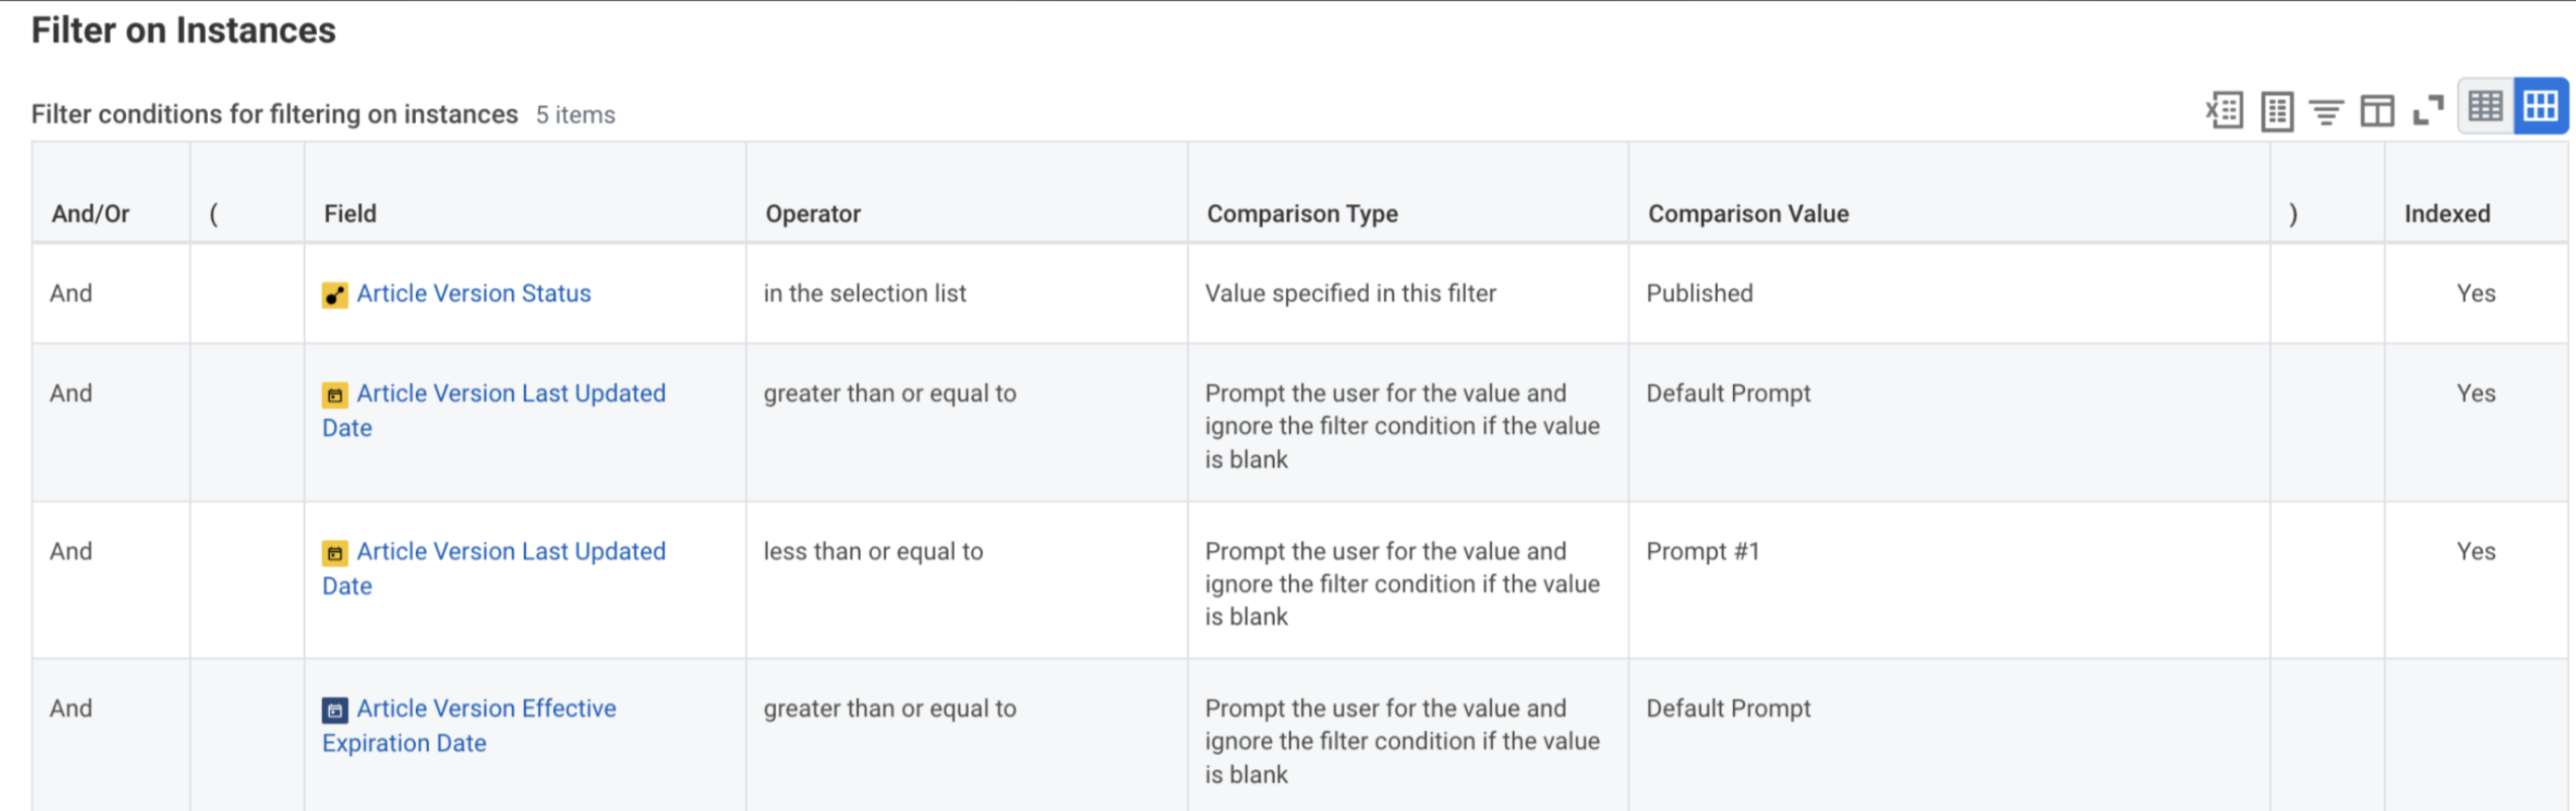
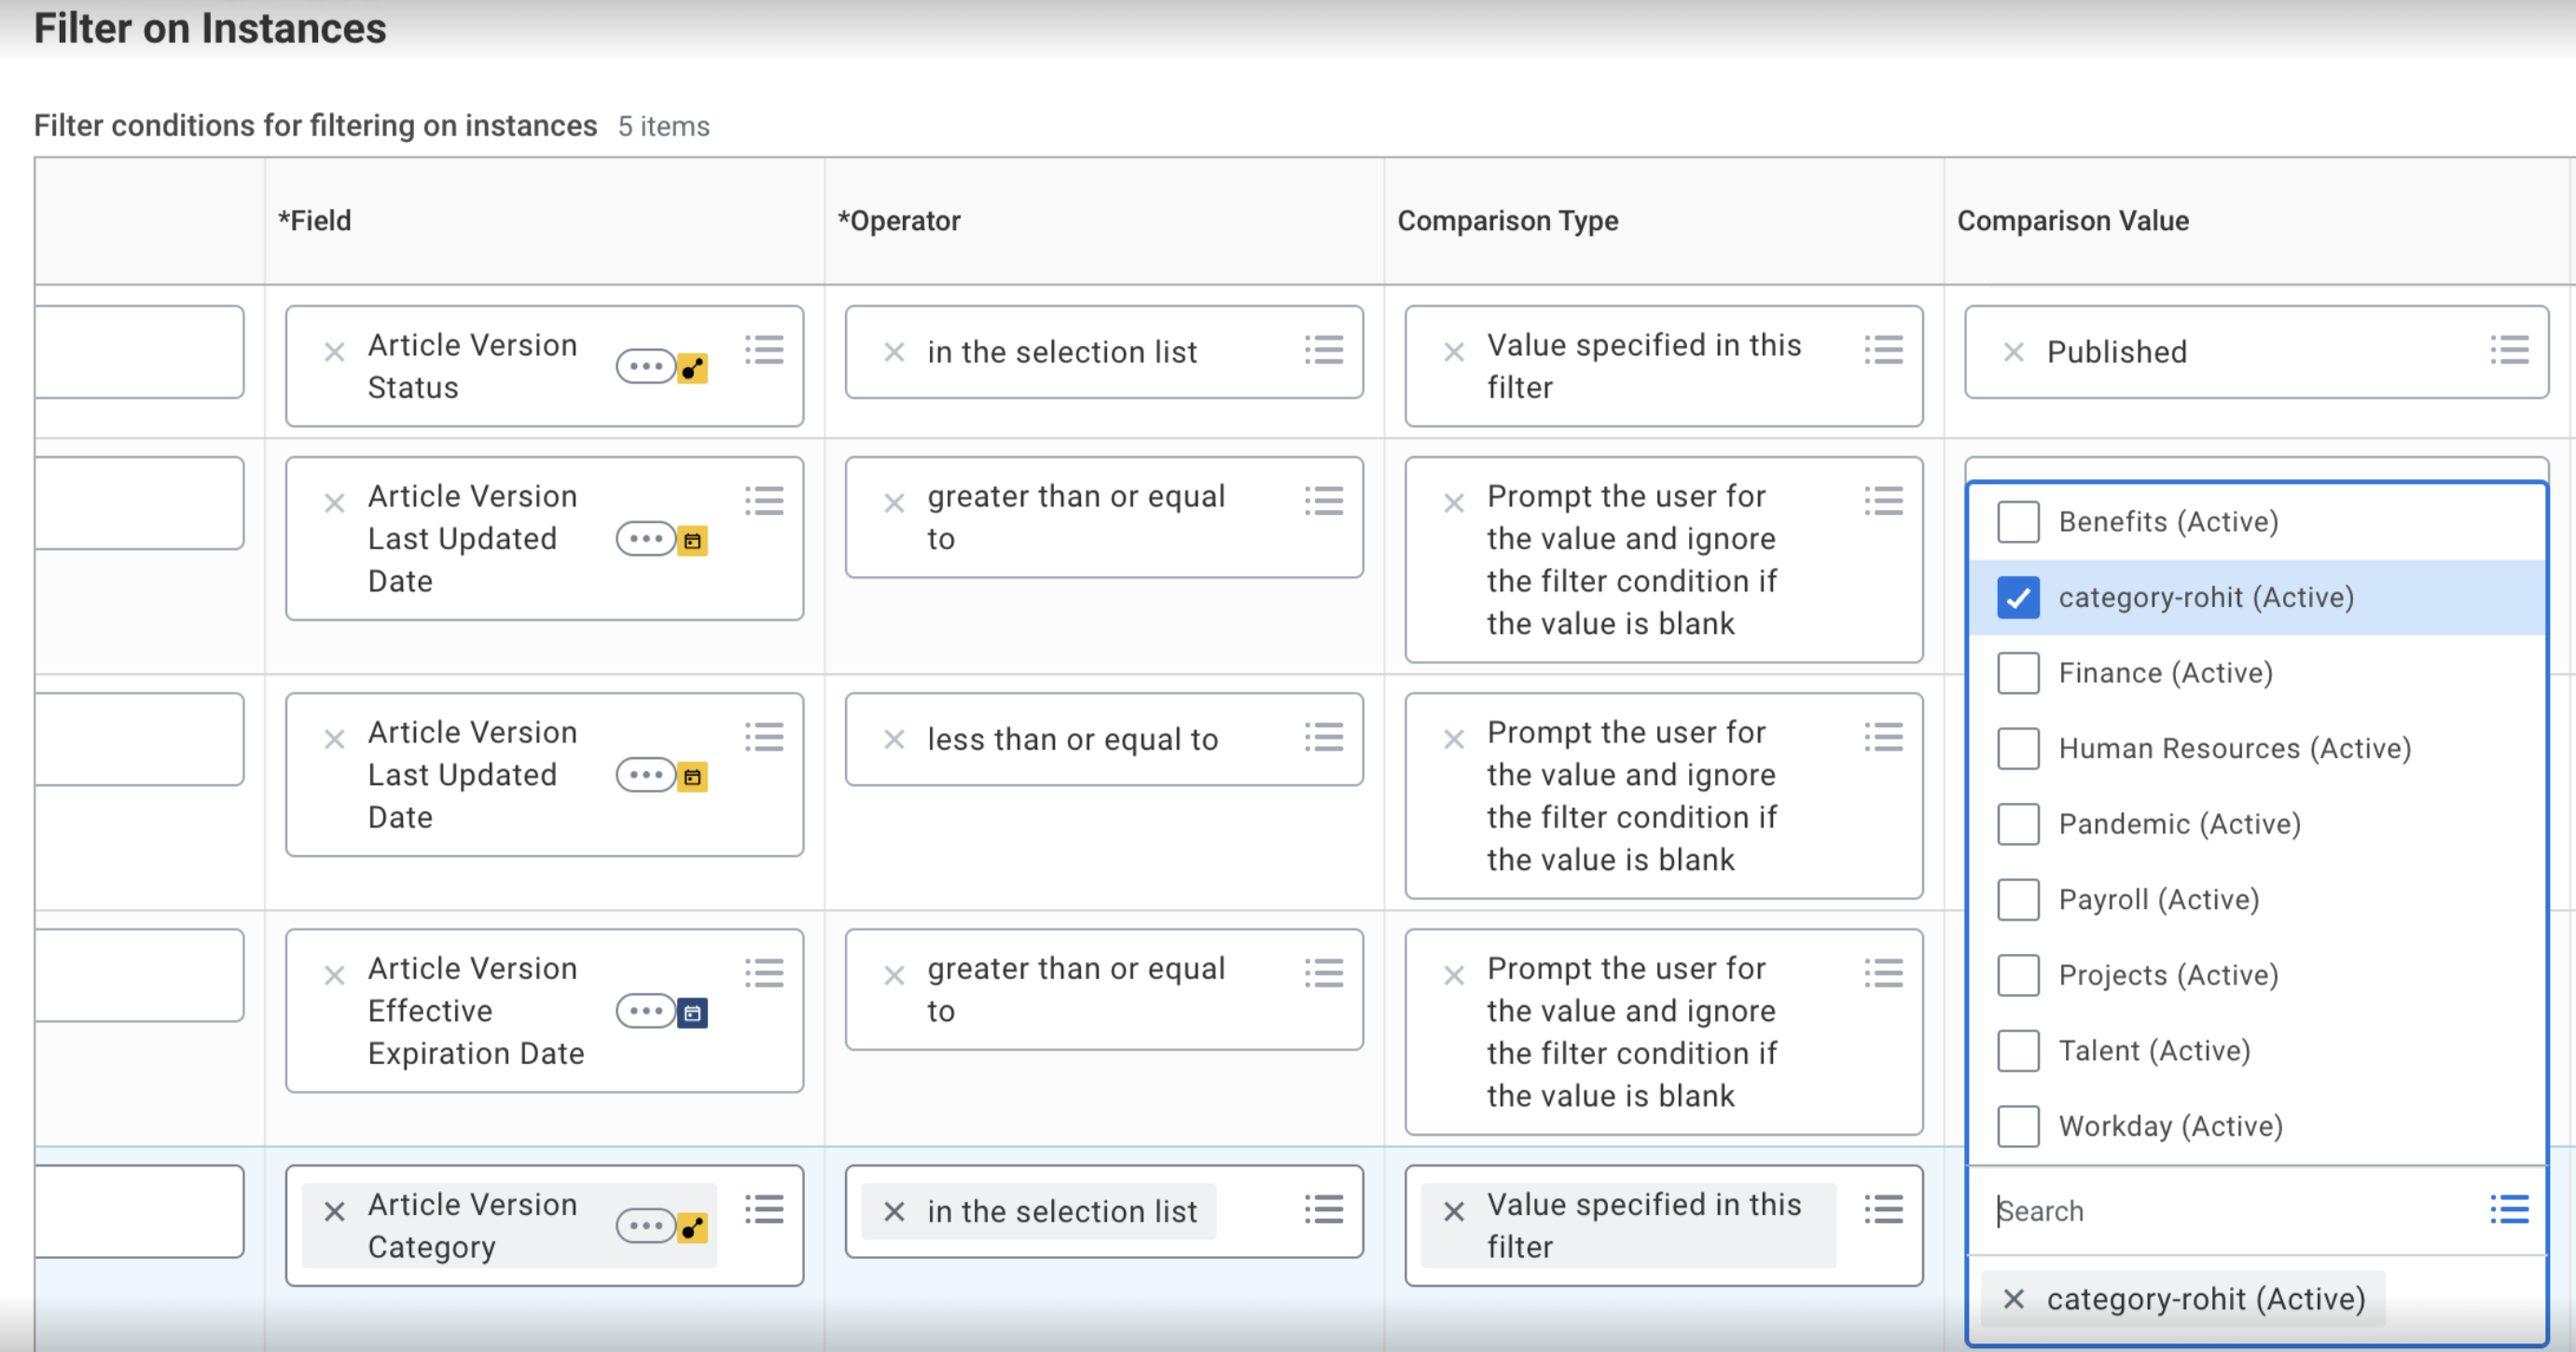
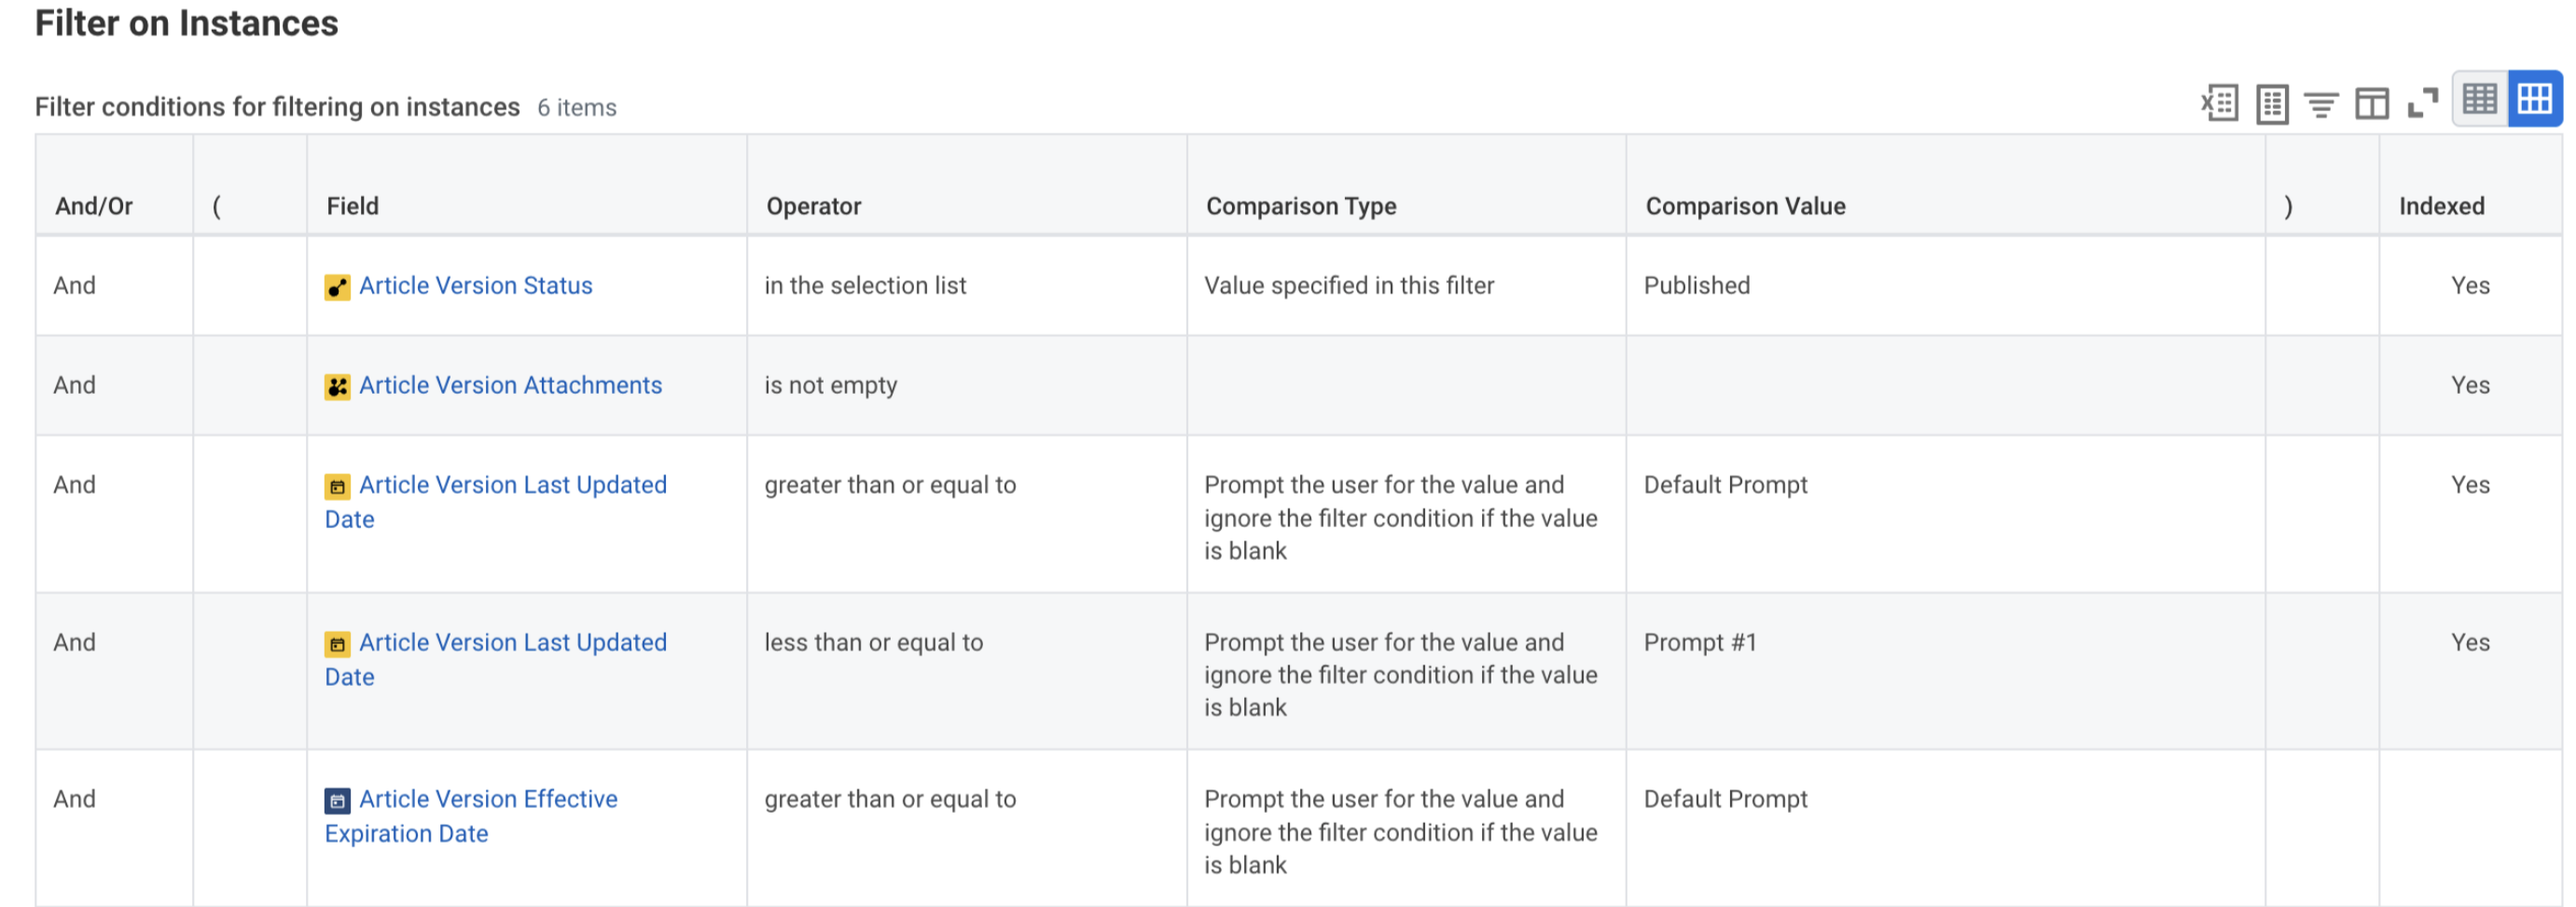
- Filter: In the Filter tab, add the following information.
Optional
-
For filtering articles based on metadata whether its “Category”, “Language”, “Expiry” or “Audience”.
-
Go to the filter tab, in the field add “category”, operator choose “in the selection list” and comparison type is “Value specified in this filter” and in comparison value choose the required category. Do the same for the rest of the metadata of articles. Note : Please choose the “AND” , “OR” filters as per your need.
For example: in the image below, you can see how we added filters for the desired category.
-
Similarly do for other fields as per your requirement.
-
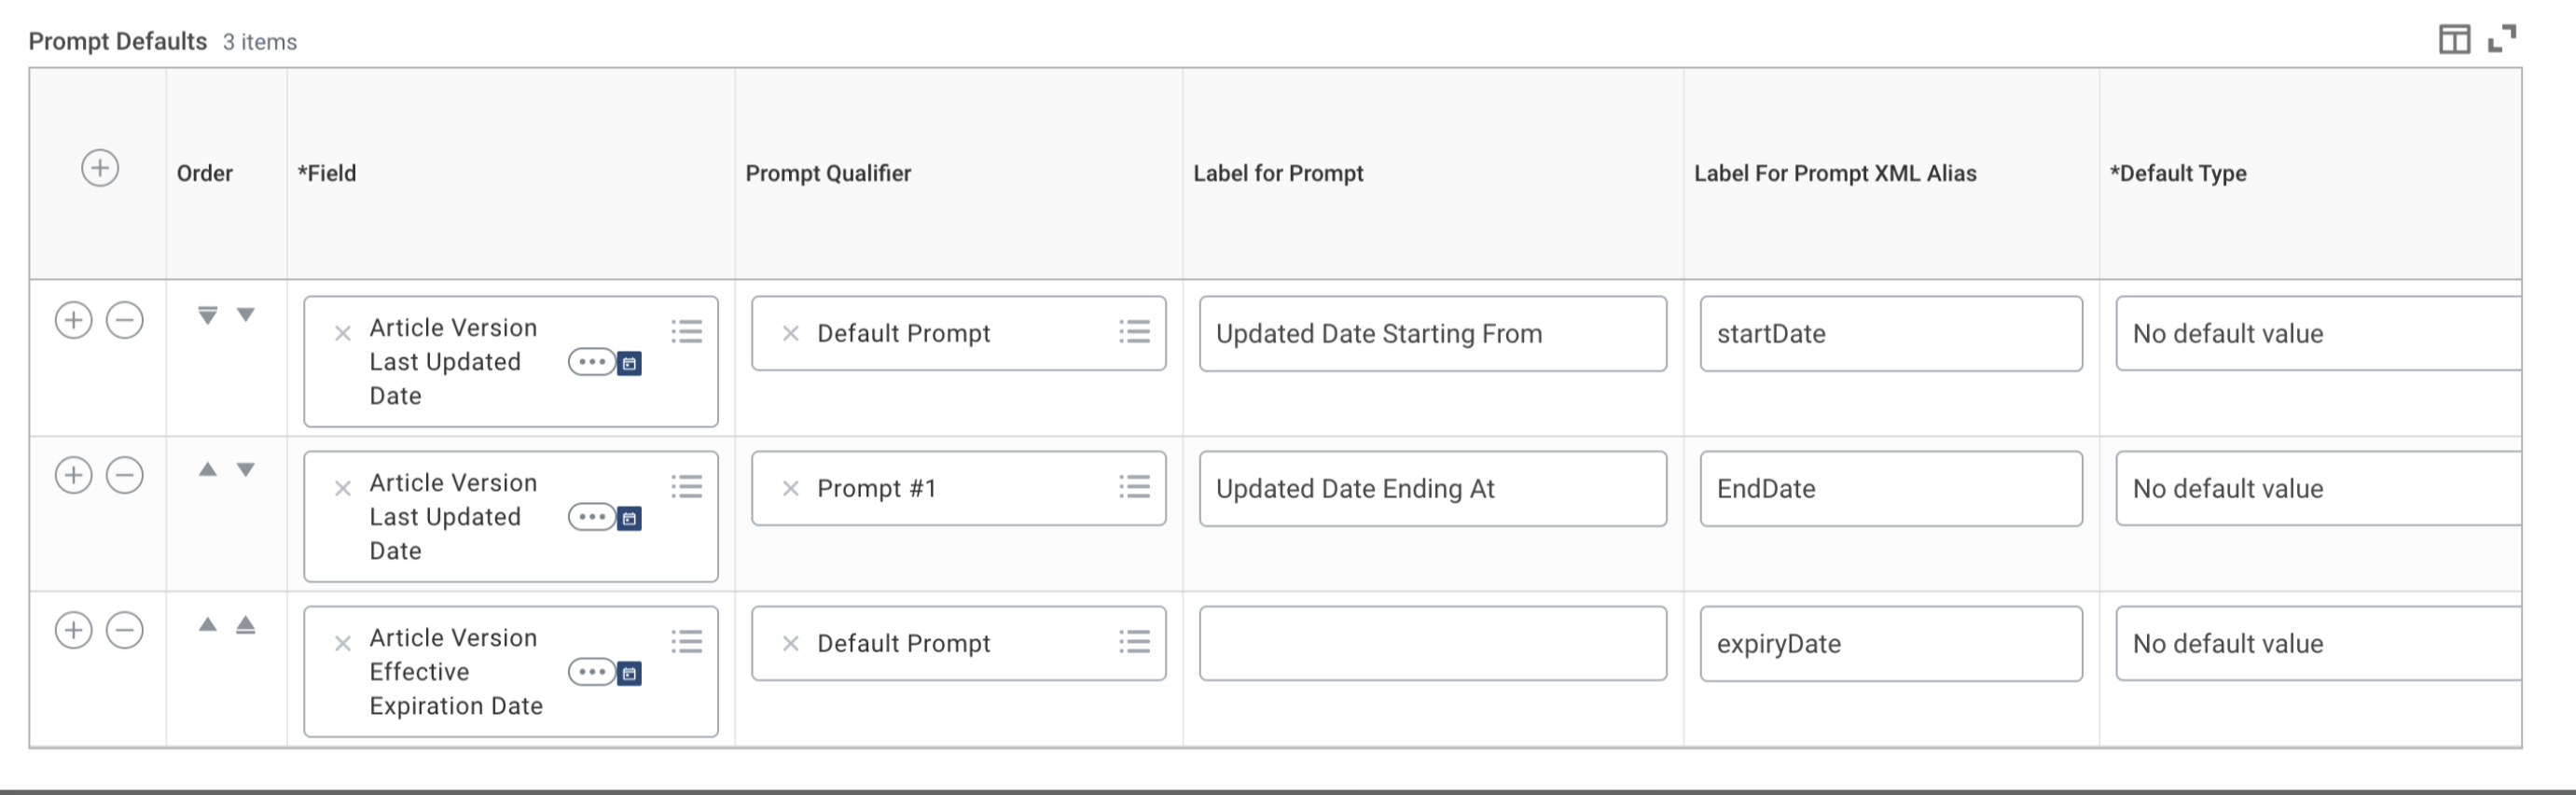
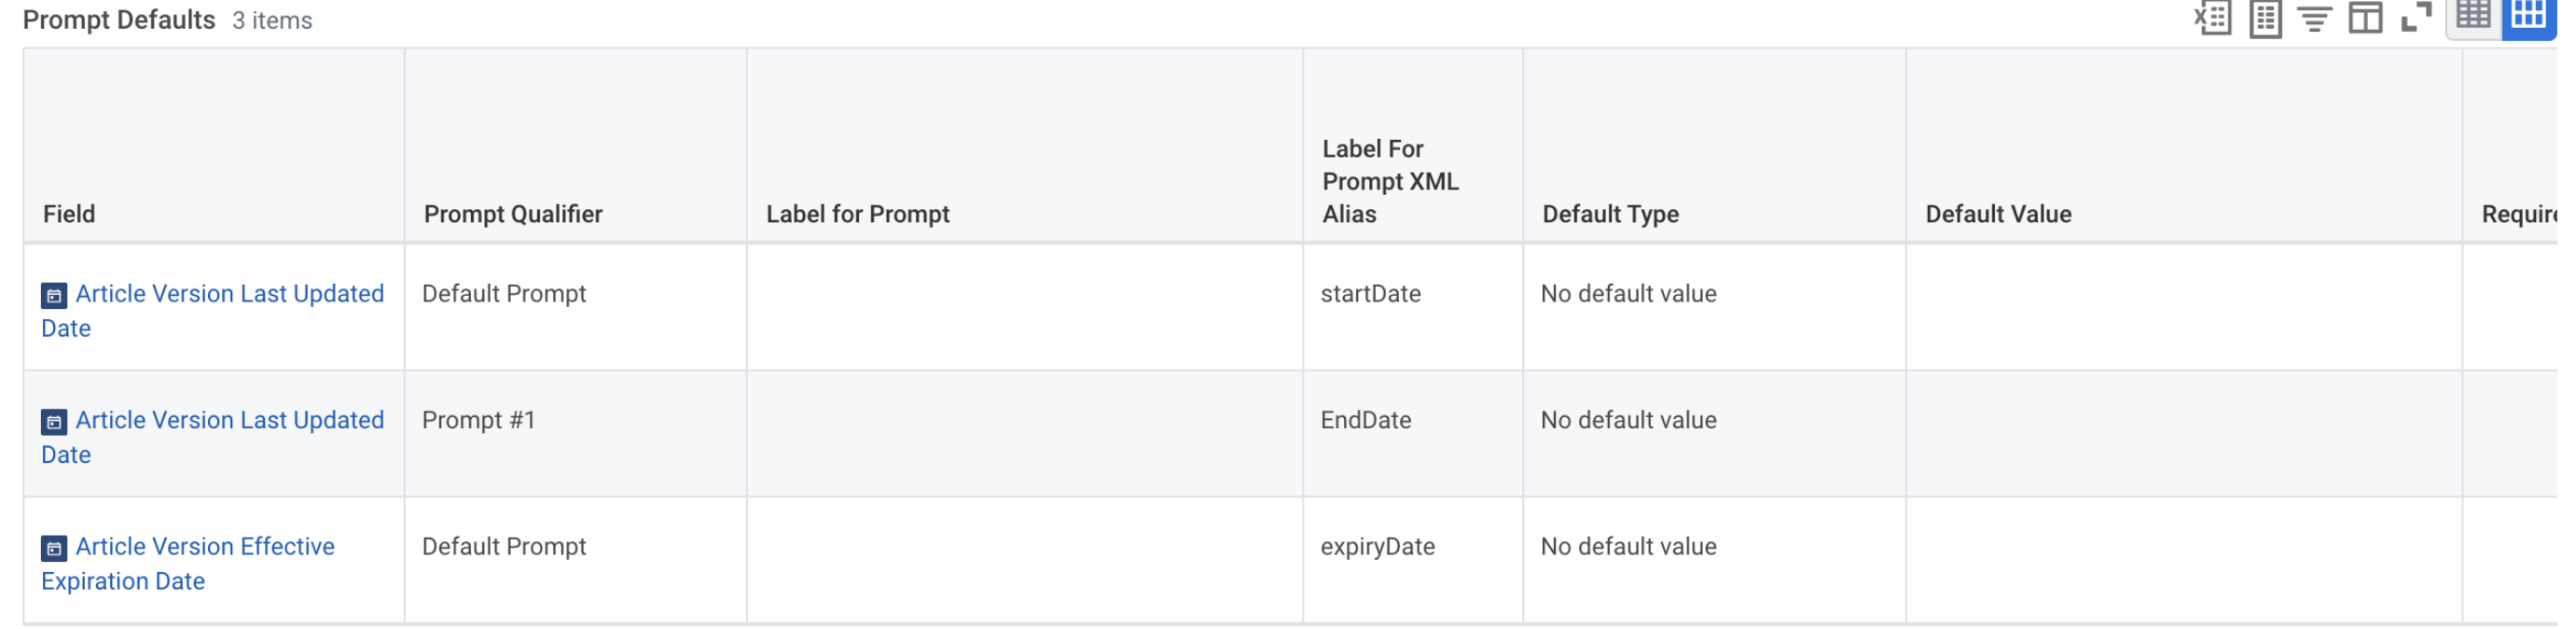
Prompts
- Go to Prompts tab and add the prompts as mentioned below.
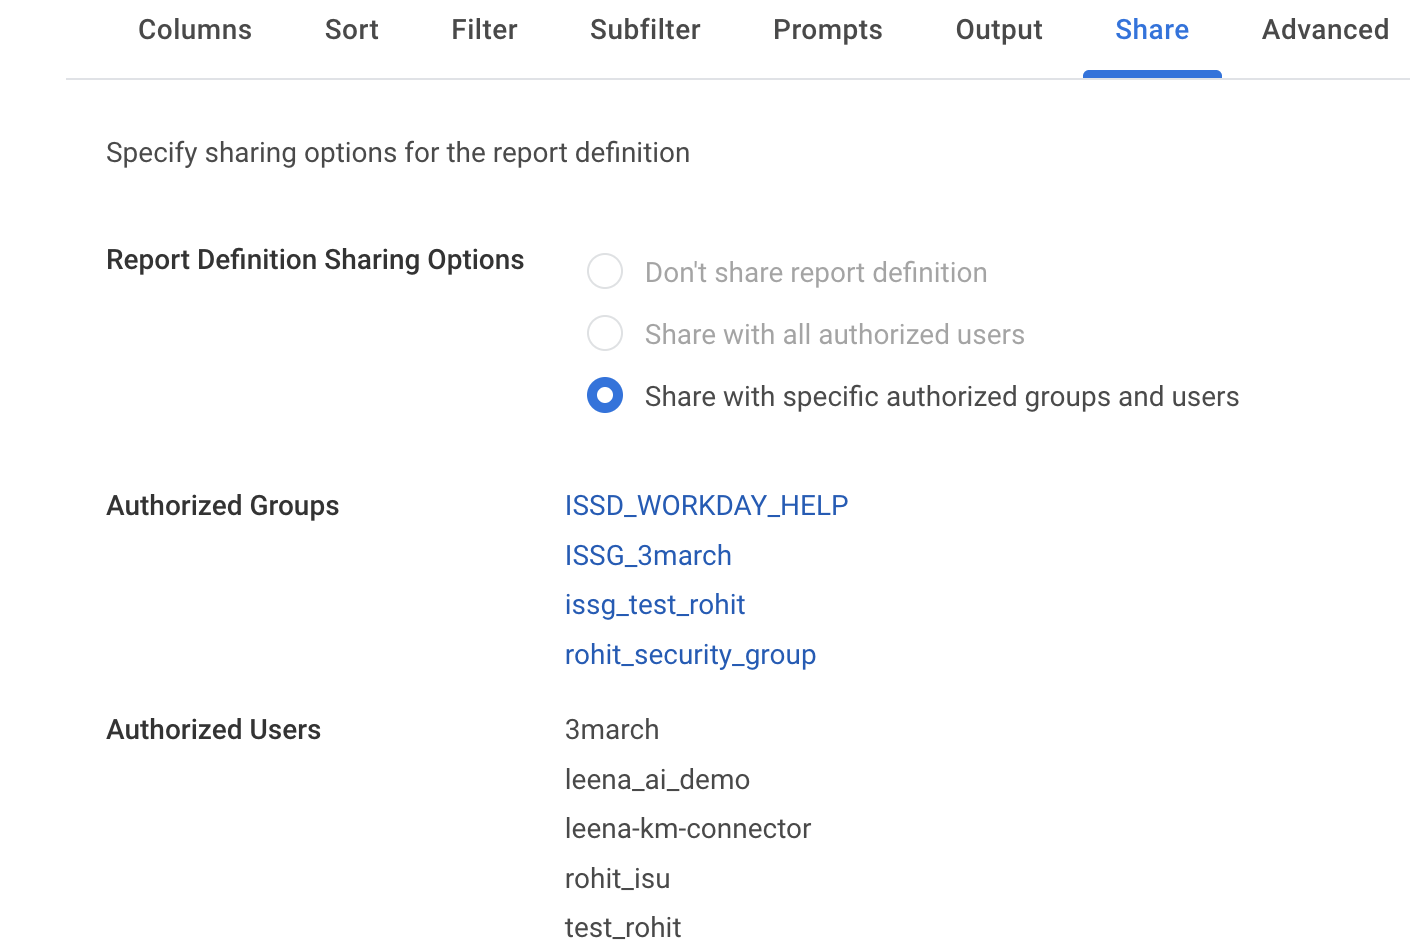
Share
-
Go to Report Definition Sharing Options within Share Tab.
-
Select Share with authorised groups and Share.
-
Within Authorised User share add your ISU user that you created before.
-
Within Authorised Groups selected ISSG group that you created above.
-
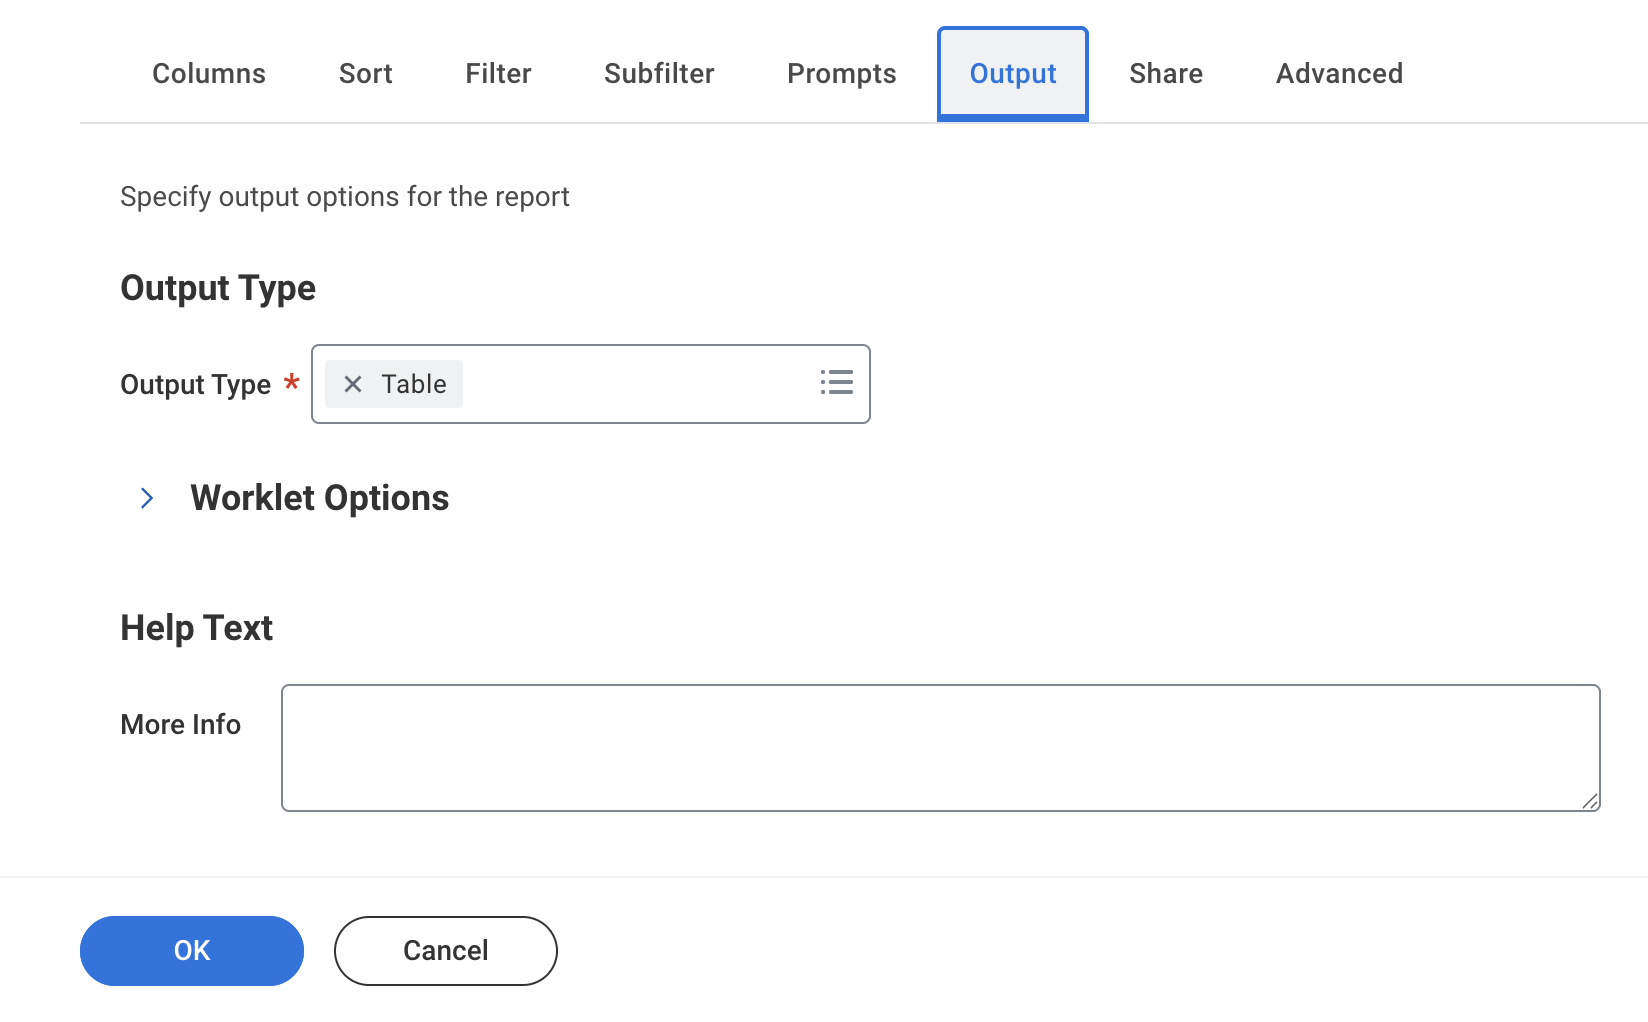
Finalizing
-
Output Tab: Ensure the output type is set to table.
-
Click OK to save and then Run to verify the data.
-
Report 2: All Articles – Attachment
Follow these steps to configure the attachment-specific report for the Workday connector.
1. Initial Setup
- Navigate to the Create Custom Report task in Workday.
- Enter the following header details:
| Field | Value |
|---|---|
| Report Name | All Articles – Attachment |
| Report Type | Advanced |
| Data Source | Knowledge Base Article Versions |
2. Verification
Before proceeding to columns, verify the following data source attributes:
- Data Source Type:
Indexed - Primary Business Object:
Article Version
Next Step: Under columns tab, map the following table.
| Business Object | Field | Column Heading Override XML Alias |
|---|---|---|
| Article Version | Article | articleVersionArticle |
| Article Version | Article Status (REST) | ArticleStatusREST |
| Article Version | Article Share Assignment | Article_Share_Assignment |
| Article Version | Article Version Audiences | articleVersionAudience |
| Article Version | Article Version Language | articleVersionLanguage |
| Article Version | Article Version Category | articleVersionCategory |
| Article Version | Article Version Title | articleVersionTitle |
| Article Version Attachments | Attachment | Attachment |
| Article Version Attachments | File Name | fileName |
| Article Version Attachments | Active Base64 Image Data | activeAttachmentContent |
| Article Version Attachments | Reference ID | referenceID |
| Article Version Attachments | Workday ID | workdayID_attachment |
| Article | Workday ID | workdayID |
| Article Version | Current Effective Date | Current_Effective_Date |
| Article Version | Article Version Last Updated By | articleVersionLastUpdatedBy |
| Article Version Attachments | Content Type | contentType |
| Article Version | Article Version Created Date | articleVersionCreatedDate |
| Article Version | Article Version Last Updated Date | lastUpdateDate |
| Article Version | Article Version Last Updated Date | articleVersionLastUpdatedDate |
| Article | Last Functionally Updated | Last_Functionally_Updated |
| Article Version | Article Version Effective Expiration Date | Article_Version_Effective_Expiration_Date |
- Group Column Headings:
To maintain the correct data structure for the Workday connector, configure the following in the Group Column Headings section at the bottom of the Columns tab:
| Business Object | Group Column Heading XML Alias |
|---|---|
| Article Version Attachments | articleVersionAttachments_group |
| Article | articleVersionArticle_group |
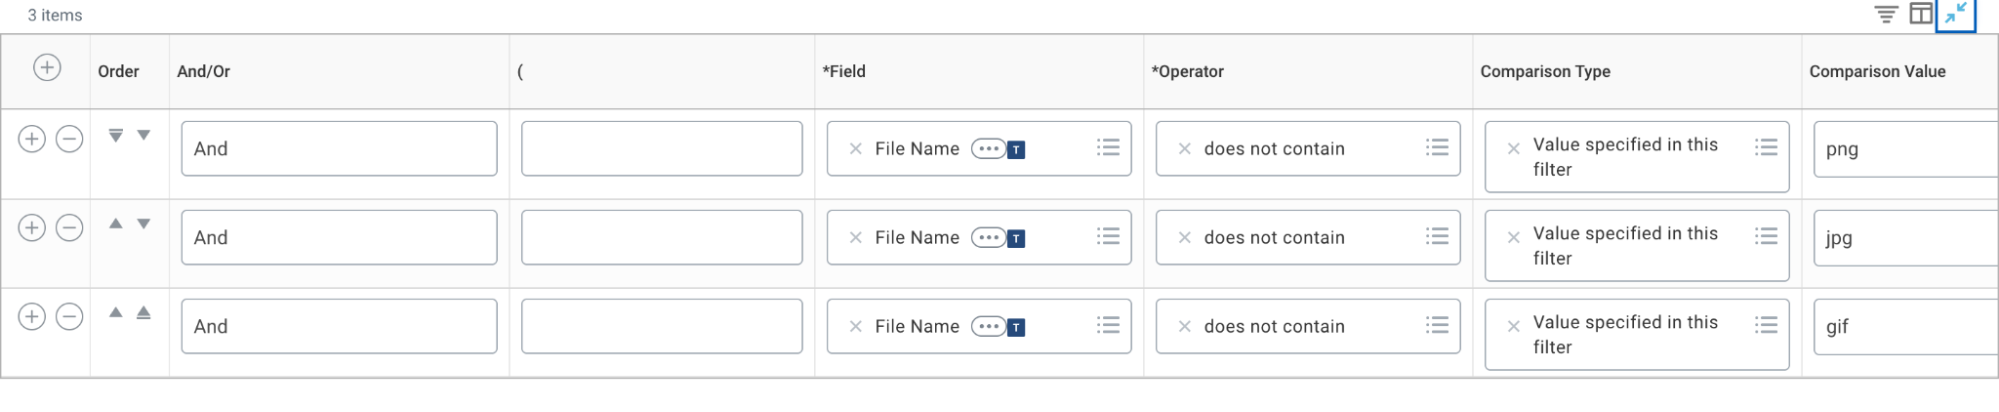
- Filters: Map the following information under Filters tab.
Optional
- For filtering articles based on metadata whether its “Category”, “Language”, “Expiry” or “Audience”.
- Go to the filter tab, in the field add “category”, operator choose “in the selection list” and comparison type is “Value specified in this filter” and in comparison value choose the required category. Do the same for the rest of the metadata of articles. Note : Please choose the “AND” , “OR” filters as per your need.
- Sub-filters:
File Namedoes not containpng,jpg, orgif.
-
Prompt
- Go Prompts taband add the prompts as mentioned below.
-
Share
- Go to Report Definition Sharing Options within ShareTab.
- Select Share with authorised groups and Share.
- Within Authorised User share add your ISU user that you created before.
- Within Authorised Groups selected ISSG group that you created above.
-
Finalizing
- Output Tab: Ensure the output type is set to table.
- Click OK to save and then Run to verify the data.
Please note: The user can create audience via methods:
- Security groups
- Custom audience group
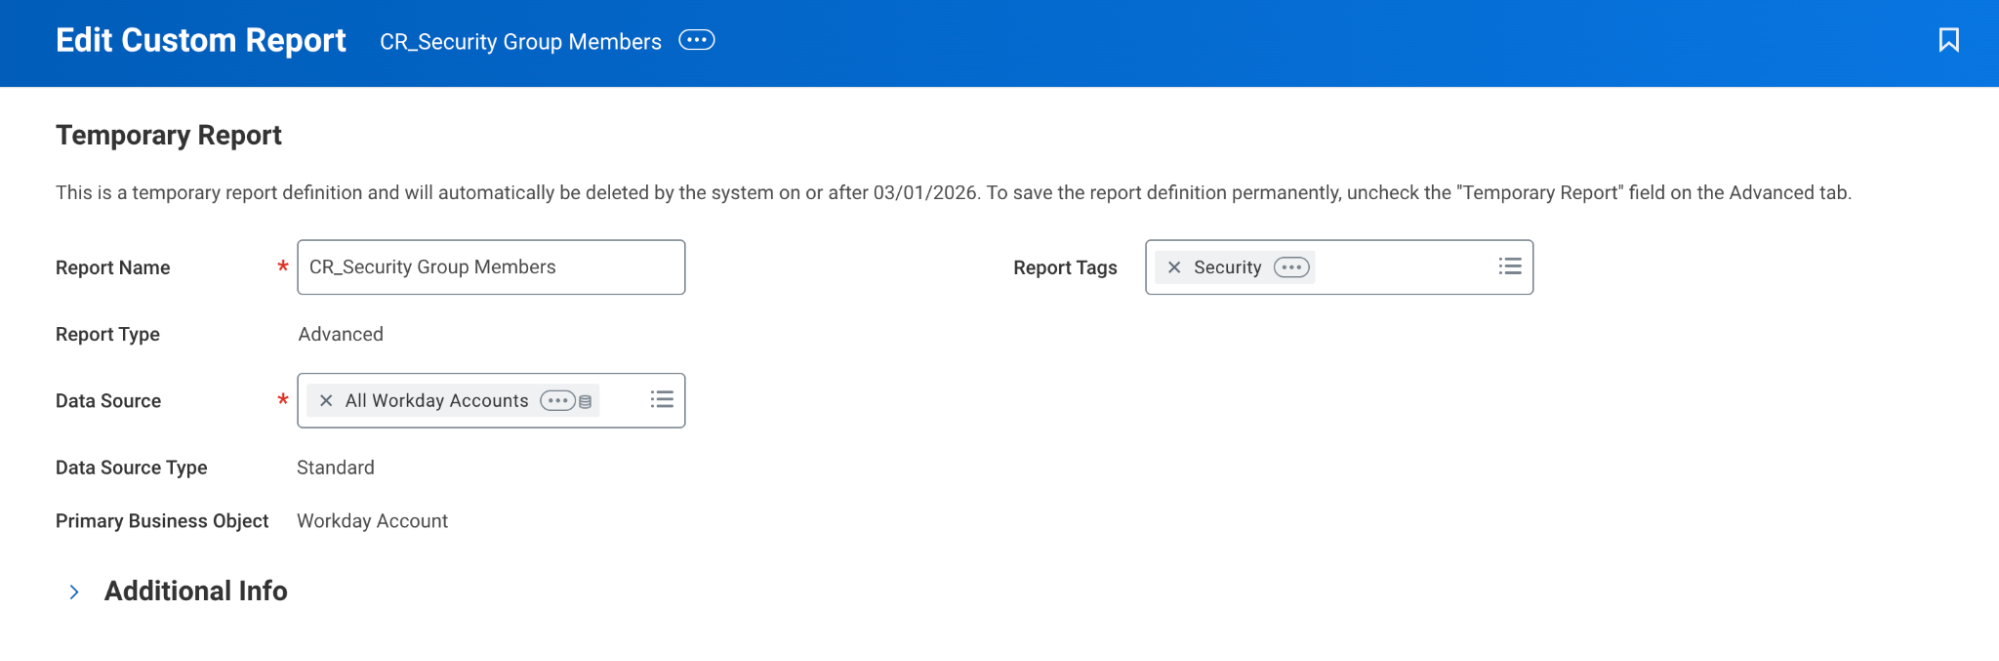
Report 3.1: CR_Security Group Members
Follow these steps to set up the security group membership report in Workday:
1. Task Initialization
- Task: Search for and select Create Custom Report.
2. Report Details
Enter the following information in the header:
| Field | Value |
|---|---|
| Report Name | CR_Security Group Members |
| Report Type | Advanced |
| Data Source | All Workday Accounts |
| Report Tags | Security |
Next Step: List the Defining Report Columns and their corresponding XML Aliases for this security report.
| Business Object | Field | Column Heading Override XML Alias |
|---|---|---|
| Worker | Worker | Worker |
| Worker | Email - Work | Email_-_Work |
| Worker | Workday ID | workdayID |
-
Group Column Headings: Set Business Object: Worker | XML Alias: Worker_group
-
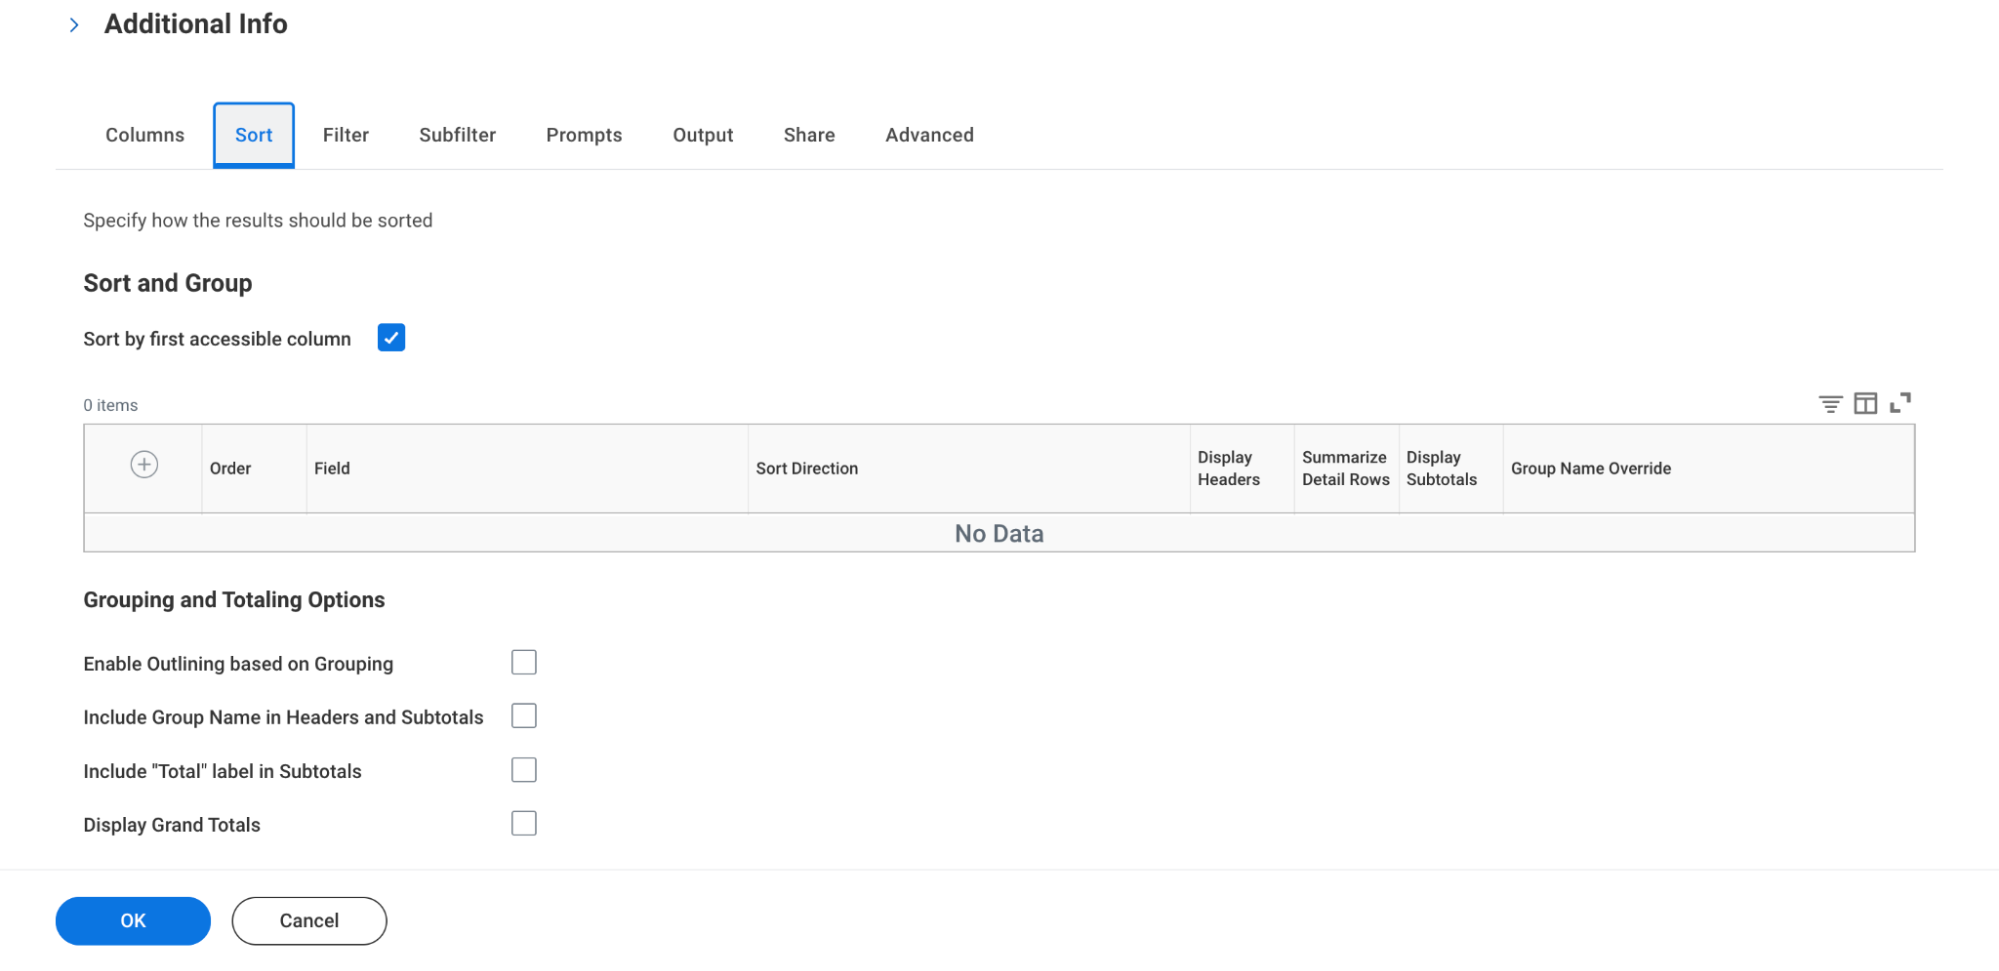
Sort: On the Sort tab, ensure Sort by first accessible column is checked.
-
Filter: Add
Security Groupsfield as shown below.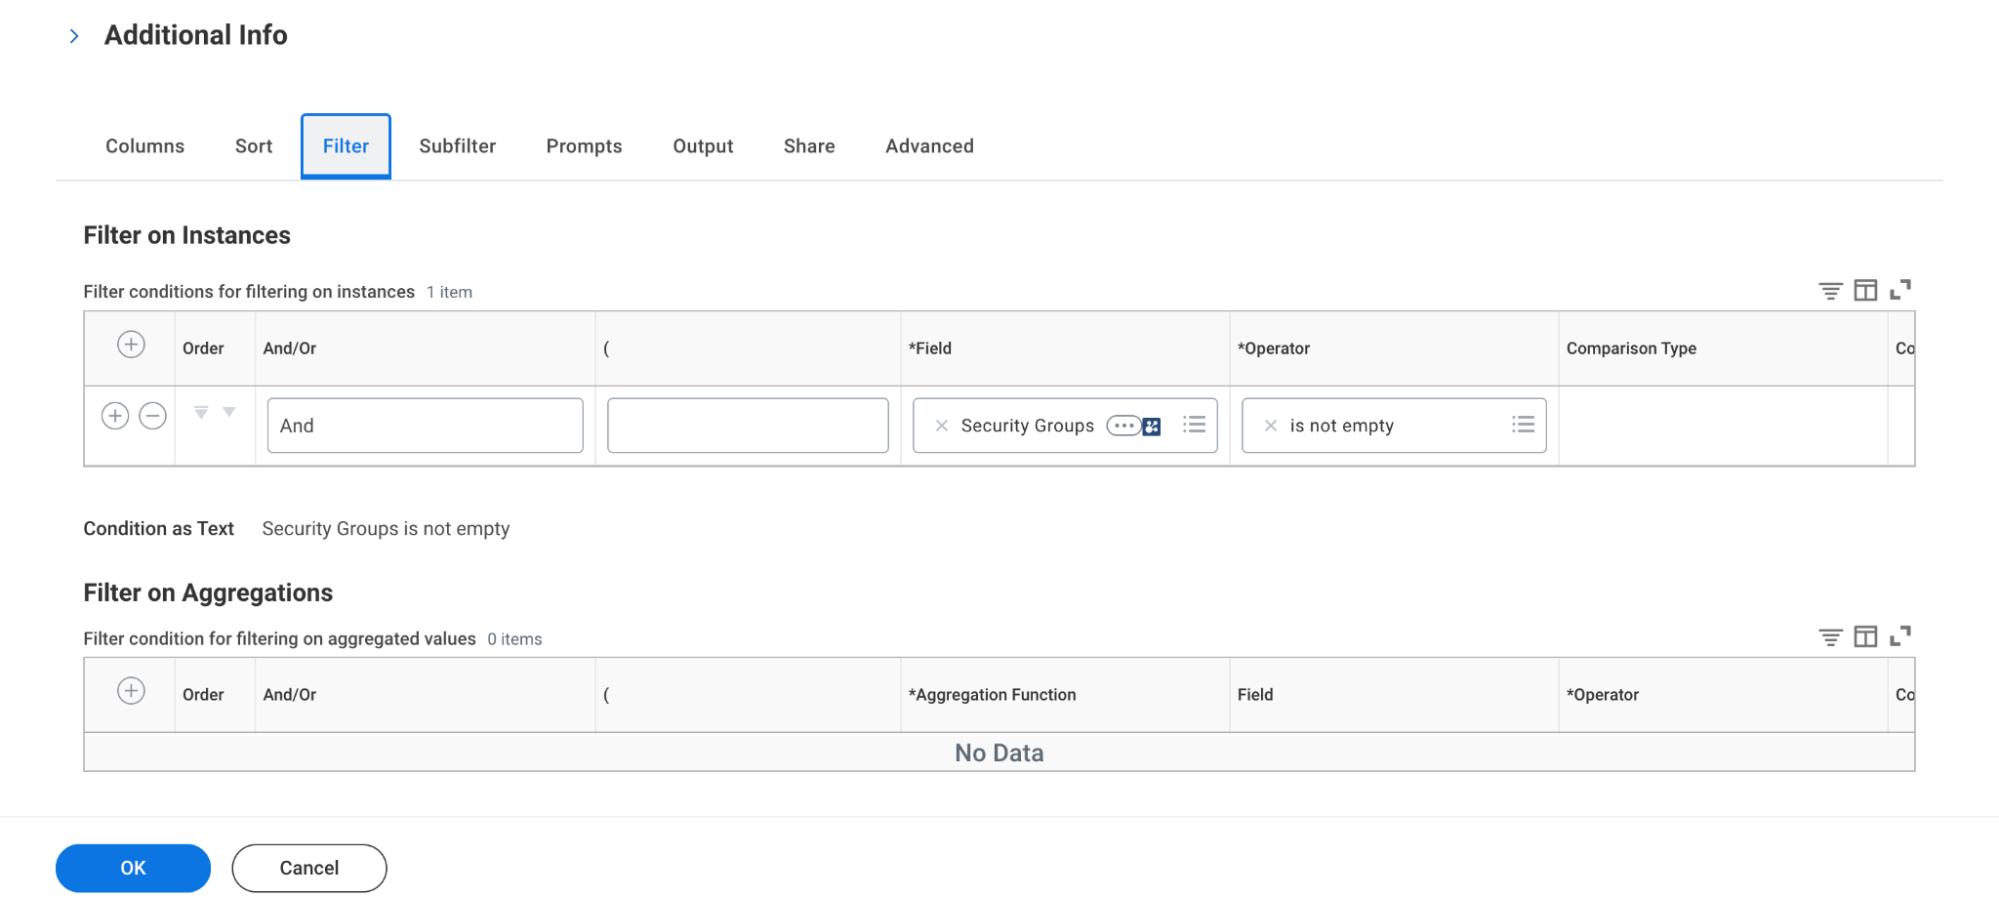
-
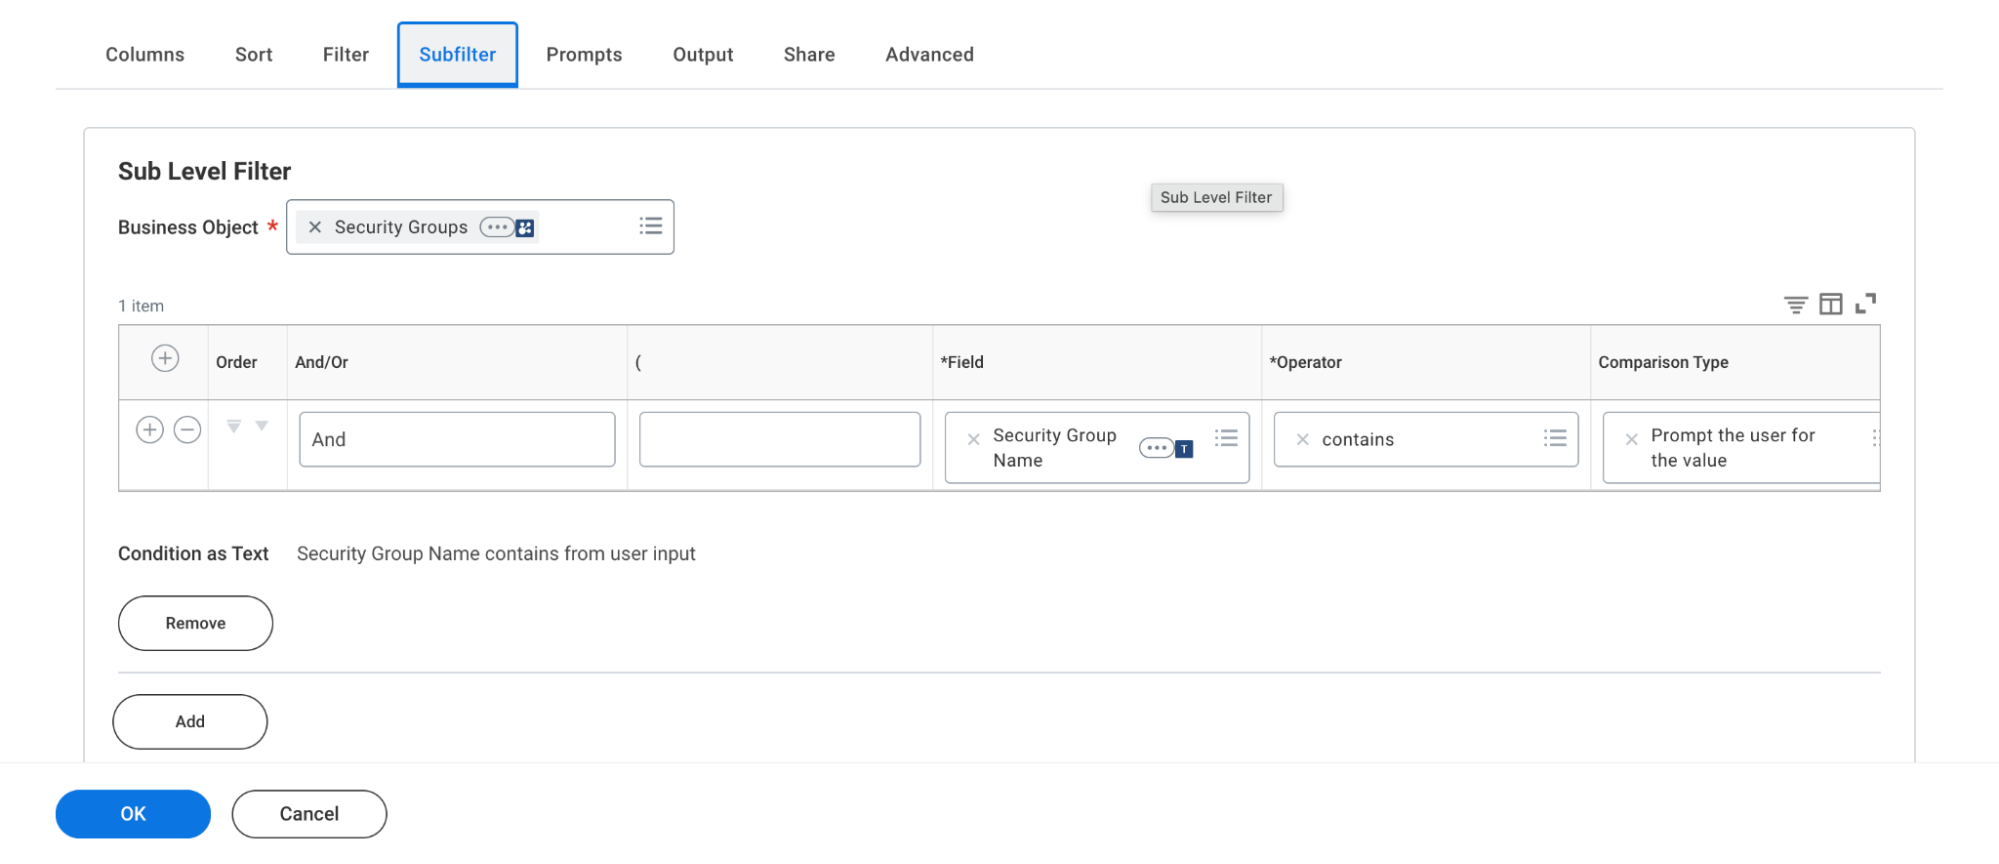
Sub-filter: Within the Subfilter tab, select Security Groups as the Business Object and add the condition: Security Group Name | contains | Prompt the user for the value.
-
Prompts and Output
-
Configure the following settings to ensure the report handles parameters and data display correctly:
1. Prompts- Date Settings: Set both Effective Date and Entry Date to
Use date and time at runtime. - Display Settings: Enable the checkbox for Display Prompt Values in Subtitle.
- Prompt Defaults: Add the following default configuration:
Field Prompt Qualifier XML Alias Security Group Name Default PromptSecurity_Group_Name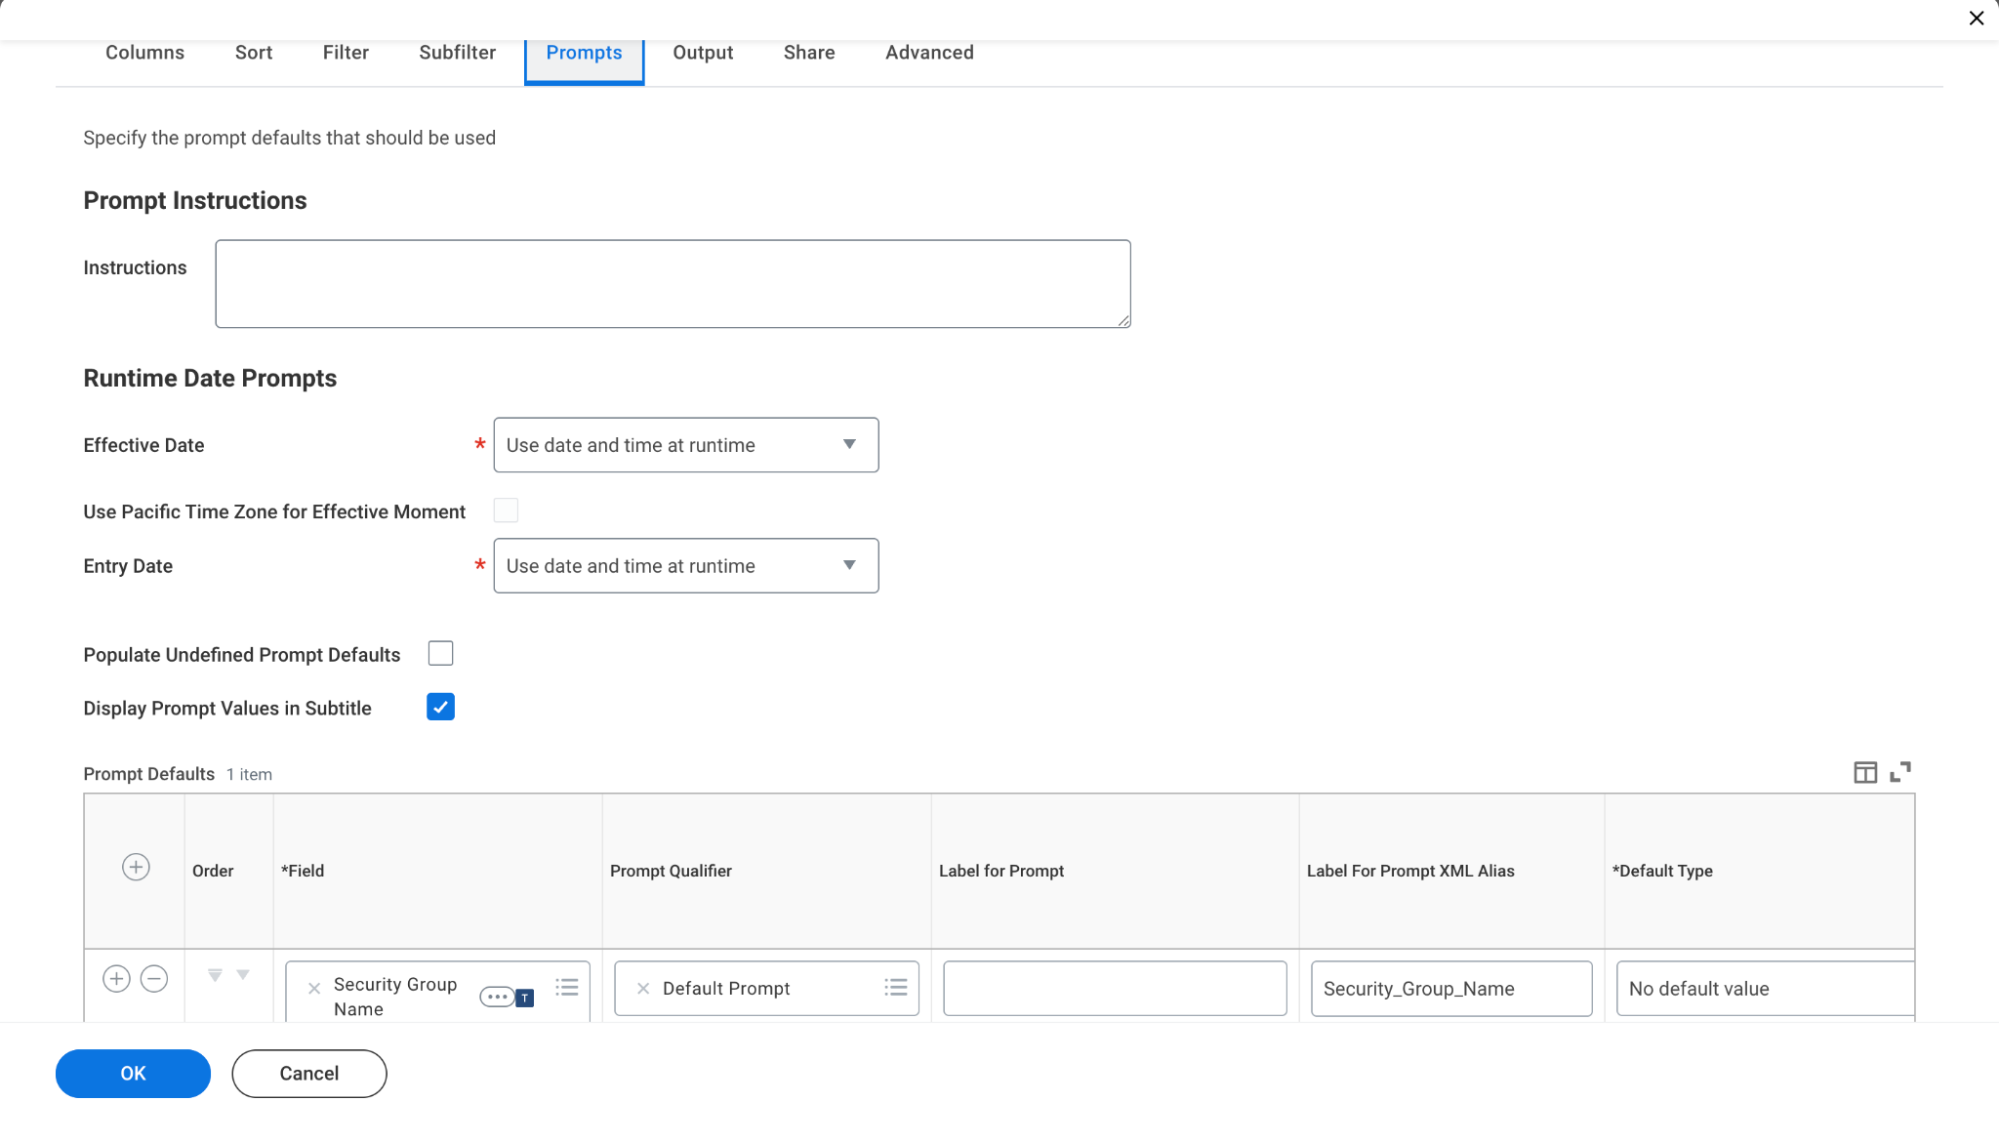 2. Output
- Navigate to the Output tab.
- Output Type: Select
Table.
- Date Settings: Set both Effective Date and Entry Date to
-
-
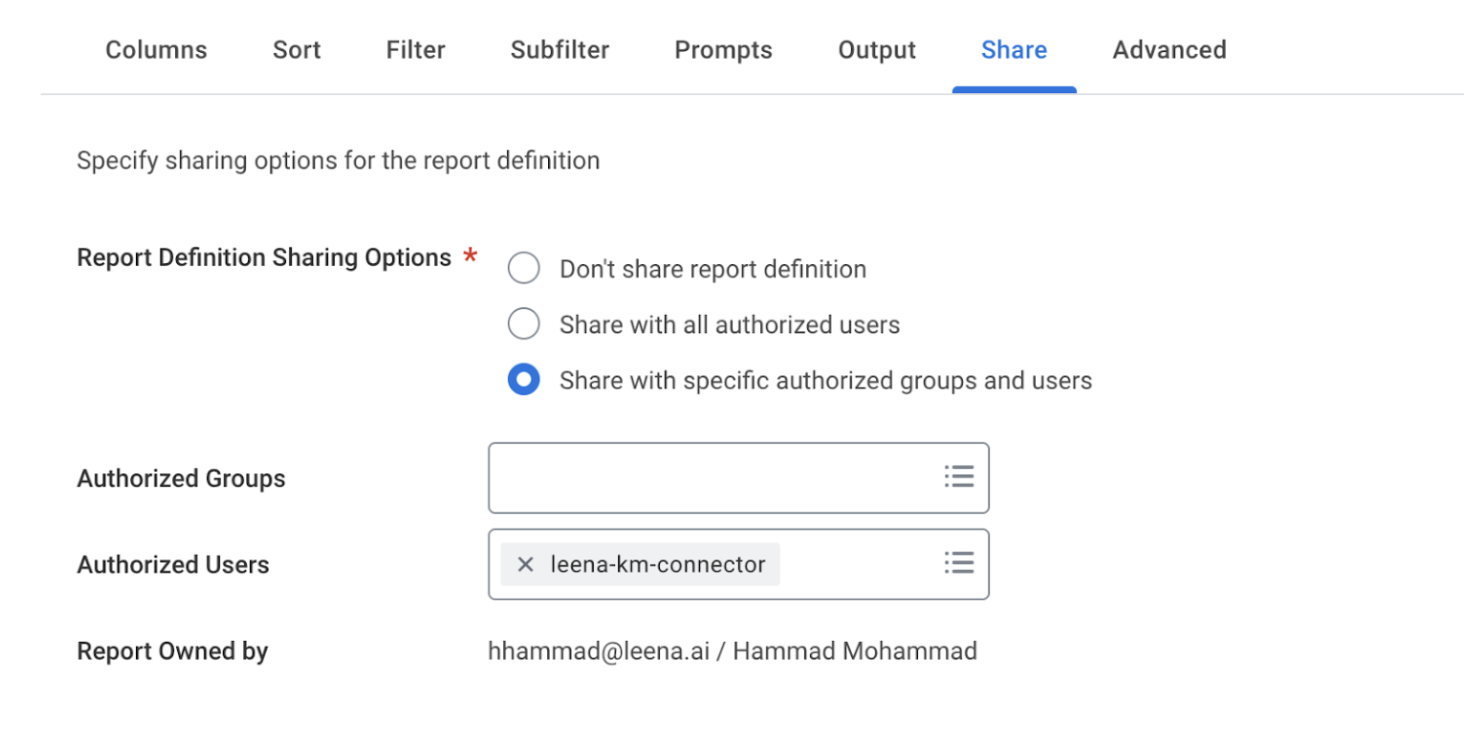
Report Sharing Configuration
To ensure Leena AI can access the generated data, configure the security settings as follows:
-
Navigate to the Share tab.
-
Select the radio button: Share with specific authorized groups and users.
-
In the Authorized Users field, add:
leena-km-connector. -
Click OK to save and finalize the report.
-
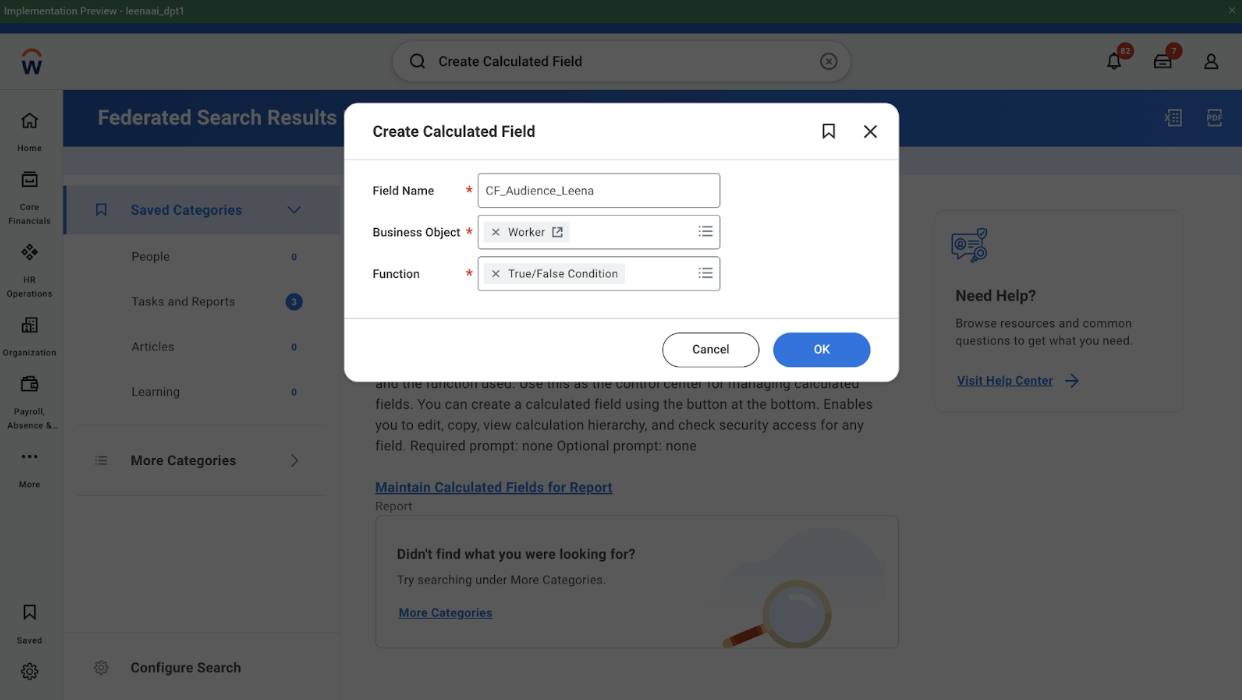
Report 3.2: Custom Audience ReportPhase 1: Build Individual Audience Calculated FieldsStep 1.1 — Navigate to Calculated Field Creation- In the Workday search bar, type Create Calculated Field and select the task
- Ensure you have the required security domain: Manage: Calculated Fields
Step 1.2 — Create the First Audience Field (Audience A)Fill in the Create Calculated Field form:
- Field Name:
CF_Audience_A_Leena - Business Object:
Worker - Function:
True/False Condition
Click OK to proceed to the field configuration page.
Step 1.3 — Define the Conditional Rules for Audience AIn the True/False Condition editor, configure rules using AND logic:
Order Field Operator Value 1 Primary Work Location → Country equal to India 2 Job Family equal to Engineering 3 Hire Date greater than or equal to 01/01/2023 4 Active Status equal to Yes - Set the And/Or connector to AND between all rules
- Save the field
Workday will validate that the field returns Yes/No per worker.
Repeat the same process for all custom audience groups (Audience B, C, etc.) with their respective rules.
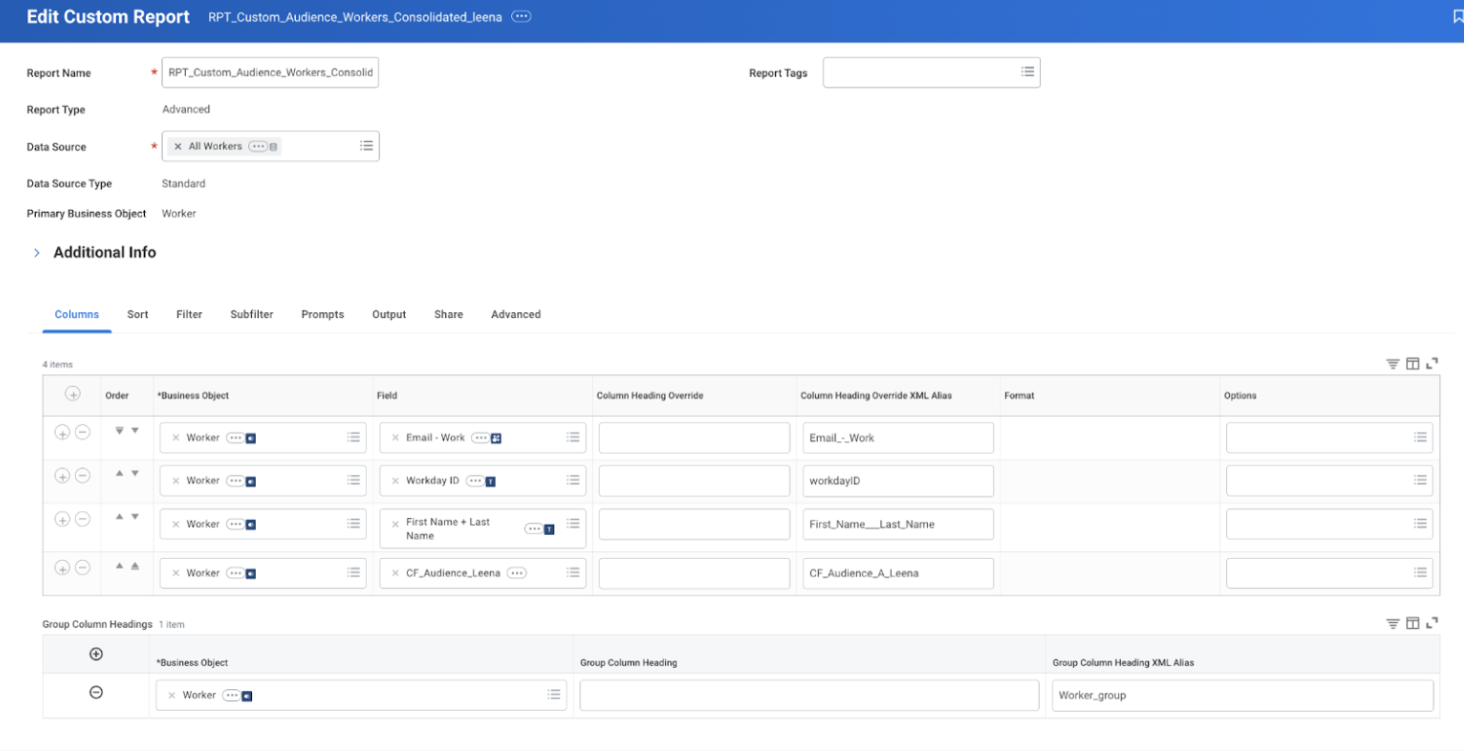
Phase 2: Build the Master ReportStep 2.1 — Create the Advanced Report-
Search for Create Custom Report in Workday
-
Fill in the following details:
- Report Name:
RPT_Custom_Audience_Workers_Consolidated - Report Type:
Advanced - Data Source:
All Workers
(or useAll Active Employeesif only active workers are required) - Business Object: Auto-populates to
Worker
- Report Name:
Click OK.
Step 2.2 — Add ColumnsGo to the Columns tab and add the following fields in order:
- Employee ID
- Worker (Name)
- Primary Work Email
- CF_Audience_A_Leena
- CF_Audience_B_Leena
- CF_Audience_C_Leena
- (Continue adding additional audience fields as needed)
-
And then share the report with the ISU and ISSG created above
This structure ensures a single consolidated report showing which workers belong to which audience segments via calculated fields.
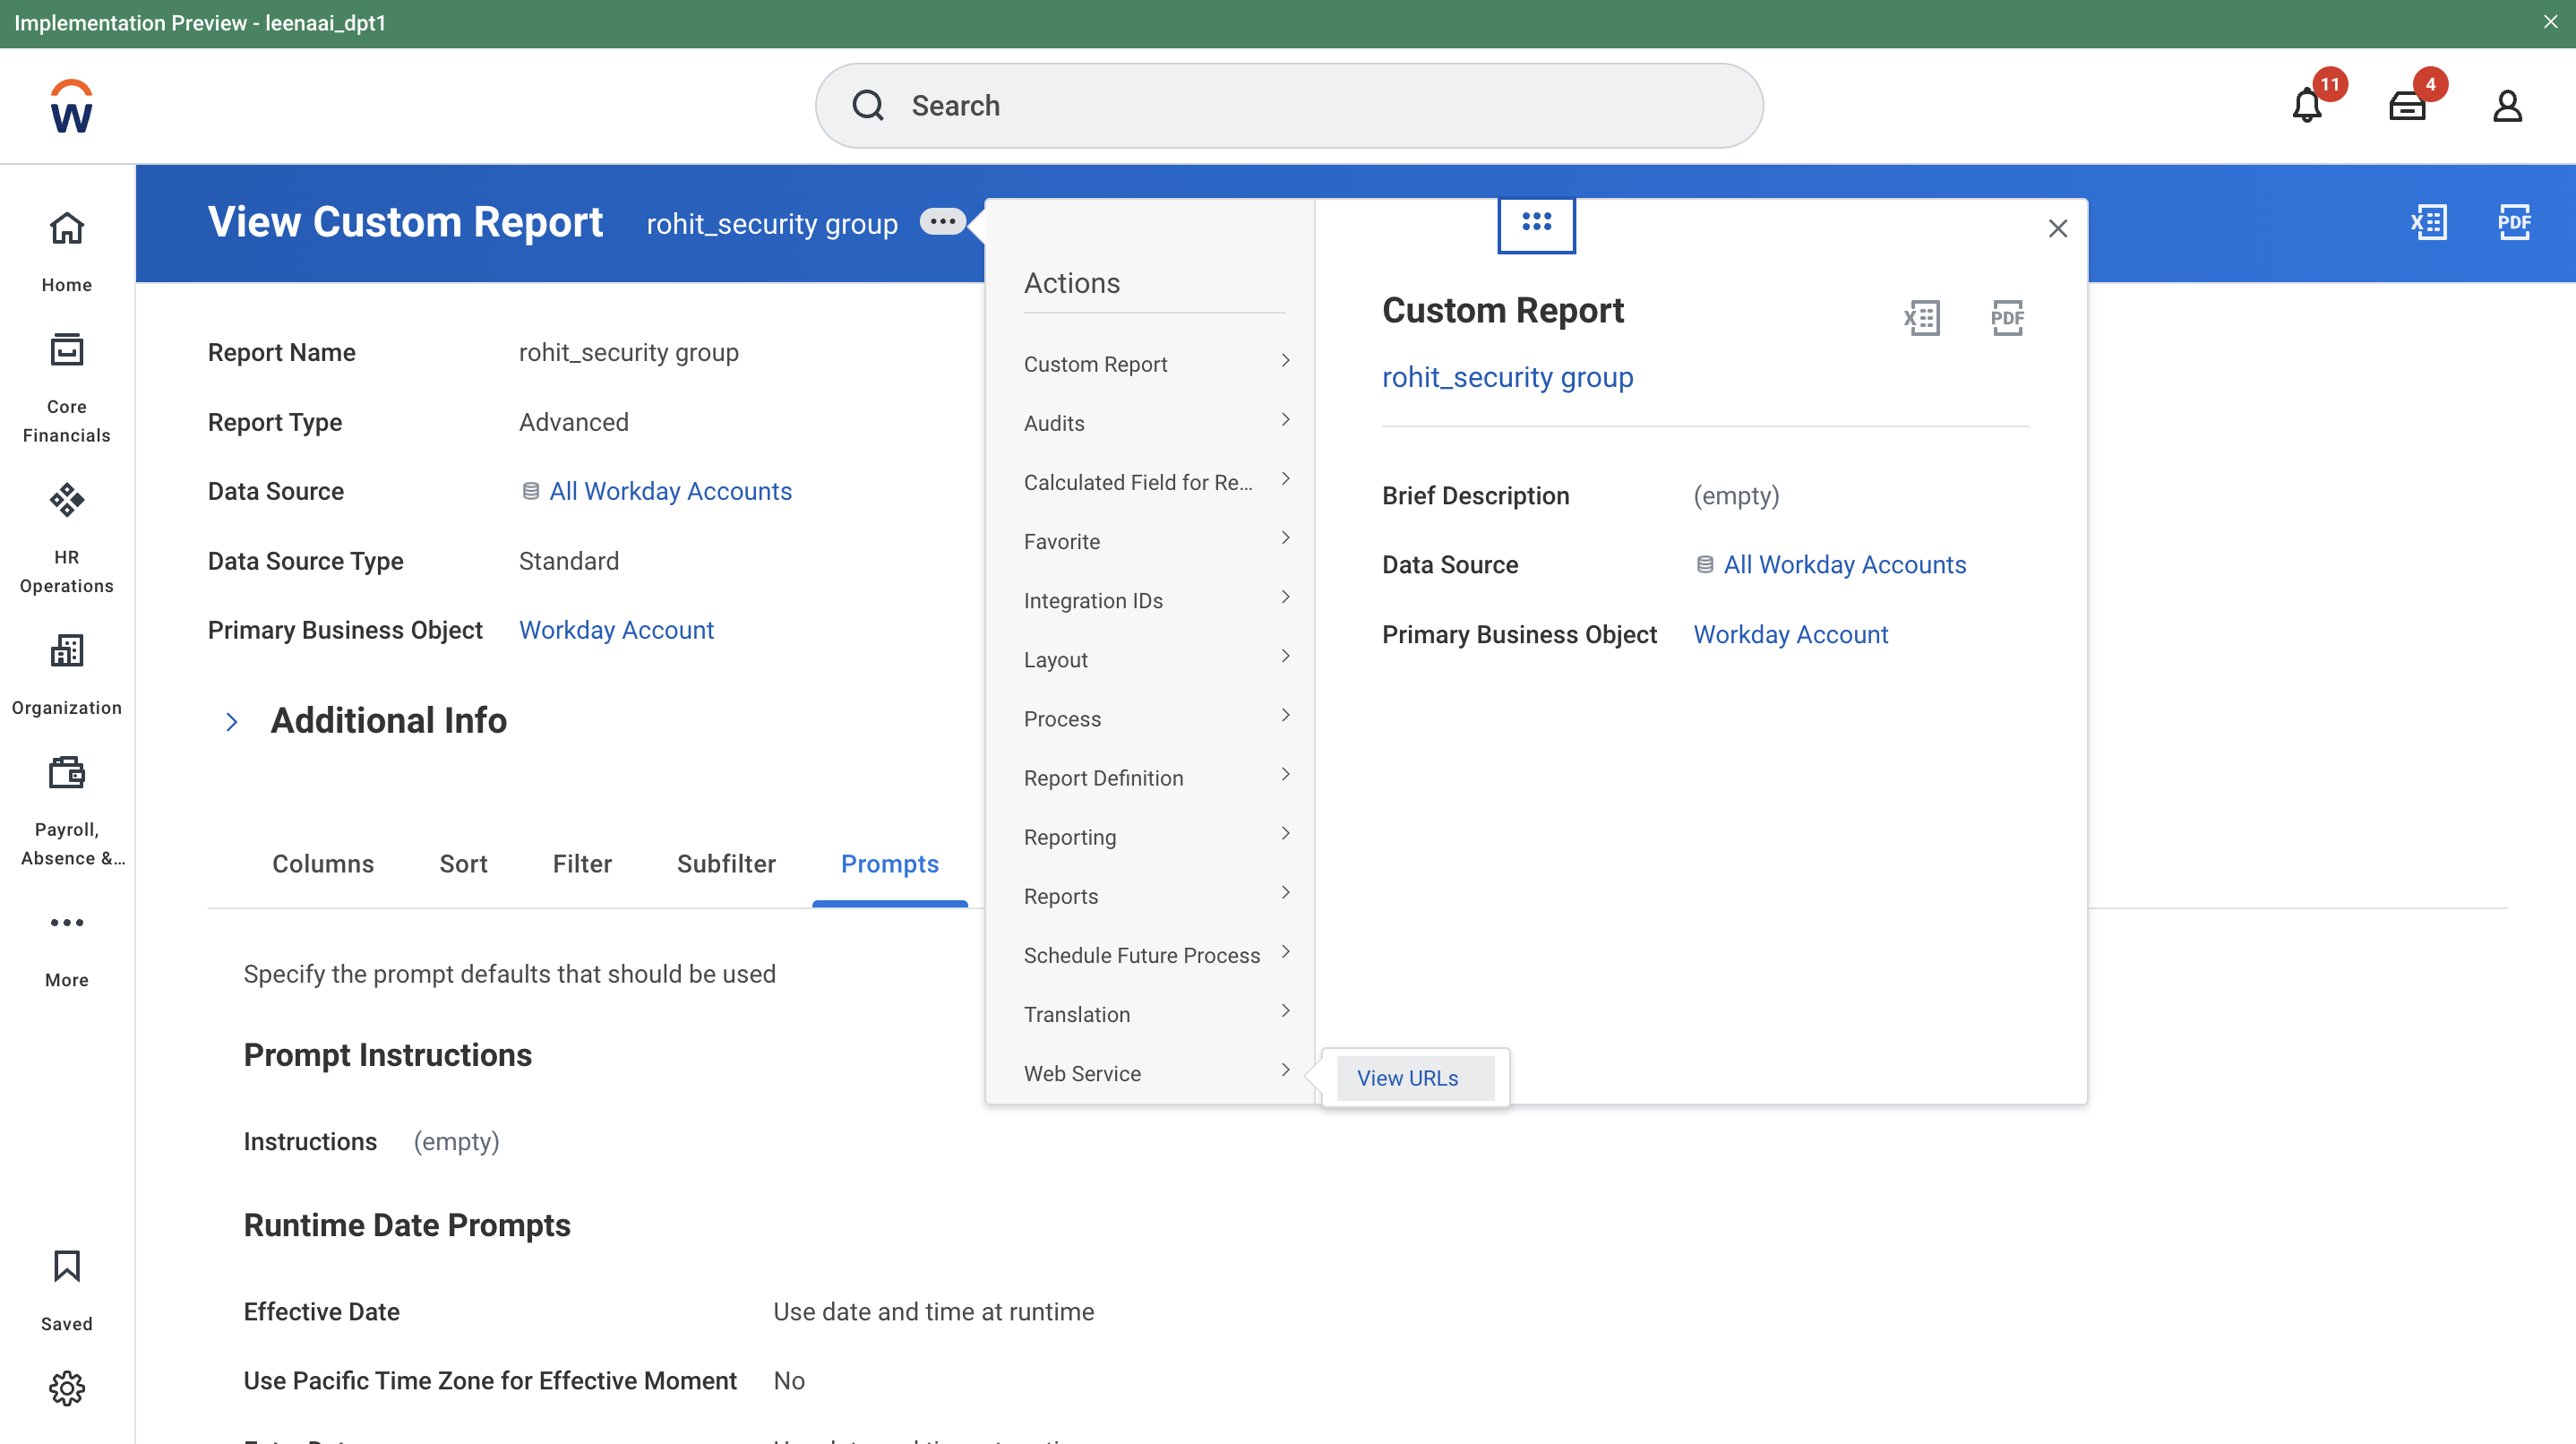
Fetching API URLs
-
Search for View Custom Report.
-
Navigate to Web Service > View URLs.
-
Right-click JSON and select Copy URL.
To verify weather reports are correct or not:
Copy JSON API url(which we get above), and paste in incognito then enter isu username and password, then json file being downloaded in your system and if the data is correct in json, then report is correct.
Required Report names for Integration:
- All Article report
- All Article Attachment report
- CR_Security Group report
Leena AI Configuration
- Go to the Knowledge Management Dashboard.
- Navigate to Settings > Integrations > Workday Connector.
- Click Connect and enter:
- ISU Username & Password
- Base_url":
- Tenant ID
- The names of 3 RaaS Reports
- Client ID, Client Secret and Refresh Token
- Set to Manual Sync or Auto Sync.
Updated 23 days ago